
When equipment fails, the fastest fix isn’t always the right one. Repairing a failure without investigating why it happened just resets the clock until it breaks again, often the same way, on the same asset. Equipment failure analysis is the process of tracing a breakdown back to its actual cause, so the fix addresses the problem instead of papering over the symptom.
This guide covers when a failure is worth a full investigation, the most common causes of equipment failure, a four-step analysis process you can run on any asset, and how to turn what you find into a permanent fix. It also includes a free worksheet you can use to run the process yourself.
Key takeaways
- Not every failure needs a full investigation; a quick severity and cost check tells you which ones are worth the time.
- Most equipment failures trace back to a small set of causes: aging equipment, operator error, lack of preventive maintenance, environmental conditions, and installation errors.
- An analysis isn't complete until the corrective action is assigned, completed, and verified to have actually stopped the failure from recurring.
- A CMMS keeps the equipment failure analysis attached to the asset's history, so the fix becomes a permanent part of how that equipment is maintained, not a one-off note.
What is equipment failure analysis?
Equipment failure analysis is the process of investigating why an asset broke down, so you can trace the breakdown back to its root cause rather than just its symptom. It covers the full arc from documenting what failed to confirming that the fix held.
The term overlaps closely with root cause analysis (RCA). In practice, most equipment failure analyses use an RCA method, like the 5 Whys or a fault tree, to find the cause. Think of equipment failure analysis as the broader workflow that all RCA frameworks use: Capture the failure, investigate it, fix it, verify it. RCA is the specific investigation technique that lives within the investigation step.
Done well, equipment failure analysis turns a one-time repair into permanent data on what failed, why, and what changed as a result.
When is equipment failure worth a full investigation?
Not every failure needs a full investigation. A jammed sensor that takes five minutes to clear doesn't need the same process as a motor that takes a production line down for a shift. Running a full analysis on every minor issue wastes time your team could spend on finding and fixing the most costly failures.
Use three quick filters to decide which failures actually deserve an investigation:
- Severity: Did the failure cause an injury, a near miss, or a regulatory or environmental exposure? Any safety implication means it's worth a full investigation, regardless of how minor the repair itself was.
- Downtime cost: A failure that costs a few minutes and a spare part is different from one that stops a production line for hours. Set a cost or downtime threshold for your facility. For example, anything over a set dollar amount or a set number of downtime hours triggers a full analysis.
- Recurrence: A failure you've seen before is a signal that the underlying cause was never fixed. Recurring failures deserve investigation even when each instance looks minor on its own.
If a failure doesn't trip any of these three filters, log it, make the repair, and move on. If it meets one criteria, it's worth the time to work through the full process below.
Check out our guide to asset criticality assessments to learn how to factor criticality into your decision on which failures to analyze more closely.
Common causes of equipment failure (and how to prevent them)
Most equipment failures trace back to one of five root causes. Knowing which one you're dealing with tells you what to watch for and what to fix so it doesn't happen again.
Follow manufacturer specs during commissioning and document installation procedures in your CMMS. Early-life failures are worth investigating as installation issues before assuming a defective part.
The equipment failure analysis process
Once you've decided to investigate a failure, there are four steps in the process: secure the scene and capture the data, investigate the cause, assign corrective action, and verify the fix worked. The steps below walk through part of this process, along with what to capture on your equipment failure analysis worksheet as you go.
1. Secure the scene and capture the data
Before you touch anything, capture the failure as it actually happened. Once equipment is repaired or disassembled, evidence disappears with it.
Start by logging the basics on your equipment failure analysis worksheet. This includes:
- Work order number
- Date
- Asset ID
- Location
- Failure mode
- Downtime hours
- Estimated cost
- Severity and safety classification.
These fields give you a record you can compare against future failures on the same asset.
Before doing anything else:
- Note operating parameters and anything abnormal: Record what the equipment was doing right before it failed, including speed, load, temperature, or any unusual sounds, smells, or readings.
- Lock out equipment if needed: If there's any risk to a technician working on the asset, follow lockout/tagout procedures before proceeding.
- Preserve evidence before disassembly: Take photos, collect samples, and pull sensor or CMMS data before you start taking anything apart. Once a part is replaced or a system is reset, that evidence is gone for good.
- Assemble who needs to be involved: Pull in the people who have insight into the failure or who'll be affected by the fix.
- Collect work and asset records: Pull the asset's maintenance history and prior work orders as well as technician notes or observed conditions logged at the time of failure.
2. Investigate the cause
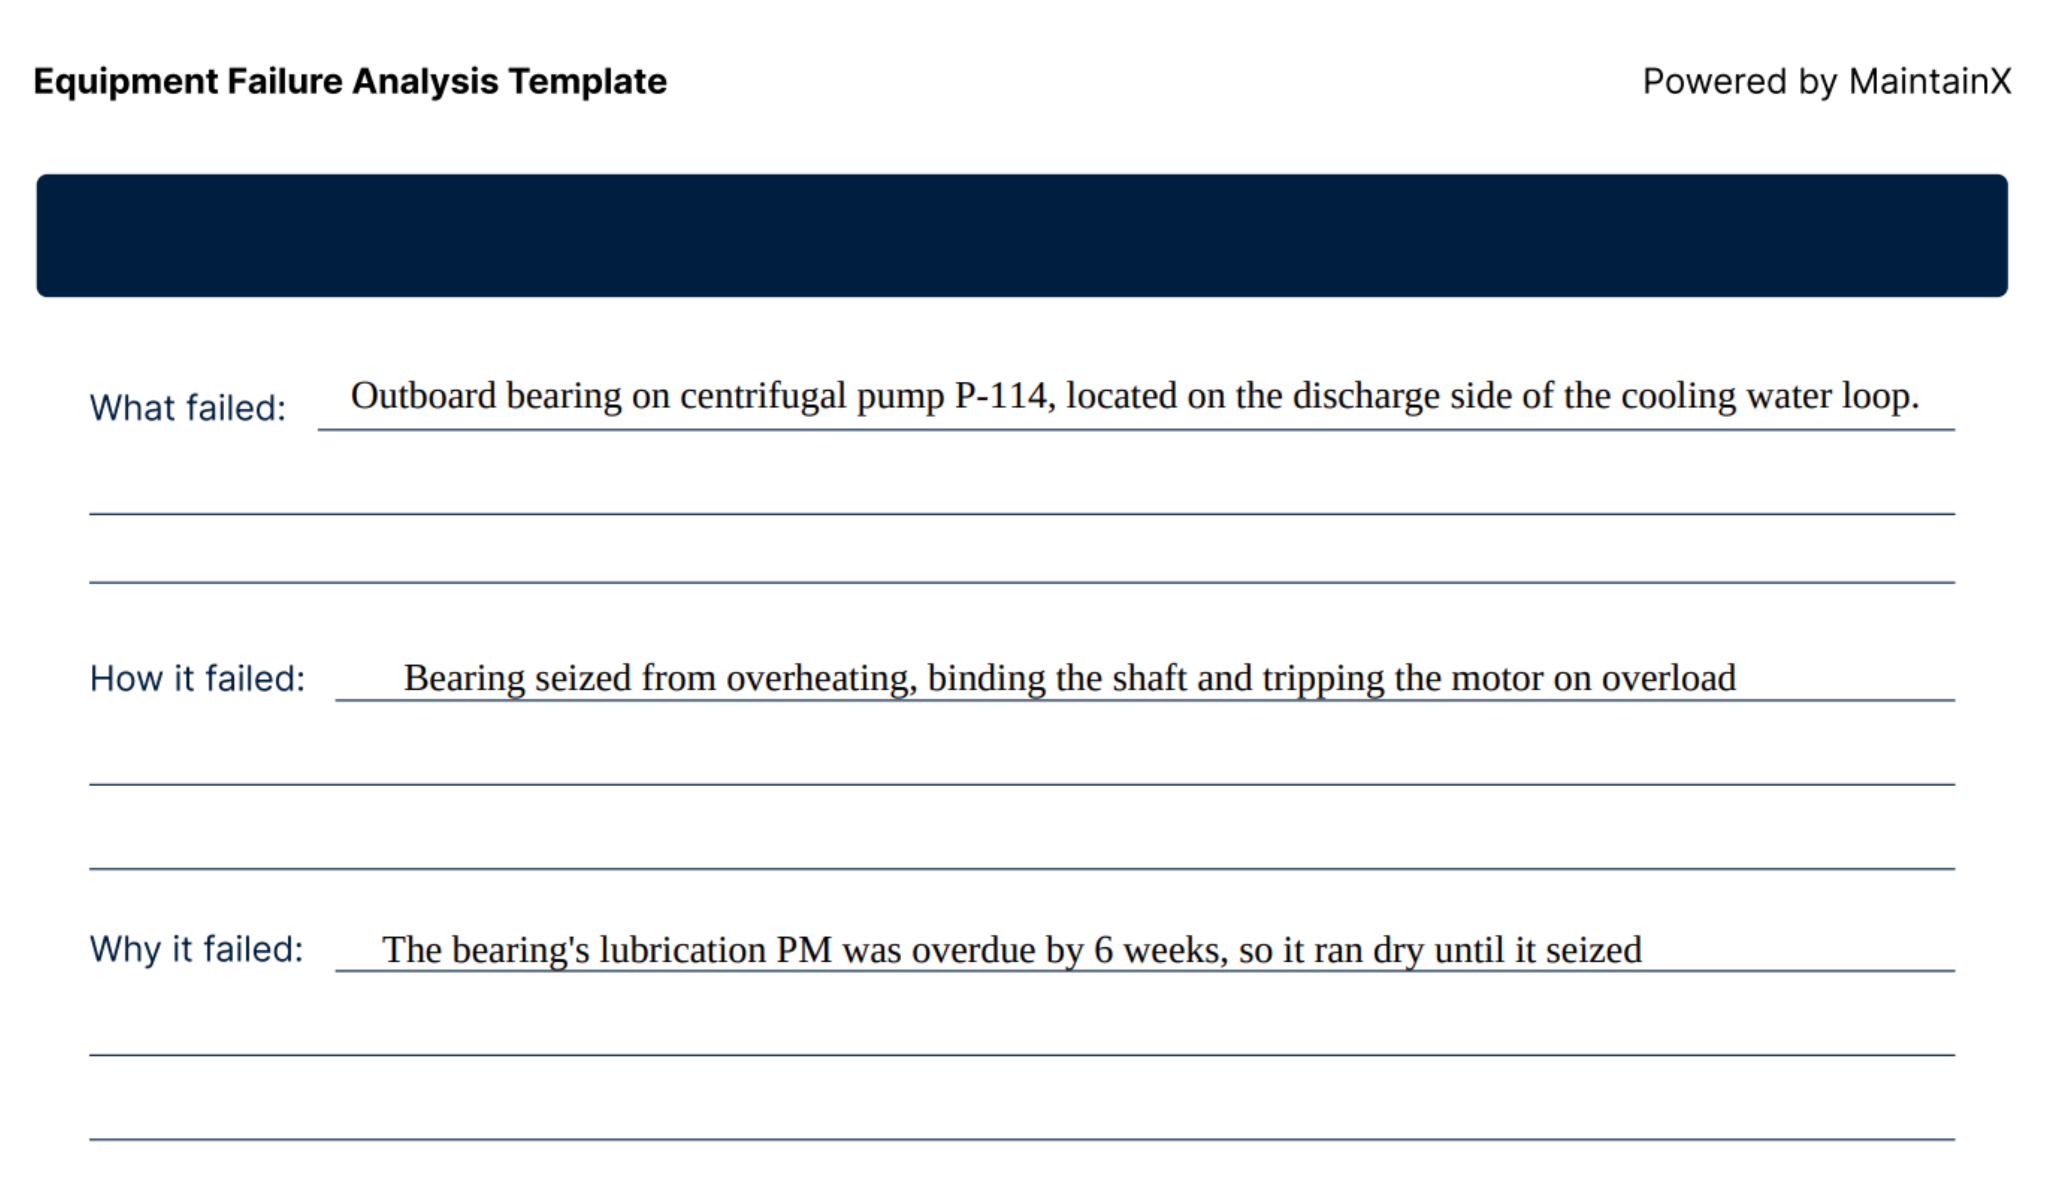
Investigating the cause of failure involves working through what failed, how it failed, and why it failed. The first two questions describe the failure itself and the third is where you get beyond the symptoms of failure to the actual root cause.
- What failed. Name the specific component or system that broke down along with the asset it belongs to. "The bearing seized" is more useful than "the motor failed."
- How it failed. Describe the failure mode. Did it seize, crack, leak, short out, or degrade gradually? This is the mechanical or physical description of what happened.
- Why it failed. This is the root cause. Keep asking why until you reach something you can fix, not just a restatement of the symptom.
Here’s an example of what that might look like in your worksheet using an example of a seized bearing.
Don't rely on memory or a technician's first guess. Validate what you find against real data, like sensor readings, maintenance logs, and CMMS work order history. If the data doesn't support the initial theory, keep digging.
Working through those three questions and checking them against your data is enough for most failures. But complex or safety-critical failures often require a dedicated framework for structuring the investigation instead of relying on informal judgment. Those frameworks include the 5 Whys, a fishbone diagram, or a fault tree. Note which method you used on the worksheet so it's part of the record.
To learn more about root cause analysis and download the fault tree analysis and 5 Whys templates, see our RCA Template. If the failure involves multiple failure modes across a system or asset, use our FMEA Template to break each one down individually.
3. Assign corrective action and close the loop
An effective root cause analysis isn’t finished until you've assigned a corrective action, given it an owner and a due date, and made sure it's tracked to completion.
Use the action plan page of your worksheet to capture:
- Corrective action: What's going to change. For example, a part replacement, design modification, updated procedure, or revised PM interval.
- Owner: Who's responsible for making sure the action gets done.
- Due date: Ensure you log a specific date. Corrective actions that don’t have a deadline tend to sit open indefinitely.
If the root cause was a lapsed lubrication schedule, the corrective action isn't "re-greased the bearing." It's updating the PM schedule so the interval doesn't lapse again, or generating a new work order if the fix requires parts or labor beyond what a PM task covers. Update the asset's PM schedule directly in your CMMS so the fix becomes part of that equipment’s maintenance plan, not a one-time note in a closed work order.
For more detail on structuring and tracking corrective action work orders, including a full CAPA (corrective and preventive action) template, see our guide to corrective and preventive action work orders.


4. Verify the fix worked
A corrective action isn't confirmed until you've watched the asset run past the point where the original failure would have recurred.
Set a tracking window, typically 60 to 90 days, and monitor the asset's mean time between failures (MTBF) during that period. If MTBF holds or improves and the same failure mode doesn't reappear, the corrective action addressed the actual root cause. If the failure recurs within the window, the analysis missed something, and it's worth reopening the investigation rather than treating it as a new, unrelated failure.
On your worksheet, log the test and results, then get sign-off with a signature and completed date once you've confirmed the fix held.
Log the full analysis, findings, and outcome to the asset's history in your CMMS. That record is what turns a single fix into data you can use the next time a similar failure shows up, on this asset or another one like it.
How a CMMS supports equipment failure analysis
Every step of the asset failure analysis process generates data, from diagnosis to corrective action and verification. Without somewhere consistent to put that data, it lives in a technician's notes, a spreadsheet, or a paper worksheet that gets filed away and forgotten.
A CMMS solves that in two main ways.
First, it centralizes failure history and work orders per asset. Every failure, work order, and analysis tied to an asset lives in one place instead of being scattered across paper forms, email threads, and individual technicians' memories. That history is what lets you spot a pattern, like a bearing that's failed twice in eight months, instead of treating each incident as unrelated. It's also what makes metrics like MTBF and MTTR meaningful. You can only track whether reliability is improving if the failure data is being captured consistently over time.
Second, it gives the fix somewhere to live going forward. Once a corrective action calls for a permanent change, like adding a cleaning step or adjusting an inspection interval, that change can be built into a new PM schedule or work order template in the same system, rather than noted in the plan and left for someone to remember to update manually.
Are you interested in learning more about how a CMMS can improve your maintenance program? Check out our guide to CMMS benefits for more details.
Equipment failure analysis FAQs
What's the difference between equipment failure analysis and root cause analysis?
Equipment failure analysis is the full process, from securing the scene through verifying the fix. Root cause analysis is the investigation technique used inside that process to identify why the failure happened. Every equipment failure analysis includes some form of RCA, but RCA alone doesn't cover capturing evidence or verifying the fix worked.
How do I decide which investigation method to use for equipment failures?
For straightforward failures, working through what failed, how it failed, and why it failed is usually enough. For complex or safety-critical failures, especially ones with multiple contributing factors or failure modes, use a structured method like the 5 Whys, a fishbone diagram, a fault tree, or an FMEA to keep the investigation organized and defensible.
How long should an equipment failure analysis take?
It depends on the failure's severity and complexity. A straightforward failure with a clear cause might take an hour or two to document and assign corrective action. A complex or safety-critical failure involving a structured method like FMEA or fault tree analysis can take days, especially if it requires a cross-functional team. The verification step then runs in the background for 60 to 90 days, regardless of how long the initial investigation took.
What data should I track for every equipment failure?
At minimum: work order number, date, asset ID, location, failure mode, downtime hours, estimated cost, and a severity and safety classification. During the investigation, also capture what failed, how it failed, why it failed, and what the findings were validated against.
How does a CMMS help prevent repeat equipment failures?
A CMMS keeps failure history, investigation findings, and corrective actions tied to the asset record instead of scattered across paper forms or individual memory. That makes patterns visible over time and lets you convert corrective actions directly into updated PM schedules, so the fix changes how the asset is maintained going forward instead of being a one-time repair note.

Marc Cousineau is the Senior Content Marketing Manager at MaintainX. Marc has over a decade of experience telling stories for technology brands, including more than five years writing about the maintenance and asset management industry.


.webp)