

Automation is one of the best ways for maintenance teams to be more efficient while reducing downtime. In fact, 56% of organizations are using meters and other technology to track the performance of assets and turn that data into action, according to the 2025 State of Industrial Maintenance.
While automating your processes can seem daunting at first, setting up work order automations can often take less time than a coffee break. This article provides a step-by-step guide to setting up meter-based work order automations, a guide to what meter readings to capture, and a framework for using meter readings to drive action on the plant floor.
Key takeaways
- Meter-based automation helps teams shift from reactive work to condition- and usage-driven maintenance.
- The biggest benefit of automating work orders with meters comes from focusing on high-impact assets and high-signal meters, not trying to automate everything at once.
- Good automations reduce noise by using well-defined parameters and context.
- A CMMS is what makes maintenance automation scalable by turning readings into trackable work.
A step-by-step guide to creating automated work orders with meter readings
Step 1: Create a name and description for the work order
The first step in automating a work order is to give it a clear name and description. If you’re triggering the work order based on a meter reading, make sure to specify the following in the name:
- Meter reading type (ex. Knife temperature)
- Asset (ex. Wrapper 001)
- Trigger point (ex. Abnormal temperature)
- Work order type (ex. Inspection)
The description should clearly outline the issue (ex. Consecutive abnormally high temperature readings) and the follow-up action (ex. Inspect and perform any necessary corrective actions).
Below is an example of what this step looks like in a computerized maintenance management system (CMMS).

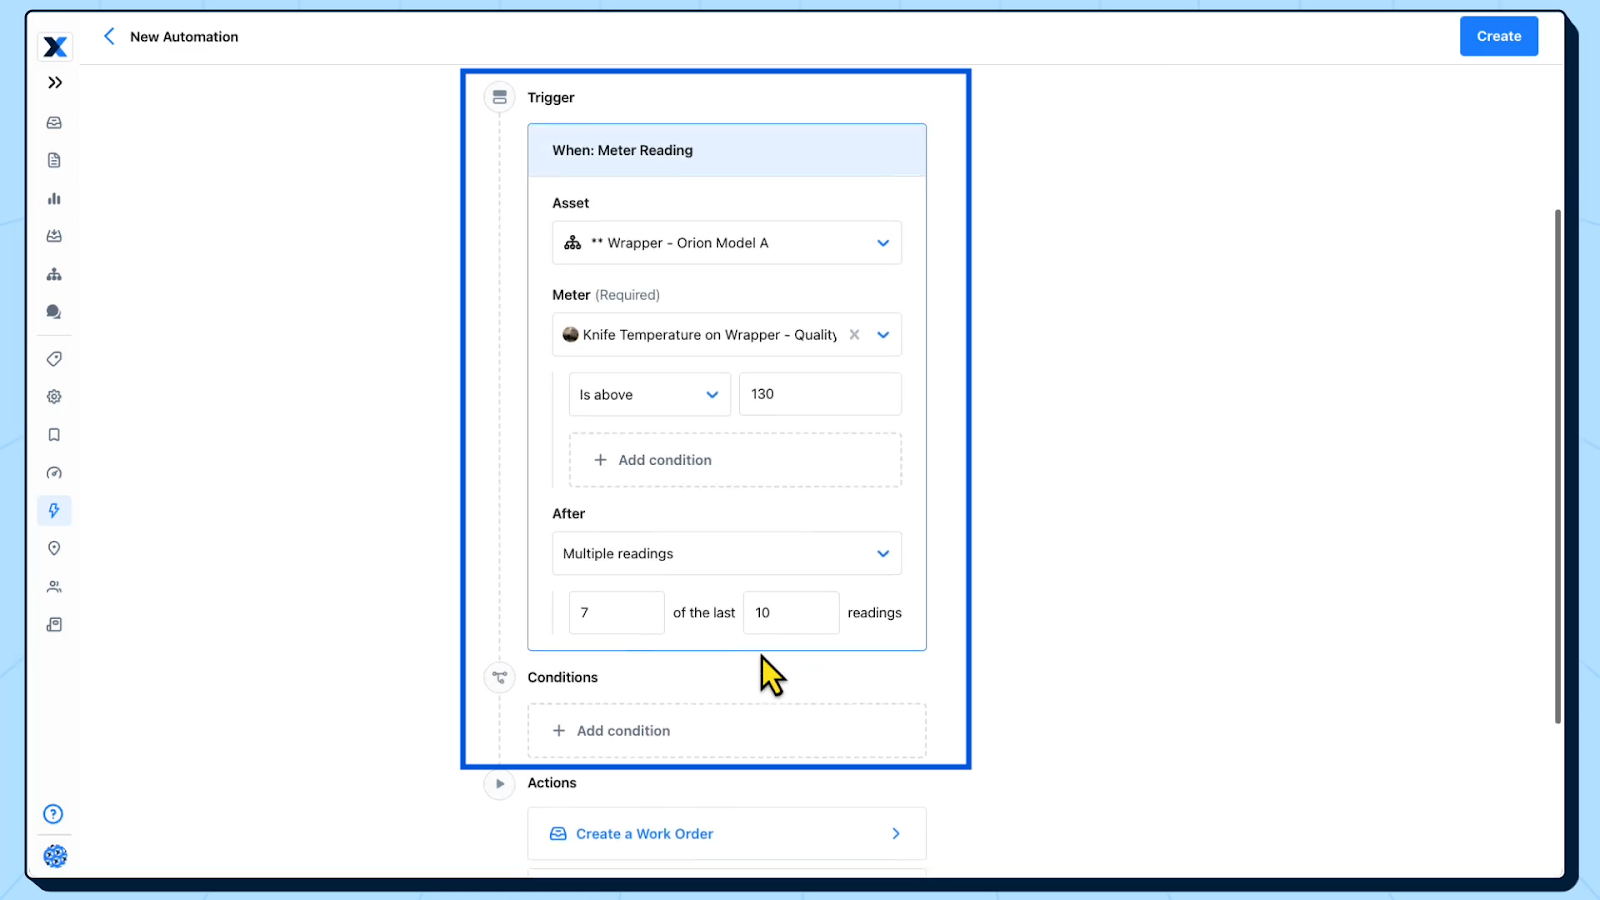
Step 2: Set a trigger and conditions for the work order
The next step is to build the triggers and conditions that will lead to the creation and scheduling of a work order. These are parameters that, when met, indicate that something might be wrong with an asset and that failure has already occurred or may occur soon.
Use the following inputs to set a trigger for work orders:
- Asset: The asset that the meter readings and work order associated with.
- Meter: The meter type on the asset.
- Reading threshold or range: The value or range that indicates a problem with an asset. For example, if the temperature exceeds 130°F.
- Reading frequency: The number of abnormal or out-of-range meter readings that are required for an asset to be considered at-risk.
- Conditions: Additional parameters that ensure alerts are relevant, such as specifying that meter readings should only be tracked between certain hours of the day.
There are a number of ways to determine the threshold/range and reading frequency. If you don’t have any historical information about the performance of an asset, start by using the specified numbers in the machine’s OEM manual. If you have a record of baseline measurements and failure data, use it alongside the manual to inform your settings.
Below is an example of meter-based trigger settings:
Step 3: Establish an action and routing for the work order
Next, define what should happen when the trigger fires. Common actions include:
- Creating a follow-up work order to inspect or correct a piece of equipment
- Changing an asset’s status to offline or in need of maintenance
- Sending a notification to maintenance team members to alert them of a potential problem
Each action includes different fields to populate so the right people are notified and the right work is completed. For example, if a meter reading triggers a work order, you should specify:
- The original work order that triggered the task
- A description of the work to be done
- The associated asset
- Who it is assigned to
- Priority and due date
- Associated procedures and/or task lists
Below is an example of what these details might look like when setting up a work order automation.

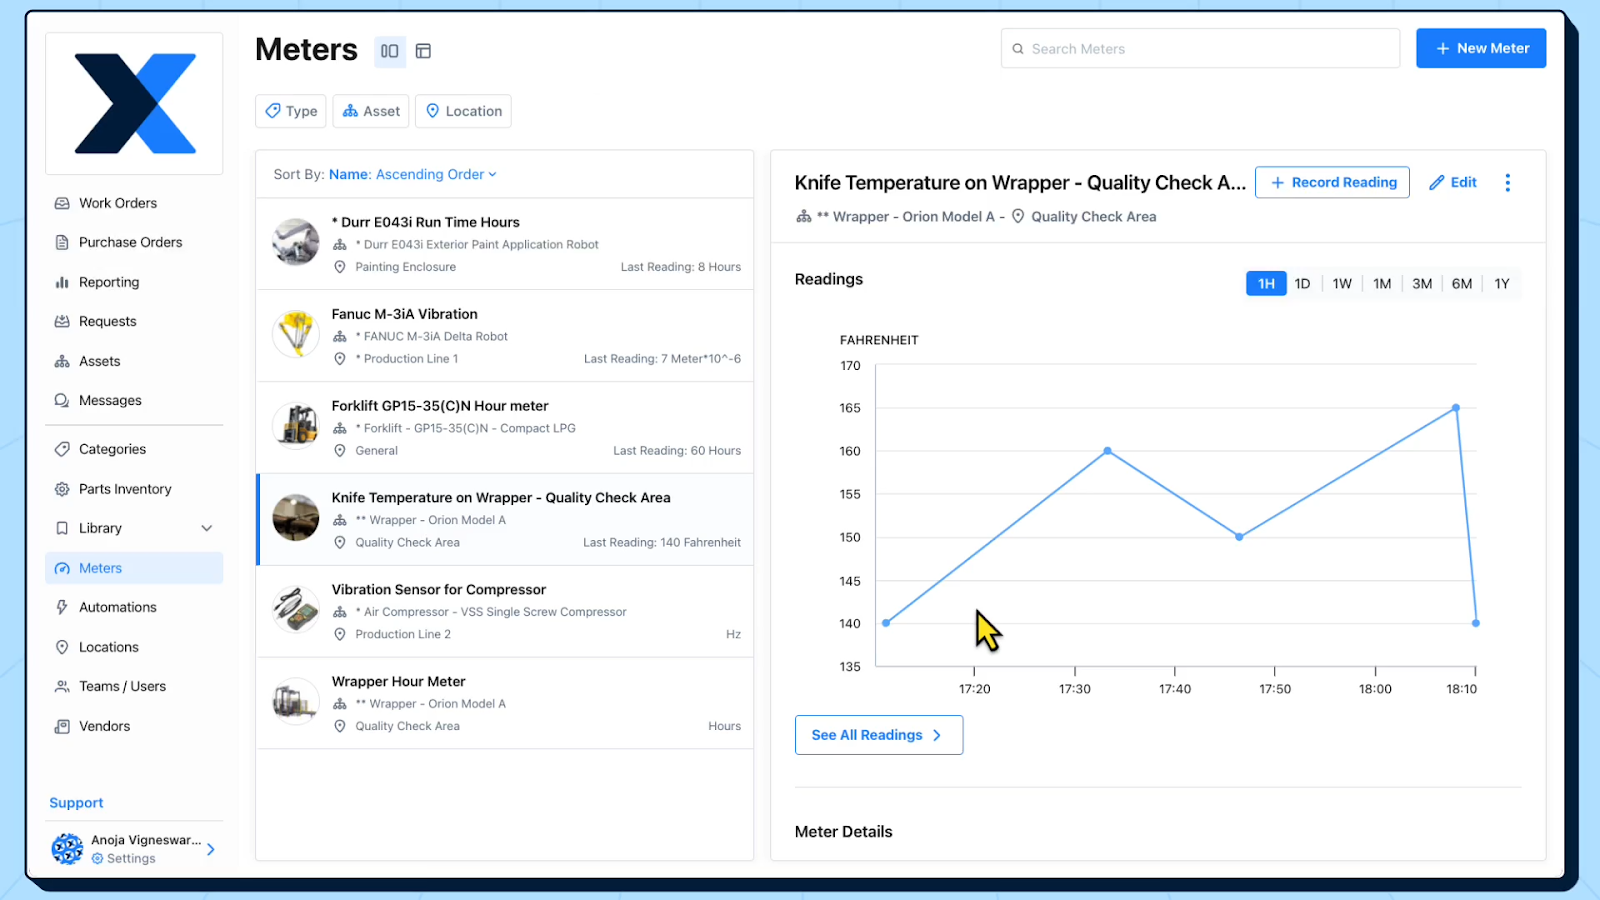
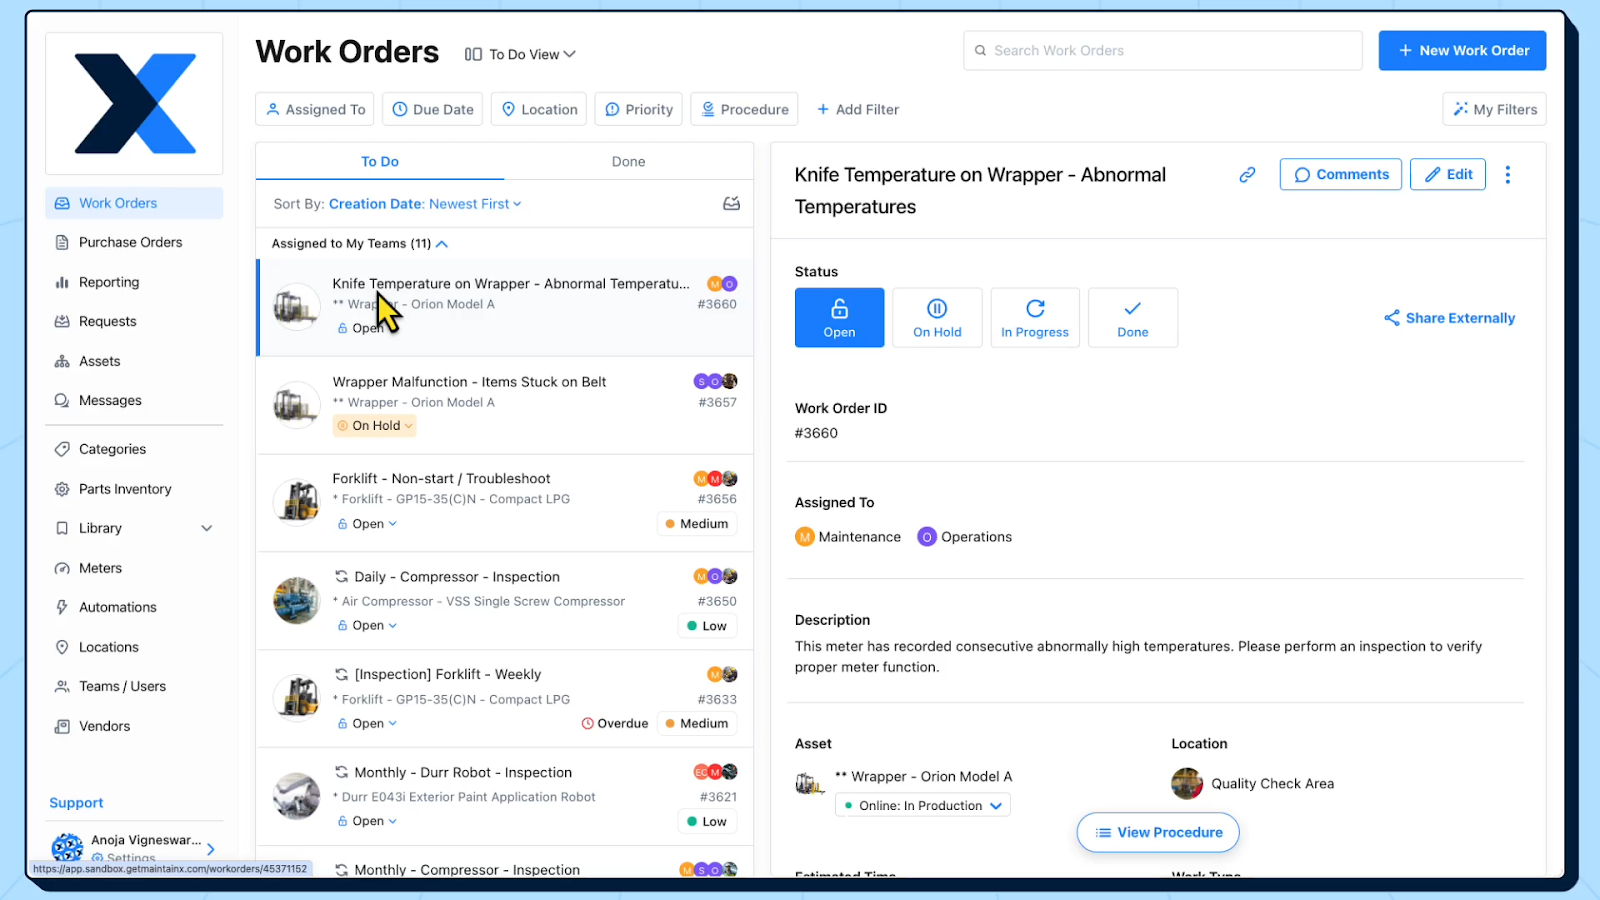
An example of an automated work order based on a meter reading
In this example, a meter is tracking the temperature of the knife on a wrapper. The meter reading is logged as 140°F.
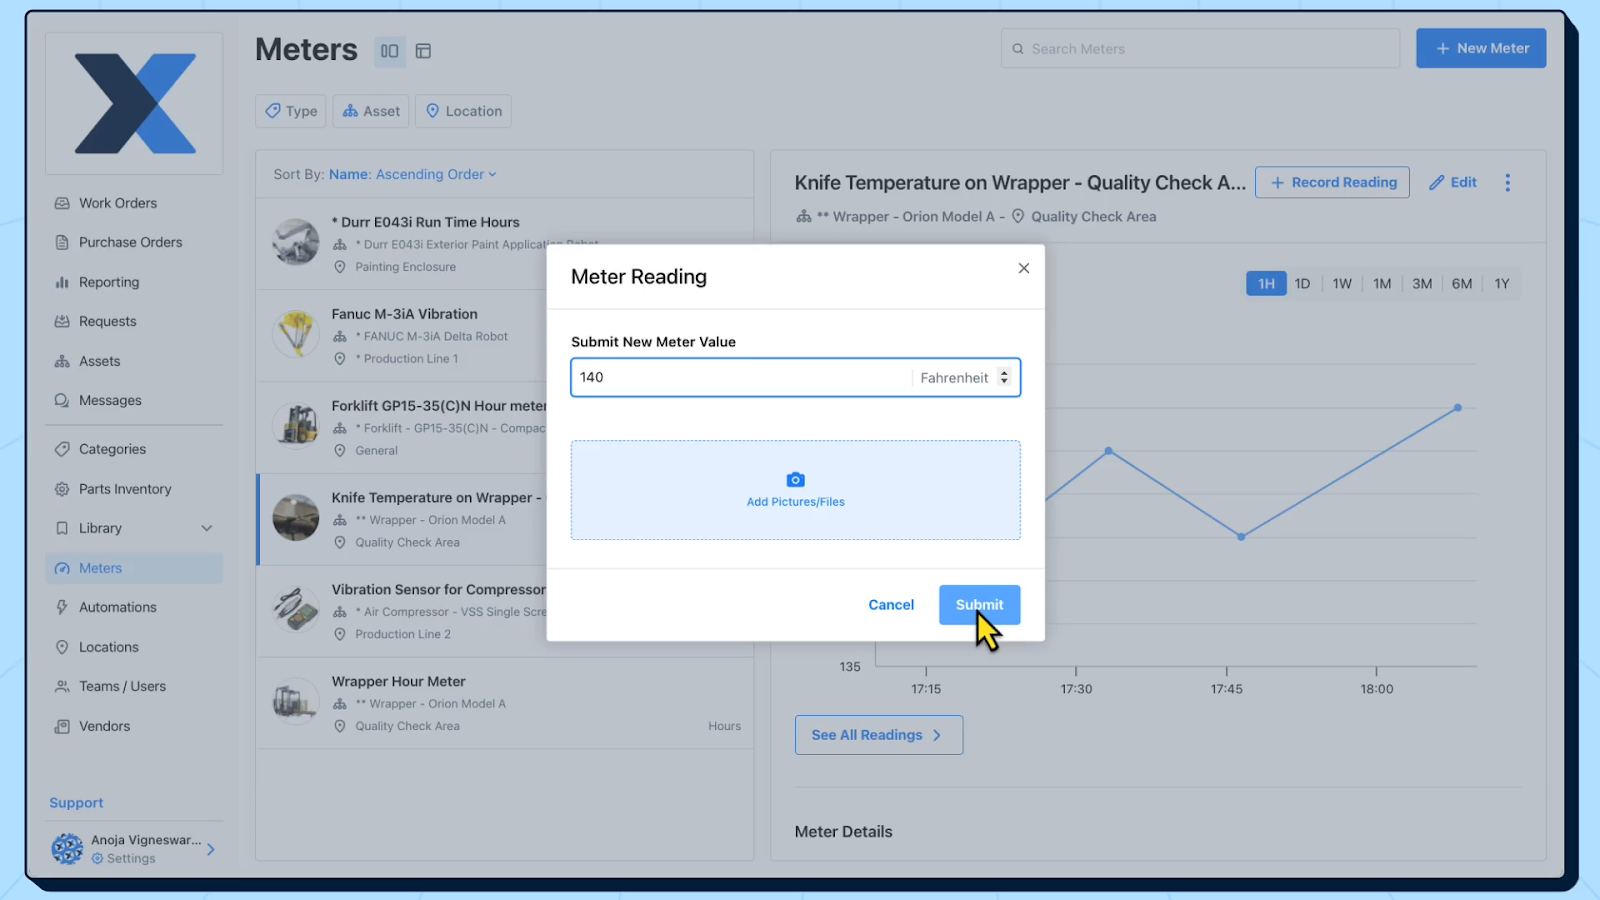
You can see in the image below that the meter reading drops below the normal operating range for the knife. This triggers the creation of a work order to inspect the asset.
The work order that is created is automatically assigned to the relevant technicians and teams with a description and procedure attached to it.
What types of equipment meter readings can you use to automate work orders?
There are a variety of different types of meters you can use to monitor the condition of assets and trigger work orders. Here are some of the conditions you can track with these meters and examples of the measurements you can log:
Meters that monitor asset condition
- Vibration: RMS velocity, acceleration, displacement, peak-to-peak
- Temperature: Thermal delta vs baseline, hot-spot temp
- Ultrasound/acoustic: dB level, ultrasonic spectrum bands
- Lubrication/oil analysis: Particle count, water percentage, viscosity
- Electrical signature: Motor current, imbalance, power factor, harmonics/THD
- Insulation health: Insulation resistance, polarization index, partial discharge counts
- Corrosion: Corrosion rate, wall thickness
- Alignment: Misalignment index, axial vibration
- Thermography: Temperature rise over ambient, delta-T across connections
Meters that monitor process and operating performance
- Pressure: Suction/discharge pressure, differential pressure
- Flow: Low/high flow, unstable flow
- Speed/RPM: Fan speed, conveyor speed, overspeed events, slip percentage
- Torque/load: Drive torque, load percentage
- pH/conductivity/ORP: Excursions that drive cleaning/inspection/chemical system maintenance
- Turbidity/solids concentration: Filter performance degradation
Meters that monitor safety, compliance, and environmental conditions
- Gas detection: LEL percentage, oxygen percentage
- Dust/particulate: Airborne particulate concentration
- Emissions: NOx/SOx, opacity
- Noise: dBA exceedances
Meters that monitor asset usage and lifecycle
- Run hours/operating hours: Motors, compressors, pumps, generators
- Cycles/starts/stops: Press strokes, valve actuations, pump starts
- Distance/throughput: Conveyor footage, crane travel distance, odometer hours
- Units produced/batches
How these meters trigger work orders
- Hard thresholds: Ex. Temperature above 90°C for 10 minutes
- Rate-of-change: Ex. Vibration rises more than 20% week-over-week
- Trend vs. baseline: Ex. ΔP across filter trending up, replace when predicted to hit limit in seven days
- Composite health score: Ex. Weighted vibration, temperature, and load
- Event-based: Ex. Alarm or breaker fault
- Counting logic: Ex. Every 500 hours or 10,000 cycles
How to log meter readings
There are three main ways to log and track meter readings to trigger work orders:
1. Manual, not digital
This is the simplest method and works well for low-criticality assets, readings that don’t change quickly, and readings that don’t indicate an immediate risk to asset health or worker safety.
How it works: A technician records the meter reading on a log sheet, in a binder, on a whiteboard, or with another non-digital method.
Best for: Infrequent checks, remote areas without connectivity and basic compliance checks.
How it triggers work: A manager reviews logs and creates work orders if a threshold is reached.
Pros: Lowest cost, no setup, and easy to start.
Cons: Prone to missed readings, transcription errors, delayed response, and difficult reporting.
2. Manual, digital
This method is a step up in maturity and is often the best stepping stone to full automation.
How it works: A technician enters readings into a digital system, like a CMMS. Readings are tied to the asset, timestamped, and stored centrally in the system.
Best for: Teams that want better visibility and reporting without investing heavily into sensors.
How it triggers work: The system checks the logged value against pre-set rules and automatically generates a work order based on:
- Thresholds
- Pass/fail conditions
- Trend or rate-of-change
- Usage
Pros: Cleaner data, faster escalation, easier auditing, and more standardization.
Cons: Still dependent on people and schedule adherence, which means readings can be skipped or mistyped.
3. Digital, autonomous
This method removes manual entry by collecting readings directly from connected devices.
How it works: Sensors, PLCs, historians, or IoT devices capture readings automatically and push them into a system for monitoring and action.
Best for: Critical assets, fast-moving failure modes, real-time visibility, or teams with limited labor.
How it triggers work: Rules run continuously and can create work orders automatically when conditions are met, such as:
- Exceeding thresholds
- Detection of anomalies
- Predictive triggers
- Events or alarms
Pros: Fastest response, higher data frequency, better predictive maintenance, and less manual effort.
Cons: Higher upfront cost and integration effort, and requires governance to avoid alarm fatigue.
Why a CMMS is essential for automating work orders
Automation only works if there’s a reliable system to turn signals into action. That’s exactly what a CMMS provides.
1. It turns meter readings into standardized work
A CMMS doesn’t just create alerts—it creates a work order with a standard structure, including the asset, location, procedure, parts list, priority, and assignees.
Without a CMMS, teams often rely on emails, texts, or sticky notes, which are all easy to miss and hard to be consistent with.
2. It enforces triggers, thresholds, and escalation rules
A CMMS is the rules engine that makes automation repeatable with threshold, usage, condition, and escalation-based triggers. The structure and consistency help remove ambiguity and bottlenecks in the process.
3. It closes the loop between detection and resolution
Automation fails when there’s no feedback loop. A CMMS captures what happened after the trigger, including what was found, what was done, what was used, and the state of the asset after work is complete. This history is what helps to improve triggers over time and avoid false alarms or alarm fatigue.
4. It connects maintenance execution to inventory and planning
Many automated work orders stall because the team can’t execute quickly. A CMMS solves this challenge by linking work orders to:
- Spare parts lists and locations
- Labor availability and assignments
- SOPs and safety guidelines
- Mobile devices and push notifications
The system not only creates the work, it also ensures the work gets done.
5. It creates visibility, accountability, and audit-ready records
A CMMS makes automation manageable at scale by providing dashboards to track work and meter readings, reporting on repeat failures, centralized maintenance logs and compliance records, and integrations to IT and OT systems. This data is critical for running and continuously improving an automated work order program.
6. It scales across sites, teams, and asset types
Even if you start small, a CMMS gives you a repeatable framework to expand common naming, asset hierarchies, and meter definitions, shared job plans, standardized procedures, and consistent KPIs.
The benefits of automating work orders with meter readings
Automating work orders from meter readings helps maintenance teams move from reactive firefighting to proactive control—using real operating data to trigger the right work at the right time.
1. Catch failures earlier
Condition-based triggers surface issues before they become breakdowns, helping to reduce unplanned downtime and higher maintenance costs.
2. Reduce unnecessary PMs
Instead of servicing assets on a fixed calendar, meter-based automation allows you to schedule maintenance when an asset’s usage or condition warrants it. This helps to cut wasted labor and extend asset life without increasing risk.
3. Improve response time and consistency
Automated triggers create work orders immediately, with the right priority and routing. You don’t have to wait for someone to review logs or notice a trend.
4. Standardize best practices across the team
Work orders can launch with predefined job plans, checklists, parts, and safety steps, which improves consistency and ensures work is handled the same way, regardless of who’s on shift.
5. Make work visible
Meter-triggered work orders are tracked like any other work: assigned owners, due dates, and completion records. That increases follow-through and provides a clear audit trail.
6. Enable better planning and fewer surprise jobs
When triggers are based on trends, teams can schedule inspections and repairs into planned windows. This reduces overtime, improves wrench time, and protects production schedules.
7. Create a feedback loop to continuously improve reliability
By linking meter events to findings, root causes, and parts and labor usage, teams can refine thresholds, eliminate nuisance triggers, and target chronic issues.
The final word on work order automation
Automating work orders with meter readings turns real operating data into timely maintenance, helping teams catch issues earlier, reduce unnecessary PMs, and avoid downtime. A CMMS is what makes this scalable by converting readings into assigned, trackable work with standardized procedures and a clear history of what was found and fixed. Start with a small set of critical assets and a few high-signal meters, tune your triggers based on results, and expand from there.

Marc Cousineau is the Senior Content Marketing Manager at MaintainX. Marc has over a decade of experience telling stories for technology brands, including more than five years writing about the maintenance and asset management industry.


.webp)
.webp)