


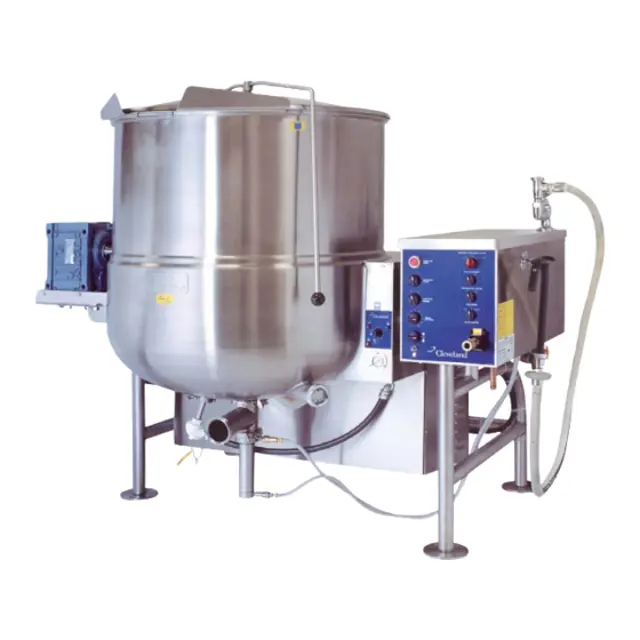
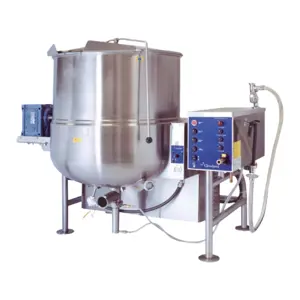
Cleveland Gas Mixing Kettle Horizontal Agitator HA-MKGL-100-CC-T
Need answers fast?
Explore the manual using AI.
Turn manuals into instant answers
with your AI-powered assistantTurn manuals into instant answers
with your AI-powered assistant
Manual for Cleveland Gas Mixing Kettle Horizontal Agitator HA-MKGL-100-CC-T
Complete asset maintenance, one click away
Get instant access to all the maintenance information you need. Empower technicians to perform preventive maintenance with asset packages, ready to use right out of the box.

Documents & Manuals
Find all the essential guides in one place.
 Tensioning Guide
- Belt-diagram
- C-120 pulleys
+ 13 more

Work Order Templates
Pre-built workflows to keep your asset running smoothly.
- Daily Electrical System Inspection
- Replace Roller and Pulley
- Install Engine B-120
+ 29 more

Procedures
Integrate maintenance plans directly into your work orders.
- Motion Industries
- Applied Industrial Technologies
- Electrical Brothers
+ 5 more

Parts
Access the parts list for your equipment in MaintainX.
- Drive Motor
- B2 Rollers
- Tensioning System
+ 40 more
Cleveland Gas Mixing Kettle Horizontal Agitator HA-MKGL-100-CC-T
Create an account to install this asset package.
Maintenance Plans for Cleveland Gas Mixing Kettle Horizontal Agitator Model HA-MKGL-100-CC-T
Integrate maintenance plans directly into your work orders in MaintainX.
1 Monthly Kettle Maintenance
MONTHLY INSPECTION
• Inspect all switches for damage. Replace rubber boots or switches as required.
• Check that the automatic dump valve works fully and smoothly and no air leaks are evident.
• Check that the 3 way regulator shuts off the incoming air and completely vacates the air from the air hose to the metering filling station.
• Tilt kettle and check for smooth operation in both directions.
• Inspect gear and worm assembly in gear box for play - tighten Allen screws if required.
• Inspect gasket material on covers for integrity.
• Check spring assist covers for tightness to handle and insure spring is holding cover up - adjust if required. Refer to HINGE ADJUSTMENT INSTRUCTIONS.
HINGE ADJUSTMENT INSTRUCTIONS

Kettle Calibration
Ensure the unit has a vacuum
If unit requires venting, refer to KETTLE VENTING INSTRUCTIONS
Turn kettle ON and set temperature control to 10
Allow the unit to cycle twice
Check temperature of the inner kettle surface with a digital surface thermometer
Temperature should be between 260°F and 265°F
Using a screw driver adjust temperature by turning the potentiometer on the Solid State Temperature Control Box; Turn very little. Turn clockwise to INCREASES and counter-clockwise to DECREASE temperature
Allow the unit to cycle twice
Check temperature of the inner kettle surface with a digital surface thermometer
Quad Ring Cleaning
QUAD RING (Used prior to June 1999)
Remove retaining knobs
Slide shaft seal retainer plate and quad ring away from kettle body
Clean quad ring, shaft, and seal retainer plate with clean cloth
Rinse with fresh water
Apply light coat of food safe grease to both sides of the quad ring
Slide quad ring back into original position, making sure it does not twist
Slide retainer plate back toward kettle, replacing retaining knobs
Tighten with hand pressure only
3 Monthly Kettle Lubrication
LUBRICATION PROCEDURE
Lubricate the following parts every three months to insure smooth operation and reduce wear.
TRUNNION HOUSING, WORM SCREW AND TILT GEAR
These parts are accessed through the top cover of the console.
Apply grease to gear teeth. Check for excessive play and adjust with adjusting screw located on top of cross bar.
KETTLE TRUNNIONS
On the left hand side of the kettle there are two grease nipples on the top back portion of the trunnion housing.; On the right hand side of the kettle you must remove the console cover to access the two grease nipples.
Agitator Bushing Cleaning
AGITATOR BUSHING
Agitator removed
Bushing removed by turning 1/4 turn and pulling away from the kettle wall
Bushing and bushing mounting area cleaned, rinsed and sanitized
Metal surfaces lubricated with food safe grease
Bushing installed by locating retaining pin and sliding bushing on
Bushing rotated to lock into position
Sign off on the agitator bushing cleaning
Parts for Cleveland Gas Mixing Kettle Horizontal Agitator HA-MKGL-100-CC-T
Access the parts list for your equipment in MaintainX.
Scraper Blade
KE54602
Spring
KE54608
Retaining Knobs
KE01911
O Ring
FA05002-8
Pin
KE54594
Scraper Blade
KE54602
Spring
KE54608
Retaining Knobs
KE01911
O Ring
FA05002-8
Pin
KE54594
Scraper Blade
KE54602
Spring
KE54608
Retaining Knobs
KE01911
O Ring
FA05002-8
Pin
KE54594
Unlock efficiency
with MaintainX CoPilot
MaintainX CoPilot is your expert colleague, on call 24/7, helping your team find the answers they need to keep equipment running.
Reduce Unplanned Downtime
Ensure your team follows consistent procedures to minimize equipment failures and costly delays.
Maximize Asset Availability
Keep your assets running longer and more reliably, with standardized maintenance workflows from OEM manuals.
Lower Maintenance Costs
Turn any technician into an expert to streamline operations, maintain more assets, and reduce overall costs.
Thousands of companies manage their assets with MaintainX

'%3e%3cpath%20fill='url(%23b)'%20d='M66.008%2080.068c-5.084-.786-9.763-3.834-12.442-8.68a16.942%2016.942%200%200%201-1.87-5.18c1.096.19%202.203.476%203.298.87%206.525%202.333%2010.836%207.68%2011.014%2012.99ZM51.47%2061.576c.488-5.524%203.62-10.716%208.847-13.597a17.132%2017.132%200%200%201%2011.335-1.882c-.798%208.145-7.43%2014.848-16.038%2015.599-1.417.119-2.799.07-4.144-.12Zm28.564-11.478a17.513%2017.513%200%200%201%203.727%204.62c4.608%208.335%201.584%2018.813-6.75%2023.409a16.988%2016.988%200%200%201-4.359%201.679%2019.624%2019.624%200%200%201-3.977-12.776c.346-7.561%204.942-13.931%2011.36-16.932Z'/%3e%3cpath%20fill='%23110F0D'%20fill-rule='evenodd'%20d='M142.831%2048.324h4.977V77.03h-4.977V48.324Zm27.278%2013.002c.322%201.048.453%202.263.453%203.62v12.073h-4.787V66.208c0-.75-.047-1.572-.154-2.143-.453-2.382-1.822-3.572-4.215-3.572-2.31%200-3.882%201.274-4.43%203.476-.143.596-.226%201.405-.226%202.25v10.8h-4.787V56.623h4.477v2.989c1.536-2.5%203.906-3.43%206.371-3.43%203.488%200%206.263%201.68%207.298%205.144Zm24.636%207.323c0%203.882-2.358%206.525-5.763%207.727-1.298.453-2.632.643-4.62.643h-10.169V48.324h9.085c1.691%200%203.156.143%204.049.38%203.465.93%205.727%203.68%205.727%207.335%200%202.441-.81%204.156-2.762%205.644%202.905%201.417%204.453%203.727%204.453%206.966Zm-15.634-8.656h4.584c1.024%200%201.917-.143%202.536-.417%201.215-.548%201.905-1.608%201.905-3.167%200-1.548-.643-2.572-1.845-3.132-.691-.31-1.762-.452-2.763-.452h-4.417v7.168Zm10.716%208.465c0-1.536-.893-3.37-3.227-3.893-.428-.095-1.036-.143-1.571-.143h-5.918v8.085h5.501c.56%200%201.429-.048%201.953-.167%201.94-.453%203.262-1.846%203.262-3.882Zm47.747-11.847-8.097%2020.408h-4.429l-8.109-20.408h5.191l5.192%2014.574%205.108-14.574h5.144Zm-20.218%2010.002c0%20.69-.036%201.262-.155%201.94h-15.943c.631%202.87%202.714%204.728%205.882%204.728%202.131%200%203.607-.882%204.703-2.525h4.87c-1.762%204.144-5.204%206.692-9.657%206.692-6.084%200-10.537-4.858-10.537-10.49%200-6.108%204.524-10.776%2010.335-10.776%206.239%200%2010.442%204.954%2010.502%2010.43Zm-4.763-1.405c-.333-2.846-2.643-4.858-5.691-4.858-2.894%200-5.287%201.929-5.621%204.858h11.312Zm-72.667%203.44c0%204.787-3.287%208.371-9.419%208.371H119.363V64.66c-1.917.274-3.87.69-5.811%201.238l4.537%2011.121h-5.418l-3.596-9.585c-5.144%202.084-10.085%205.216-14.217%209.585h-4.786L101.8%2048.312h4.56l5.68%2013.883a44.112%2044.112%200%200%201%207.323-1.774V48.312h9.084c1.703%200%203.156.143%204.061.393%203.453.929%205.727%203.667%205.727%207.323%200%201.917-.738%204.179-2.81%205.691%203.06%201.56%204.501%204.025%204.501%206.93Zm-15.634-8.667a62.664%2062.664%200%200%201%202.06-.036c1.703.012%203.239.131%204.608.37%201.441-.549%202.357-1.727%202.357-3.537%200-1.941-.881-3.144-2.488-3.667-.548-.18-1.358-.286-2.322-.286h-4.215v7.156Zm-16.55%203.905-3.715-9.894-6.394%2016.502c2.833-2.595%206.263-4.858%2010.109-6.608Zm27.254%204.74c0-2.775-3.131-4.347-8.513-4.418-.715%200-1.441.011-2.191.047v8.252h5.918c2.548%200%204.786-1.37%204.786-3.882Z'%20clip-rule='evenodd'/%3e%3c/g%3e%3cdefs%3e%3clinearGradient%20id='b'%20x1='51.47'%20x2='85.916'%20y1='62.946'%20y2='62.946'%20gradientUnits='userSpaceOnUse'%3e%3cstop%20stop-color='%23CD9F28'/%3e%3cstop%20offset='1'%20stop-color='%23ECD80B'/%3e%3c/linearGradient%3e%3cclipPath%20id='a'%3e%3cpath%20fill='%23fff'%20d='M51.47%2045.728h186.104V80.14H51.47z'/%3e%3c/clipPath%3e%3c/defs%3e%3c/svg%3e)


More from Cleveland


Explore Other Assets


© 2026 MaintainX. All rights reserved.