


JCB Telescopic Handler 510-56
Need answers fast?
Explore the manual using AI.
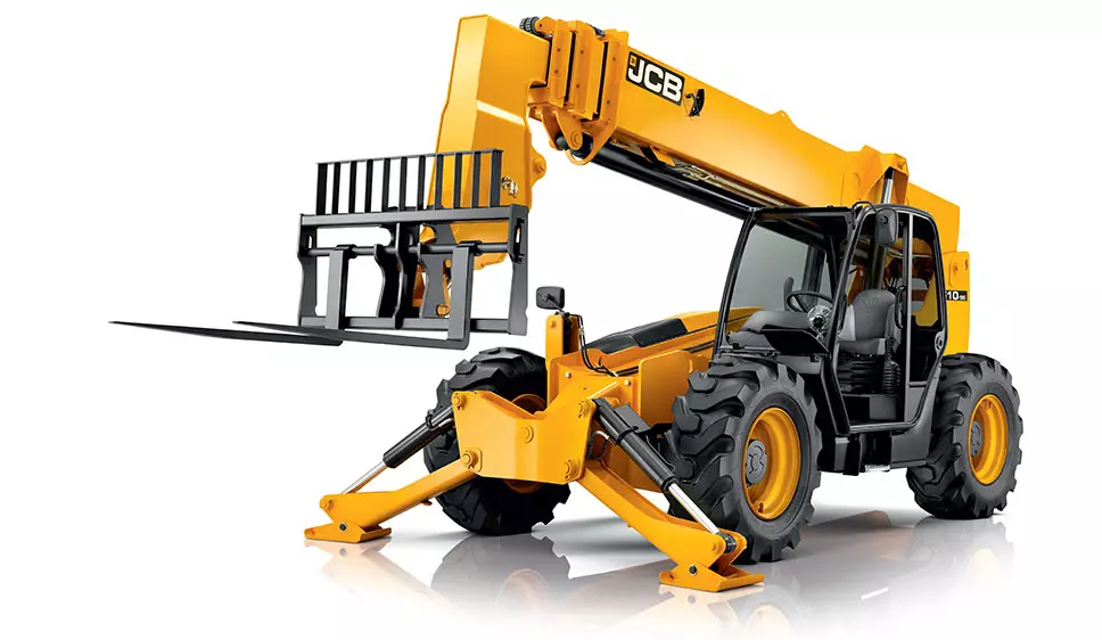
The JCB Telescopic Handler 510-56 is a versatile and robust piece of industrial equipment designed for lifting and moving materials in construction and agricultural settings. Known for its reliability and efficiency, this model offers exceptional maneuverability and performance, making it an essential asset for various heavy-duty applications.
Turn manuals into instant answers
with your AI-powered assistantTurn manuals into instant answers
with your AI-powered assistant
Manual for JCB Telescopic Handler 510-56
Complete asset maintenance, one click away
Get instant access to all the maintenance information you need. Empower technicians to perform preventive maintenance with asset packages, ready to use right out of the box.

Documents & Manuals
Find all the essential guides in one place.
 Tensioning Guide
- Belt-diagram
- C-120 pulleys
+ 13 more

Work Order Templates
Pre-built workflows to keep your asset running smoothly.
- Daily Electrical System Inspection
- Replace Roller and Pulley
- Install Engine B-120
+ 29 more

Procedures
Integrate maintenance plans directly into your work orders.
- Motion Industries
- Applied Industrial Technologies
- Electrical Brothers
+ 5 more

Parts
Access the parts list for your equipment in MaintainX.
- Drive Motor
- B2 Rollers
- Tensioning System
+ 40 more
JCB Telescopic Handler 510-56
Create an account to install this asset package.
Maintenance Plans for JCB Telescopic Handler Model 510-56
Integrate maintenance plans directly into your work orders in MaintainX.
Crankcase Ventilation Filter Replacement
Make the machine safe. Refer to (PIL 01-03).
Get access to the engine. Refer to (PIL 06-06).
Rotate the filter cover anti-clockwise and remove.
Lift out the filter element and discard it.
Clean the inside of the filter housing. Remove all oil and sludge contamination.
Make sure that the oil drain in the bottom of the filter housing is not blocked with sludge.
Install a new filter element. Make sure that the correct type of filter element is installed.
Align the arrows on both parts to install the filter cover.
Sign off on the filter replacement

Oil Level Check
Warning: Failure to replace the oil and filter at the recommended interval could cause serious engine failure.
Machine made safe
Access to the engine obtained
Oil level is between the two marks on the dipstick
Is it necessary to add oil?
If necessary, add recommended oil through one of the filler points.
Sign off on the oil level check
Special Tools Replacement
Drain the oil when the engine is warm as contaminants held in suspension will then be drained with the oil.
CAUTION! Oil will gush from the hole when the drain plug is removed. Keep to one side when you remove the plug.
1. Place a container of suitable size beneath the drain plug.
2. Remove the oil sump drain plug and 'O' ring. Let the oil drain out, then clean and install the drain plug with a new 'O' ring. Tighten the plug to the correct torque value.
3. Loosen and remove the filter housing drain plug. Let the oil fully drain. Install the plug. Tighten the plug to the correct torque value.
4. Unscrew the filter canister, use special tool if necessary.
Special Tool: Oil Filter Removal Tool (Qty.: 1)
5. Clean the seal face of the filter head.
6. Smear the seal on the new filter canister with clean engine oil.
Air Filter Replacement
Do not attempt to wash or clean the elements, they must only be renewed.
A new inner element must be installed at least every other time the outer element is changed. As a reminder, mark the inner element with marker pen each time the outer element is changed.
Remove:
1. Make the machine safe. Refer to (PIL 01-03).
2. Get access to the engine.
3. Depress the clips and lift off the cover.
4. Remove the outer element. Take care not to tap or knock the element.
5. If the inner element is to be changed, lift up pulls and remove the inner element.
Install:
Tensioner Replacement
Before Removal
Machine made safe
Engine safe to work on
Access to the engine obtained
Drive belt removed
Remove
Tensioner assembly bolts removed
Tensioner pulley lifted from the cylinder block
Install
Parts for JCB Telescopic Handler 510-56
Access the parts list for your equipment in MaintainX.
Oil Filter Removal Tool
892/00292
Data Link Adaptor (DLA) Kit
892/01174
Oil Filter Removal Tool
892/00292
Data Link Adaptor (DLA) Kit
892/01174
Oil Filter Removal Tool
892/00292
Data Link Adaptor (DLA) Kit
892/01174
Unlock efficiency
with MaintainX CoPilot
MaintainX CoPilot is your expert colleague, on call 24/7, helping your team find the answers they need to keep equipment running.
Reduce Unplanned Downtime
Ensure your team follows consistent procedures to minimize equipment failures and costly delays.
Maximize Asset Availability
Keep your assets running longer and more reliably, with standardized maintenance workflows from OEM manuals.
Lower Maintenance Costs
Turn any technician into an expert to streamline operations, maintain more assets, and reduce overall costs.
Thousands of companies manage their assets with MaintainX

'%3e%3cpath%20fill='url(%23b)'%20d='M66.008%2080.068c-5.084-.786-9.763-3.834-12.442-8.68a16.942%2016.942%200%200%201-1.87-5.18c1.096.19%202.203.476%203.298.87%206.525%202.333%2010.836%207.68%2011.014%2012.99ZM51.47%2061.576c.488-5.524%203.62-10.716%208.847-13.597a17.132%2017.132%200%200%201%2011.335-1.882c-.798%208.145-7.43%2014.848-16.038%2015.599-1.417.119-2.799.07-4.144-.12Zm28.564-11.478a17.513%2017.513%200%200%201%203.727%204.62c4.608%208.335%201.584%2018.813-6.75%2023.409a16.988%2016.988%200%200%201-4.359%201.679%2019.624%2019.624%200%200%201-3.977-12.776c.346-7.561%204.942-13.931%2011.36-16.932Z'/%3e%3cpath%20fill='%23110F0D'%20fill-rule='evenodd'%20d='M142.831%2048.324h4.977V77.03h-4.977V48.324Zm27.278%2013.002c.322%201.048.453%202.263.453%203.62v12.073h-4.787V66.208c0-.75-.047-1.572-.154-2.143-.453-2.382-1.822-3.572-4.215-3.572-2.31%200-3.882%201.274-4.43%203.476-.143.596-.226%201.405-.226%202.25v10.8h-4.787V56.623h4.477v2.989c1.536-2.5%203.906-3.43%206.371-3.43%203.488%200%206.263%201.68%207.298%205.144Zm24.636%207.323c0%203.882-2.358%206.525-5.763%207.727-1.298.453-2.632.643-4.62.643h-10.169V48.324h9.085c1.691%200%203.156.143%204.049.38%203.465.93%205.727%203.68%205.727%207.335%200%202.441-.81%204.156-2.762%205.644%202.905%201.417%204.453%203.727%204.453%206.966Zm-15.634-8.656h4.584c1.024%200%201.917-.143%202.536-.417%201.215-.548%201.905-1.608%201.905-3.167%200-1.548-.643-2.572-1.845-3.132-.691-.31-1.762-.452-2.763-.452h-4.417v7.168Zm10.716%208.465c0-1.536-.893-3.37-3.227-3.893-.428-.095-1.036-.143-1.571-.143h-5.918v8.085h5.501c.56%200%201.429-.048%201.953-.167%201.94-.453%203.262-1.846%203.262-3.882Zm47.747-11.847-8.097%2020.408h-4.429l-8.109-20.408h5.191l5.192%2014.574%205.108-14.574h5.144Zm-20.218%2010.002c0%20.69-.036%201.262-.155%201.94h-15.943c.631%202.87%202.714%204.728%205.882%204.728%202.131%200%203.607-.882%204.703-2.525h4.87c-1.762%204.144-5.204%206.692-9.657%206.692-6.084%200-10.537-4.858-10.537-10.49%200-6.108%204.524-10.776%2010.335-10.776%206.239%200%2010.442%204.954%2010.502%2010.43Zm-4.763-1.405c-.333-2.846-2.643-4.858-5.691-4.858-2.894%200-5.287%201.929-5.621%204.858h11.312Zm-72.667%203.44c0%204.787-3.287%208.371-9.419%208.371H119.363V64.66c-1.917.274-3.87.69-5.811%201.238l4.537%2011.121h-5.418l-3.596-9.585c-5.144%202.084-10.085%205.216-14.217%209.585h-4.786L101.8%2048.312h4.56l5.68%2013.883a44.112%2044.112%200%200%201%207.323-1.774V48.312h9.084c1.703%200%203.156.143%204.061.393%203.453.929%205.727%203.667%205.727%207.323%200%201.917-.738%204.179-2.81%205.691%203.06%201.56%204.501%204.025%204.501%206.93Zm-15.634-8.667a62.664%2062.664%200%200%201%202.06-.036c1.703.012%203.239.131%204.608.37%201.441-.549%202.357-1.727%202.357-3.537%200-1.941-.881-3.144-2.488-3.667-.548-.18-1.358-.286-2.322-.286h-4.215v7.156Zm-16.55%203.905-3.715-9.894-6.394%2016.502c2.833-2.595%206.263-4.858%2010.109-6.608Zm27.254%204.74c0-2.775-3.131-4.347-8.513-4.418-.715%200-1.441.011-2.191.047v8.252h5.918c2.548%200%204.786-1.37%204.786-3.882Z'%20clip-rule='evenodd'/%3e%3c/g%3e%3cdefs%3e%3clinearGradient%20id='b'%20x1='51.47'%20x2='85.916'%20y1='62.946'%20y2='62.946'%20gradientUnits='userSpaceOnUse'%3e%3cstop%20stop-color='%23CD9F28'/%3e%3cstop%20offset='1'%20stop-color='%23ECD80B'/%3e%3c/linearGradient%3e%3cclipPath%20id='a'%3e%3cpath%20fill='%23fff'%20d='M51.47%2045.728h186.104V80.14H51.47z'/%3e%3c/clipPath%3e%3c/defs%3e%3c/svg%3e)


More from JCB


Explore Other Assets


© 2026 MaintainX. All rights reserved.