


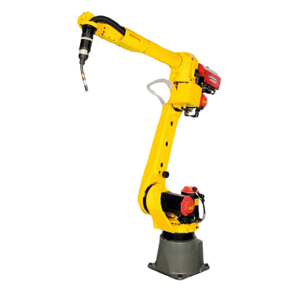
Fanuc Robot M20iA/35M
Need answers fast?
Explore the manual using AI.
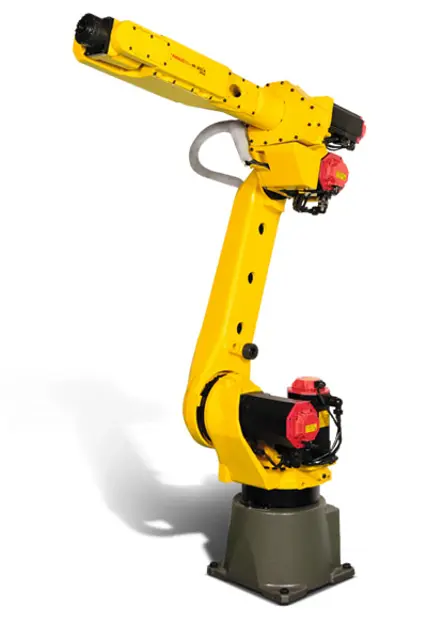
The Fanuc Robot M20iA/35M is a versatile industrial robot known for its precision and efficiency in automation tasks. This model excels in various applications, making it a reliable choice for manufacturing and assembly processes. Regular maintenance ensures optimal performance and longevity of the robot.
Turn manuals into instant answers
with your AI-powered assistantTurn manuals into instant answers
with your AI-powered assistant
Manual for Fanuc Robot M20iA/35M
Complete asset maintenance, one click away
Get instant access to all the maintenance information you need. Empower technicians to perform preventive maintenance with asset packages, ready to use right out of the box.

Documents & Manuals
Find all the essential guides in one place.
 Tensioning Guide
- Belt-diagram
- C-120 pulleys
+ 13 more

Work Order Templates
Pre-built workflows to keep your asset running smoothly.
- Daily Electrical System Inspection
- Replace Roller and Pulley
- Install Engine B-120
+ 29 more

Procedures
Integrate maintenance plans directly into your work orders.
- Motion Industries
- Applied Industrial Technologies
- Electrical Brothers
+ 5 more

Parts
Access the parts list for your equipment in MaintainX.
- Drive Motor
- B2 Rollers
- Tensioning System
+ 40 more
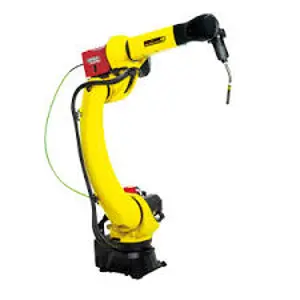
Fanuc Robot M20iA/35M
Create an account to install this asset package.
Maintenance Plans for Fanuc Robot Model M20iA/35M
Integrate maintenance plans directly into your work orders in MaintainX.
J1 To J3-Axis Reducer Grease Replacement
1 Move the robot to the greasing posture described in Table 7.2.3.1 (b).
2 Turn off the controller power.
3 Remove the seal bolt or taper plug from grease outlet. (Fig.7.2.3 (b), (c), (e))
J1-axis : 1 location (seal bolt M8x10)
J2-axis : 3 locations (seal bolt M8x10)
J3-axis : 1 locations (J3-axis reducer first grease outlet ,seal bolt M8x10) *When robot is shipped after June,2011, robot has 2 grease outlet. Remove only first grease outlet.
4 Remove the seal bolt or taper plug from grease inlet and attach grease nipple.
5 Keep greasing until the new grease pushes out the old grease and comes out from each grease outlet.
6 Release remaining pressure using the procedure given in Subsection 7.2.3.6. In case of upside-down mount, pull out about 130cc grease to make space of grease bath.;

1 Daily Robot Check
Check there is oil leak on sealed part of each joint parts.
If there is oil leak, clean them.
When air control set is combined
Check air pressure using the pressure gauge on the air regulator as shown in Fig.7.1.1 (c). If it does not meet the specified pressure of 0.49 to 0.69 MPa (5-7 kgf/cm2), adjust it using the regulator pressure-setting handle.
Check the drop quantity during wrist or hand motion. If it does not meet the specified value (1drop/10-20 sec), adjust it using the oiler control knob. Under normal usage, the oiler becomes empty in about 10 to 20 days under normal operation.
Check to see that the lubricator level is within the specified level.
Check the joints, tubes, etc. for leaks. Repair leaks, or replace parts, as required.
Check drain and release it. When quantity of the drain is remarkable, examine the setting of the air dryer to the air supply side.
After automatic operation
960 Hourly / 3 Monthly Axis Gearbox Maintenance
Check the oil sight glass of J4, J5/J6-axis gearbox
Exhausting oil method
1 Move the robot to the greasing posture described in Table 7.2.3.2 (b).
2 Turn off the controller power.
3 Remove any peripheral equipment, if it was mounted at the ventilator hole.
4 Put the oil pan under the oil outlet.
5 Block the gap using tape etc. to prevent oil from oil outlet intruding into the J4 connector panel. If robot is shipped before March,2009, remove the J4 connector panel mounting bolts and make plug of oil inlet/outlet can be seen. When moving the connector panel, remove user side or air joint if it is necessary. Then Remove taper plug or seal bolt or oil outlet and ventilator hole and exhaust oil.
6 When all oil is discharged, attach the taper plug. Replace the taper plug by new one. When reusing it, wind it with a seal tape.
7 According to description below, inject oil.
First 320 hourly / 1 Monthly Gearbox Maintenance
Check the oil sight glass of J4, J5/J6-axis gearbox (except M-20iA/20M)
Please confirm whether the amount of oil of the oil sight glass has come above Fig.7.2.3.2 (d), Fig.7.2.3.3 (c) and Fig. 7.2.3.4 (c) and replenish it if the level is low. When the oil sight glass does not have an air bubble then please check that the oil level is above the sight glass through the vent plug. A flashlight may be useful to see the level in the gearbox. Please consult your local FANUC representative if you have questions or concerns regarding the gearbox oil level.
Moreover, please exchange oil when it is discolored due to deterioration or the quality is questionable in the oil sight glass such as right side of Fig.7.1.2. Refer to Subsection 7.2.2 about replacing method of oil.
Check whether the cable connected to the teach pendant and robot is unevenly twisted.;
7680 Hourly / 2 Yearly Robot Maintenance
Check the mechanical cable. (Damaged or twisted)
Check the motor connector. (Loosening)
Tighten the end effector bolt.
Retightening extemal main bolts
Check the mechanical stopper and adjustable mechanical stopper.
Remove spatter and dust etc.
Check the application cable
Check the oil sight glass of J4 to J6 axis
Replacing battery
Parts for Fanuc Robot M20iA/35M
Access the parts list for your equipment in MaintainX.
Seal Bolt (M6X8)
A97L-0218-0417#060808
Seal Washer (M6)
A30L-0001-0048#6M
Seal Bolt (M8X10)
A97L-0218-0417#081010
Seal Washer (M5)
A30L-0001-0048#5M
Taper Plug (R1/8)
A97L-0001-0436#1-1D
Seal Bolt (M6X8)
A97L-0218-0417#060808
Seal Washer (M6)
A30L-0001-0048#6M
Seal Bolt (M8X10)
A97L-0218-0417#081010
Seal Washer (M5)
A30L-0001-0048#5M
Taper Plug (R1/8)
A97L-0001-0436#1-1D
Seal Bolt (M6X8)
A97L-0218-0417#060808
Seal Washer (M6)
A30L-0001-0048#6M
Seal Bolt (M8X10)
A97L-0218-0417#081010
Seal Washer (M5)
A30L-0001-0048#5M
Taper Plug (R1/8)
A97L-0001-0436#1-1D
Unlock efficiency
with MaintainX CoPilot
MaintainX CoPilot is your expert colleague, on call 24/7, helping your team find the answers they need to keep equipment running.
Reduce Unplanned Downtime
Ensure your team follows consistent procedures to minimize equipment failures and costly delays.
Maximize Asset Availability
Keep your assets running longer and more reliably, with standardized maintenance workflows from OEM manuals.
Lower Maintenance Costs
Turn any technician into an expert to streamline operations, maintain more assets, and reduce overall costs.
Thousands of companies manage their assets with MaintainX

'%3e%3cpath%20fill='url(%23b)'%20d='M66.008%2080.068c-5.084-.786-9.763-3.834-12.442-8.68a16.942%2016.942%200%200%201-1.87-5.18c1.096.19%202.203.476%203.298.87%206.525%202.333%2010.836%207.68%2011.014%2012.99ZM51.47%2061.576c.488-5.524%203.62-10.716%208.847-13.597a17.132%2017.132%200%200%201%2011.335-1.882c-.798%208.145-7.43%2014.848-16.038%2015.599-1.417.119-2.799.07-4.144-.12Zm28.564-11.478a17.513%2017.513%200%200%201%203.727%204.62c4.608%208.335%201.584%2018.813-6.75%2023.409a16.988%2016.988%200%200%201-4.359%201.679%2019.624%2019.624%200%200%201-3.977-12.776c.346-7.561%204.942-13.931%2011.36-16.932Z'/%3e%3cpath%20fill='%23110F0D'%20fill-rule='evenodd'%20d='M142.831%2048.324h4.977V77.03h-4.977V48.324Zm27.278%2013.002c.322%201.048.453%202.263.453%203.62v12.073h-4.787V66.208c0-.75-.047-1.572-.154-2.143-.453-2.382-1.822-3.572-4.215-3.572-2.31%200-3.882%201.274-4.43%203.476-.143.596-.226%201.405-.226%202.25v10.8h-4.787V56.623h4.477v2.989c1.536-2.5%203.906-3.43%206.371-3.43%203.488%200%206.263%201.68%207.298%205.144Zm24.636%207.323c0%203.882-2.358%206.525-5.763%207.727-1.298.453-2.632.643-4.62.643h-10.169V48.324h9.085c1.691%200%203.156.143%204.049.38%203.465.93%205.727%203.68%205.727%207.335%200%202.441-.81%204.156-2.762%205.644%202.905%201.417%204.453%203.727%204.453%206.966Zm-15.634-8.656h4.584c1.024%200%201.917-.143%202.536-.417%201.215-.548%201.905-1.608%201.905-3.167%200-1.548-.643-2.572-1.845-3.132-.691-.31-1.762-.452-2.763-.452h-4.417v7.168Zm10.716%208.465c0-1.536-.893-3.37-3.227-3.893-.428-.095-1.036-.143-1.571-.143h-5.918v8.085h5.501c.56%200%201.429-.048%201.953-.167%201.94-.453%203.262-1.846%203.262-3.882Zm47.747-11.847-8.097%2020.408h-4.429l-8.109-20.408h5.191l5.192%2014.574%205.108-14.574h5.144Zm-20.218%2010.002c0%20.69-.036%201.262-.155%201.94h-15.943c.631%202.87%202.714%204.728%205.882%204.728%202.131%200%203.607-.882%204.703-2.525h4.87c-1.762%204.144-5.204%206.692-9.657%206.692-6.084%200-10.537-4.858-10.537-10.49%200-6.108%204.524-10.776%2010.335-10.776%206.239%200%2010.442%204.954%2010.502%2010.43Zm-4.763-1.405c-.333-2.846-2.643-4.858-5.691-4.858-2.894%200-5.287%201.929-5.621%204.858h11.312Zm-72.667%203.44c0%204.787-3.287%208.371-9.419%208.371H119.363V64.66c-1.917.274-3.87.69-5.811%201.238l4.537%2011.121h-5.418l-3.596-9.585c-5.144%202.084-10.085%205.216-14.217%209.585h-4.786L101.8%2048.312h4.56l5.68%2013.883a44.112%2044.112%200%200%201%207.323-1.774V48.312h9.084c1.703%200%203.156.143%204.061.393%203.453.929%205.727%203.667%205.727%207.323%200%201.917-.738%204.179-2.81%205.691%203.06%201.56%204.501%204.025%204.501%206.93Zm-15.634-8.667a62.664%2062.664%200%200%201%202.06-.036c1.703.012%203.239.131%204.608.37%201.441-.549%202.357-1.727%202.357-3.537%200-1.941-.881-3.144-2.488-3.667-.548-.18-1.358-.286-2.322-.286h-4.215v7.156Zm-16.55%203.905-3.715-9.894-6.394%2016.502c2.833-2.595%206.263-4.858%2010.109-6.608Zm27.254%204.74c0-2.775-3.131-4.347-8.513-4.418-.715%200-1.441.011-2.191.047v8.252h5.918c2.548%200%204.786-1.37%204.786-3.882Z'%20clip-rule='evenodd'/%3e%3c/g%3e%3cdefs%3e%3clinearGradient%20id='b'%20x1='51.47'%20x2='85.916'%20y1='62.946'%20y2='62.946'%20gradientUnits='userSpaceOnUse'%3e%3cstop%20stop-color='%23CD9F28'/%3e%3cstop%20offset='1'%20stop-color='%23ECD80B'/%3e%3c/linearGradient%3e%3cclipPath%20id='a'%3e%3cpath%20fill='%23fff'%20d='M51.47%2045.728h186.104V80.14H51.47z'/%3e%3c/clipPath%3e%3c/defs%3e%3c/svg%3e)


More from Fanuc


Explore Other Assets


© 2026 MaintainX. All rights reserved.