


Brio Warehouse Water & Ice Machine CLPOU720UVRO4IC
Need answers fast?
Explore the manual using AI.
Turn manuals into instant answers
with your AI-powered assistantTurn manuals into instant answers
with your AI-powered assistant
Manual for Brio Warehouse Water & Ice Machine CLPOU720UVRO4IC
Complete asset maintenance, one click away
Get instant access to all the maintenance information you need. Empower technicians to perform preventive maintenance with asset packages, ready to use right out of the box.

Documents & Manuals
Find all the essential guides in one place.
 Tensioning Guide
- Belt-diagram
- C-120 pulleys
+ 13 more

Work Order Templates
Pre-built workflows to keep your asset running smoothly.
- Daily Electrical System Inspection
- Replace Roller and Pulley
- Install Engine B-120
+ 29 more

Procedures
Integrate maintenance plans directly into your work orders.
- Motion Industries
- Applied Industrial Technologies
- Electrical Brothers
+ 5 more

Parts
Access the parts list for your equipment in MaintainX.
- Drive Motor
- B2 Rollers
- Tensioning System
+ 40 more
Brio Warehouse Water & Ice Machine CLPOU720UVRO4IC
Create an account to install this asset package.
Maintenance Plans for Brio Warehouse Water & Ice Machine Model CLPOU720UVRO4IC
Integrate maintenance plans directly into your work orders in MaintainX.
Filter Maintenance
- Flush the filters each time you replace your filters
IMPORTANT: Ensure water supply is off before you begin
IMPORTANT: Flush ONLY the sediment, pre carbon, and post carbon filters. The reverse osmosis (RO) filter should not be flushed
A. Connect a filter (D) to the filter housing (C) by twisting the filter (D) clockwise
B. Connect the tip of the shut-off valve tube (B) to the left side of the filter housing (C)
C. Connect the filter flushing tube (A) to the right side of the filter housing (C) and lay the open end of the filter flushing tube (A) over a sink or receptacle to collect water
D. Follow instructions in table below to flush filters
IMPORTANT: After each filter is flushed, be sure to shut off water supply before disconnecting tubes to flush the next filter
Stage 1: Sediment Filter - At first, water may appear cloudy. Flush filter for an additional 4 minutes after water runs clear

3 Monthly Reservoir Cleaning
Gather the following supplies: 60-120g (4-8 tbsp.) citric acid crystals, 2 liters hot water, 5-liter (1.3 gal.) container or bucket, Screwdriver, Clean towel
IMPORTANT: BEFORE beginning the cleaning process, dispense ALL ice from the bin by pressing the ice button. Ice bin MUST BE empty before cleaning reservoirs
Switch the red heating, green cooling, black ice making, and blue night light switches to the OFF position, then unplug the dispenser
Turn the valve on the shut-off valve tube (B) to the OFF position
Place 5-liter container beneath the red hot-water outlet, unscrew the fixing screw of the clear cover over the outlet, remove the clear cover and set it aside, pull the red drain plug out and allow hot water to drain into bucket, emptying hot water reservoir
Empty the cold water reservoir, remove the screw on the transparent drain cover, place the small bucket under the drain, remove the red drain plug and allow water in cold water tank to drain, reinstall the drain plug
Prepare a cleaning solution by combining citric acid crystals with 2 liters of hot water, stir the solution so that all the crystals are dissolved
Remove screws securing the dispenser top, maneuver the top of the dispenser off, remove the cover of the ice bin, remove any remaining ice in bin, pour the cleaning solution into the ice bin
Snap the cover of the ice bin back into place, replace the top of the dispenser, secure it by screwing the 2 screws back into place
Machine Maintenance
Is the dispenser in a dry and cool place and away from direct sunshine?
Measure the distance of the back of the dispenser from the wall (in cm)
Is the dispenser placed on paper or foam?
Are there any flammable items beside the machine?
Is the dispenser used outdoors or in a place that can be splashed by water?
If the dispenser is not in use for longer than a 24-hour period, are the heating, cooling, and ice-making switches turned off?
Is the drip tray and grid empty and clean?
If the water supply is cut off, is the water supply to the dispenser shut off and all ice dispensed?
Sign off on the machine maintenance
6 Monthly Filter Replacement
IMPORTANT: Only replace the filters with new filters designed for this dispenser. Any other type of filter will damage the machine and void any warranty.
PCB (2) and RO (3) filter indicator lights steadily illuminate and the dispenser beeps?
Water supply shut off
Flush the Filters
New filters flushed as per instructions?
Expired filters removed and replaced with new filters?
Ensure filters are installed as follows, from left to right
After replacing the filters, press the up arrow (1) for approximately 3 seconds to reset the filter indicator lights and turn off the beeping
Sign off on the filter replacement
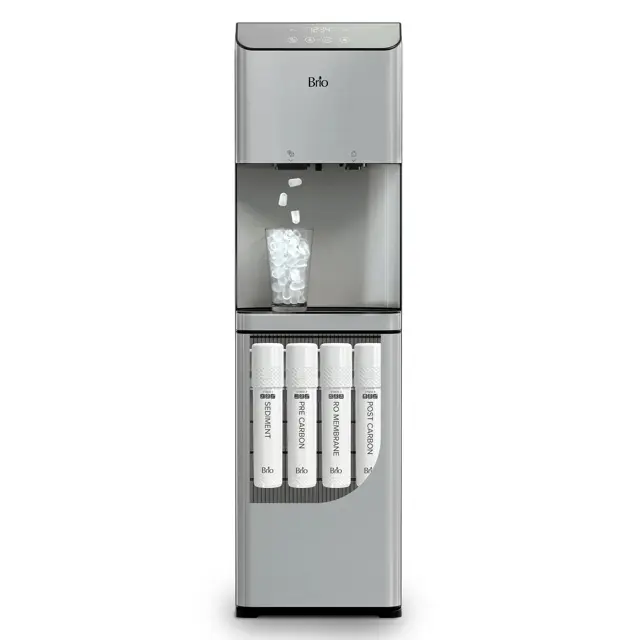
Parts for Brio Warehouse Water & Ice Machine CLPOU720UVRO4IC
Access the parts list for your equipment in MaintainX.
Sediment Filter
NFMPP5M
Pre Carbon Filter
NFMGAC
Reverse Osmosis (RO) Filter
NFMRO75GPD
Post Carbon Filter
NFMCTO5MS4
Sediment Filter
NFMPP5M
Pre Carbon Filter
NFMGAC
Reverse Osmosis (RO) Filter
NFMRO75GPD
Post Carbon Filter
NFMCTO5MS4
Sediment Filter
NFMPP5M
Pre Carbon Filter
NFMGAC
Reverse Osmosis (RO) Filter
NFMRO75GPD
Post Carbon Filter
NFMCTO5MS4
Unlock efficiency
with MaintainX CoPilot
MaintainX CoPilot is your expert colleague, on call 24/7, helping your team find the answers they need to keep equipment running.
Reduce Unplanned Downtime
Ensure your team follows consistent procedures to minimize equipment failures and costly delays.
Maximize Asset Availability
Keep your assets running longer and more reliably, with standardized maintenance workflows from OEM manuals.
Lower Maintenance Costs
Turn any technician into an expert to streamline operations, maintain more assets, and reduce overall costs.
Thousands of companies manage their assets with MaintainX

'%3e%3cpath%20fill='url(%23b)'%20d='M66.008%2080.068c-5.084-.786-9.763-3.834-12.442-8.68a16.942%2016.942%200%200%201-1.87-5.18c1.096.19%202.203.476%203.298.87%206.525%202.333%2010.836%207.68%2011.014%2012.99ZM51.47%2061.576c.488-5.524%203.62-10.716%208.847-13.597a17.132%2017.132%200%200%201%2011.335-1.882c-.798%208.145-7.43%2014.848-16.038%2015.599-1.417.119-2.799.07-4.144-.12Zm28.564-11.478a17.513%2017.513%200%200%201%203.727%204.62c4.608%208.335%201.584%2018.813-6.75%2023.409a16.988%2016.988%200%200%201-4.359%201.679%2019.624%2019.624%200%200%201-3.977-12.776c.346-7.561%204.942-13.931%2011.36-16.932Z'/%3e%3cpath%20fill='%23110F0D'%20fill-rule='evenodd'%20d='M142.831%2048.324h4.977V77.03h-4.977V48.324Zm27.278%2013.002c.322%201.048.453%202.263.453%203.62v12.073h-4.787V66.208c0-.75-.047-1.572-.154-2.143-.453-2.382-1.822-3.572-4.215-3.572-2.31%200-3.882%201.274-4.43%203.476-.143.596-.226%201.405-.226%202.25v10.8h-4.787V56.623h4.477v2.989c1.536-2.5%203.906-3.43%206.371-3.43%203.488%200%206.263%201.68%207.298%205.144Zm24.636%207.323c0%203.882-2.358%206.525-5.763%207.727-1.298.453-2.632.643-4.62.643h-10.169V48.324h9.085c1.691%200%203.156.143%204.049.38%203.465.93%205.727%203.68%205.727%207.335%200%202.441-.81%204.156-2.762%205.644%202.905%201.417%204.453%203.727%204.453%206.966Zm-15.634-8.656h4.584c1.024%200%201.917-.143%202.536-.417%201.215-.548%201.905-1.608%201.905-3.167%200-1.548-.643-2.572-1.845-3.132-.691-.31-1.762-.452-2.763-.452h-4.417v7.168Zm10.716%208.465c0-1.536-.893-3.37-3.227-3.893-.428-.095-1.036-.143-1.571-.143h-5.918v8.085h5.501c.56%200%201.429-.048%201.953-.167%201.94-.453%203.262-1.846%203.262-3.882Zm47.747-11.847-8.097%2020.408h-4.429l-8.109-20.408h5.191l5.192%2014.574%205.108-14.574h5.144Zm-20.218%2010.002c0%20.69-.036%201.262-.155%201.94h-15.943c.631%202.87%202.714%204.728%205.882%204.728%202.131%200%203.607-.882%204.703-2.525h4.87c-1.762%204.144-5.204%206.692-9.657%206.692-6.084%200-10.537-4.858-10.537-10.49%200-6.108%204.524-10.776%2010.335-10.776%206.239%200%2010.442%204.954%2010.502%2010.43Zm-4.763-1.405c-.333-2.846-2.643-4.858-5.691-4.858-2.894%200-5.287%201.929-5.621%204.858h11.312Zm-72.667%203.44c0%204.787-3.287%208.371-9.419%208.371H119.363V64.66c-1.917.274-3.87.69-5.811%201.238l4.537%2011.121h-5.418l-3.596-9.585c-5.144%202.084-10.085%205.216-14.217%209.585h-4.786L101.8%2048.312h4.56l5.68%2013.883a44.112%2044.112%200%200%201%207.323-1.774V48.312h9.084c1.703%200%203.156.143%204.061.393%203.453.929%205.727%203.667%205.727%207.323%200%201.917-.738%204.179-2.81%205.691%203.06%201.56%204.501%204.025%204.501%206.93Zm-15.634-8.667a62.664%2062.664%200%200%201%202.06-.036c1.703.012%203.239.131%204.608.37%201.441-.549%202.357-1.727%202.357-3.537%200-1.941-.881-3.144-2.488-3.667-.548-.18-1.358-.286-2.322-.286h-4.215v7.156Zm-16.55%203.905-3.715-9.894-6.394%2016.502c2.833-2.595%206.263-4.858%2010.109-6.608Zm27.254%204.74c0-2.775-3.131-4.347-8.513-4.418-.715%200-1.441.011-2.191.047v8.252h5.918c2.548%200%204.786-1.37%204.786-3.882Z'%20clip-rule='evenodd'/%3e%3c/g%3e%3cdefs%3e%3clinearGradient%20id='b'%20x1='51.47'%20x2='85.916'%20y1='62.946'%20y2='62.946'%20gradientUnits='userSpaceOnUse'%3e%3cstop%20stop-color='%23CD9F28'/%3e%3cstop%20offset='1'%20stop-color='%23ECD80B'/%3e%3c/linearGradient%3e%3cclipPath%20id='a'%3e%3cpath%20fill='%23fff'%20d='M51.47%2045.728h186.104V80.14H51.47z'/%3e%3c/clipPath%3e%3c/defs%3e%3c/svg%3e)


Explore Other Assets


© 2026 MaintainX. All rights reserved.