

When a critical pump suddenly stops building pressure or a conveyor grinds to a halt, every minute counts. According to the 2024 State of Industrial Maintenance report, unplanned downtime costs organizations an average of $25,000 per hour, and the 2026 report shows that it’s only getting more expensive.
Even as 66% of teams report stabilizing or reducing downtime incidents, 39% say the cost of those events has gone up. In other words: downtime is happening more, and is hurting more than ever.
All of this means that maintenance troubleshooting is one of your team’s most valuable skills. It's the systematic process of identifying equipment problems and implementing the right fix to restore operations. Whether you're dealing with a minor vibration issue or a complete system failure, strong maintenance troubleshooting can mean the difference between a quick repair and hours of costly downtime.
In this guide, you'll learn the essential steps that experienced maintenance professionals use to diagnose and resolve equipment issues efficiently. You'll also discover how modern maintenance software, including computerized maintenance management system (CMMS) platforms like MaintainX, can transform troubleshooting from a reactive scramble into a strategic advantage.

Key takeaways
- Follow a structured 5-step process: Identify the problem → Gather information → Isolate the cause → Test solutions → Fix and confirm. This systematic approach prevents missed clues and ensures efficient repairs.
- Combine observation with data: Use your senses to spot obvious issues, then leverage diagnostic tools and maintenance history to uncover hidden problems.
- Address root causes, not just symptoms: Troubleshooting isn't complete until you've identified why a failure occurred and taken steps to prevent recurrence.
- Document everything: Recording problems and solutions in a CMMS builds institutional knowledge that speeds future troubleshooting.
- Make troubleshooting a team effort: Share findings, collaborate on tough problems, and ensure knowledge doesn't retire with experienced technicians.
What is maintenance troubleshooting, and why is it important?
Maintenance troubleshooting is the regular process your teams go through when diagnosing equipment malfunctions and implementing fixes to restore normal operation. Think of it as detective work: You gather clues, test theories, and pinpoint the actual cause of failure, which is essential for effective troubleshooting.
This process matters for three critical reasons:
- It minimizes downtime costs. The faster you identify and fix problems, the less money your organization loses to halted production. With downtime costs averaging $25,000 per hour, efficient troubleshooting directly impacts your bottom line.
- It ensures you fix the right problem. Modern industrial equipment is complex. What appears to be a major motor failure might actually be a blown $5 fuse. Systematic troubleshooting prevents costly misdiagnosis and unnecessary part replacements.
- It protects safety. Thorough troubleshooting uncovers the real issues behind equipment failures. Instead of just resetting a tripped safety switch, you discover why it tripped, preventing issues from happening again.
Key steps to troubleshooting maintenance issues
Effective troubleshooting relies on approaching every problem methodically to avoid assumptions and wasted time. The steps below can help your team quickly get to the root cause of any issue, avoid unnecessary part replacements, and document fixes that prevent the same issue from happening again.
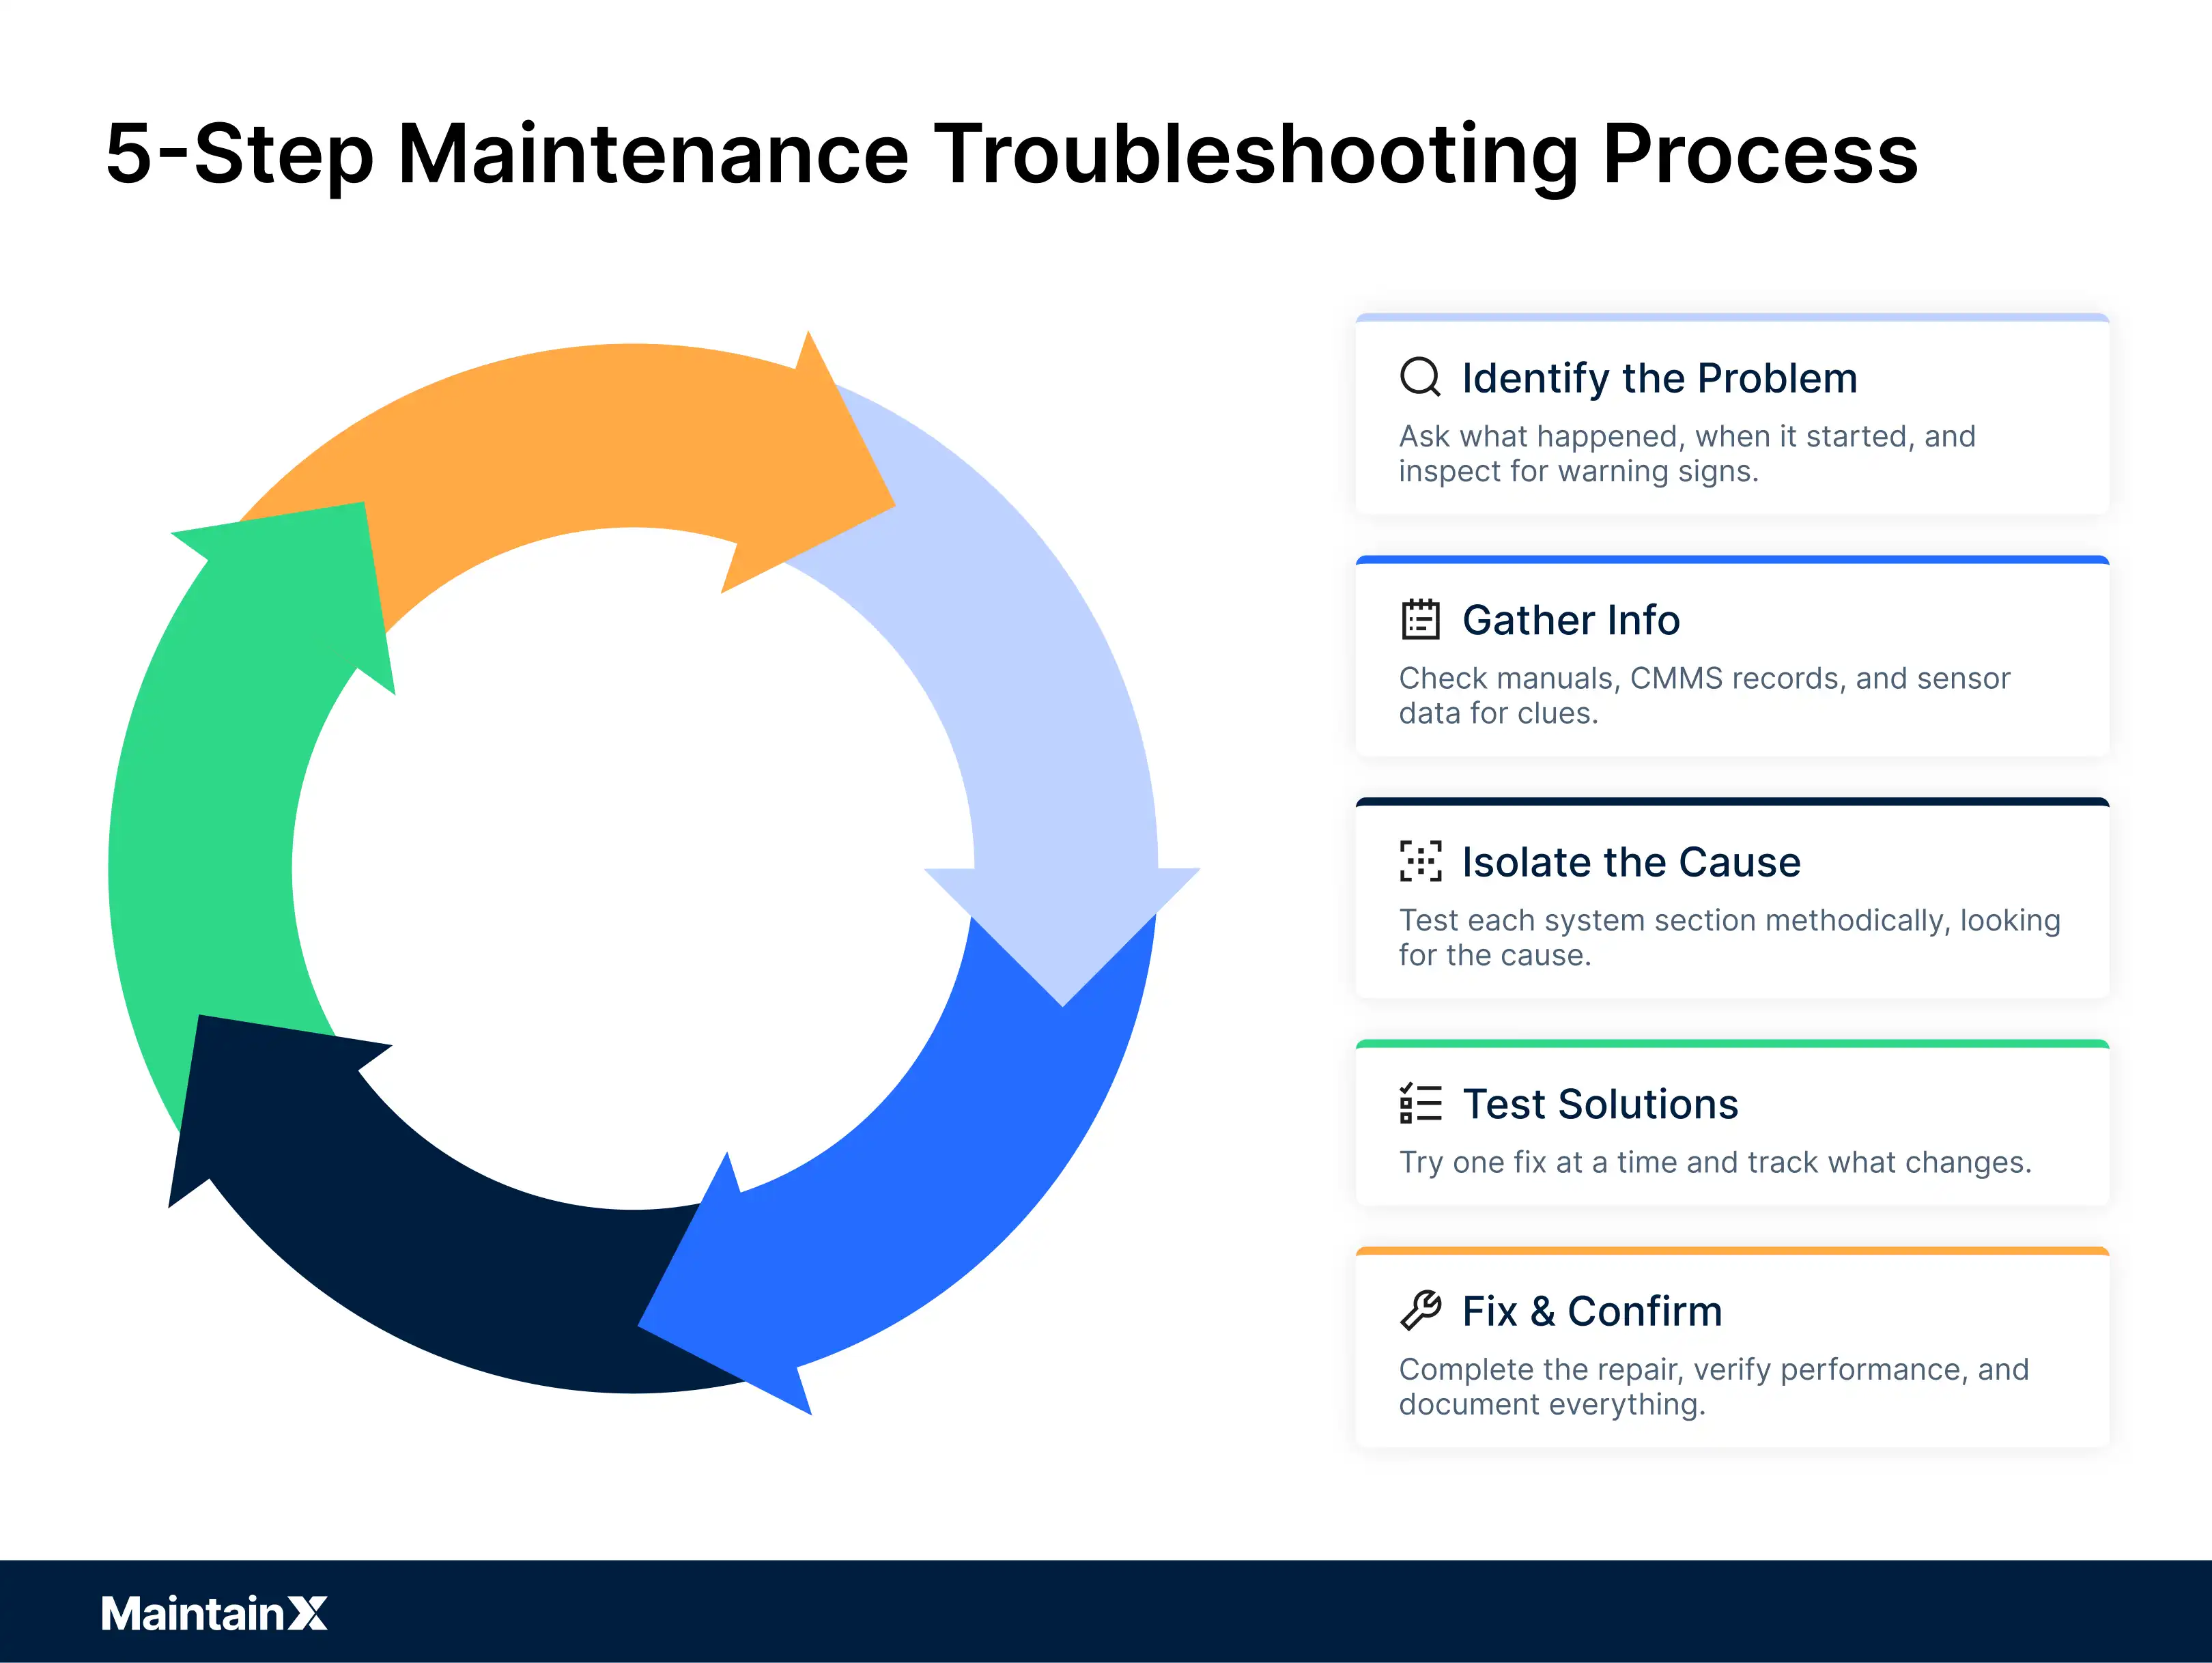
Step 1: Identifying the problem
Start by clearly defining what's wrong. This sounds basic, but skipping this step leads to wasted time chasing down the wrong issues.
Begin with the operator who reported the problem. Ask specific questions:
- What exactly did you observe?
- When did you first notice the issue?
- What were you doing when it occurred?
- Has anything changed recently with this equipment?
Next, take a look at the equipment yourself. Look for:
- Warning lights or error codes on control panels
- Unusual sounds, vibrations, or smells
- Visible damage, leaks, or loose components
- Abnormal temperatures or pressures
Document these initial observations. If you use a CMMS like MaintainX, pull up the asset's record on your mobile device. Recent work orders, inspection notes, and recurring issues provide valuable context that can point you toward the likely cause of the problem.
Step 2: Gathering the right information
Once you understand the problem, collect all relevant information before taking action. This homework phase prevents shotgun troubleshooting—randomly trying fixes without understanding the issue.
Start by:
- Consulting technical documentation. Equipment manuals often include troubleshooting flowcharts and error code definitions. For example, error code E07 on a packaging machine might directly indicate "low air pressure." Double-checking against this documentation can save you time in the long run, even if you think you know the issue.
- Reviewing maintenance history. Check recent work orders in your CMMS. Was anything replaced or adjusted recently? Has this exact issue occurred before? Past problems and their solutions often provide the fastest path to current fixes.
- Gathering operational data. For mechanical issues, review vibration analysis reports, oil analysis results, or temperature logs. For electrical problems, check previous multimeter readings or thermal imaging reports. If your equipment has IoT sensors, examine trend data for anomalies.
Modern CMMS platforms centralize all of this information, letting you access equipment manuals, past work orders, and sensor data from one screen. This eliminates the paper chase and ensures nothing gets overlooked.


Step 3: Isolating the issue
Now comes the detective work: systematically narrowing down the root cause.
Start with the simplest possibilities. If a motor won't start, check:
- Power supply (breaker tripped?)
- Control switches (e-stop engaged?)
- Safety interlocks (guard door open?)
Use the process of elimination. List all possible causes, then test each one:
- Power supply issues → Check voltage with a multimeter
- Mechanical binding → Try rotating the shaft manually
- Control problems → Review PLC fault codes
Break complex systems into sections. If a hydraulic press won't build pressure, don't randomly replace parts or start with the most expensive component. Instead, systematically test each section of the hydraulic circuit:
- Test the pump output pressure first (isolates pump issues from downstream problems).
- Check relief valve settings next (stuck open valve bypasses all pressure).
- Inspect for internal leaks in cylinders (confirms fluid is reaching actuators).
- Verify control valve operation last (eliminates electrical/mechanical control issues).
This methodical approach differs from "shotgun troubleshooting," where technicians randomly replace parts, hoping to fix the problem. By testing each section independently, you pinpoint the exact failure point without wasting time or parts.
Throughout this process, use diagnostic tools strategically:
- Multimeters for electrical checks
- Pressure gauges for hydraulic/pneumatic systems
- Vibration analyzers for rotating equipment
- Thermal cameras for hot spots
Document your findings at each step. This creates a troubleshooting trail that helps if you need to revisit the problem or collaborate with others.
Step 4: Testing solutions
Once you’ve identified a likely cause, implement and test your solution methodically.
Test one change at a time. If you replace a sensor AND adjust a valve, you won't know which action solved the problem. Make single changes and verify results before proceeding.
Start with the easiest fix. If low hydraulic pressure could be caused by a stuck relief valve or a failed pump, clean the valve first—it's simpler and cheaper than replacing the pump.
Monitor the original symptoms. After each test, ask yourself:
- Has the abnormal vibration stopped?
- Is pressure back to normal?
- Do error codes still appear?
Keep detailed notes of what you've tried and the results. In a team environment, communicate your progress: "Replaced pressure sensor—issue persists. Testing relief valve next."
Your CMMS can make this phase easier by providing quick access to previous solutions. A search for "hydraulic pressure loss" might reveal that another technician solved a similar issue by replacing a specific O-ring last month.
Step 5: Fixing the problem and confirming the solution
In this stage, you want to ensure the problem is completely fixed and then verify everything is working as it should. Here are a couple of steps to walk through:
Complete the repair thoroughly. If testing revealed a worn bearing, don't just add grease—replace it. Address any related issues discovered during troubleshooting.
Verify full operation. Start the equipment and run it through a complete cycle at normal load. Monitor all indicators that showed problems initially. The issue should be completely resolved, not just improved.
Involve the operator. They know how the equipment should run. Have them verify whether the machine is operating as it should.
Document everything. Record in your CMMS:
- What the problem was
- Root cause identified
- Actions taken to resolve it
- Any follow-up needed
Plan preventive actions. If a filter clogged and starved the system, schedule more frequent filter changes. Use your CMMS to create detailed task lists for recurring PM tasks that make sure this kind of failure doesn’t happen again.


How to spot common maintenance problems
Even the best maintenance teams run into recurring equipment issues. Knowing what to watch for and how to investigate it can help you spot small problems before they lead to bigger ones. Below are some of the most common mechanical and electrical warning signs to keep on your radar.
Mechanical issues: What to look for
Mechanical problems often announce themselves through physical symptoms. These can include:
Abnormal vibration or noise signals:
- Misalignment between coupled components
- Worn or damaged bearings
- Loose mounting bolts
- Rotor imbalance
Fluid leaks indicate:
- Failed seals or gaskets
- Cracked housings
- Loose fittings
- Overpressure conditions
Excessive heat points to:
- Insufficient lubrication
- Overloading
- Brake drag
- Bearing failure
Visible wear reveals:
- End-of-life components
- Improper installation
- Contamination issues
- Operational problems
Make sure you schedule regular visual inspections to catch these issues early. If your team spots anything out of the ordinary, have them document it in your CMMS. Even minor problems should be recorded, as that "slight leak" noted today could prevent tomorrow's catastrophic failure.
Electrical failures: Troubleshooting the basics
Electrical warning signs aren’t quite as easy to spot as mechanical ones. To troubleshoot electrical systems, have your team go through a systematic diagnosis:
Check the power supply first:
- Verify breakers haven't tripped
- Test for proper voltage at connection points
- Confirm fuses are intact
- Check disconnect switches
Inspect connections:
- Look for loose terminals (vibration loosens connections over time)
- Check for corrosion or burning
- Verify proper wire gauge
- Test continuity through connections
Test components systematically as a part of the troubleshooting process:
- Use multimeters to verify sensor outputs
- Check relay coil resistance
- Test motor winding continuity
- Verify control voltage levels
Review control logic:
- Check PLC error logs
- Verify the program hasn't been altered
- Test input/output signals
- Consider electromagnetic interference
Always follow lockout/tagout procedures when troubleshooting electrical issues. Document voltage readings and component tests in your CMMS for future reference.
Operational problems: How human error and systems affect performance
Not every maintenance issue is mechanical or electrical. In many cases, operational breakdowns are to blame—and they’re just as disruptive. Problems often stem from incorrect machine settings, missed preventive tasks, or improper startup and shutdown routines. Even something as simple as using the wrong lubricant can create downstream issues.
But it’s not just individual actions. Gaps in your processes can create systemic risks. These can include:
- No system for operators to report minor issues
- Poor communication between shifts
- Inadequate training on new equipment
- Pushing equipment beyond design limits
To identify operational causes, observe equipment operation across a full shift. Review CMMS data for patterns—do failures cluster on specific shifts or days? Filter work orders by operator to identify training needs.
Addressing these problems means going beyond repairs. Strengthen your standard operating procedures, hold regular training sessions, and make sure operators have a simple, CMMS-based way to flag concerns before they become full-blown failures.
Your maintenance troubleshooting checklist
When equipment goes down, you don’t want to waste time guessing. A solid troubleshooting process helps your team zero in on issues fast, fix them efficiently, and prevent repeat problems. Use this checklist to guide inspections, make the most of your diagnostic tools, and pull insights from past maintenance records.
Visual inspections: What to watch for
- Leaks or fluid puddles - Trace to source, note color and consistency
- Loose or damaged parts - Check bolts, belts, chains, covers
- Abnormal wire conditions - Look for fraying, pinching, or disconnection
- Wear indicators - Inspect for cracks, metal fatigue, and missing bushings
- Control panel status - Note error codes, warning lights, gauge readings
- Environmental factors - Check for blocked vents, debris, and poor housekeeping
Diagnostic tools: How to use them to find problems fast
- Multimeter - Test voltage presence, circuit continuity, component resistance
- Vibration analyzer - Identify imbalance, misalignment, and bearing issues
- Infrared thermometer - Find overheating components from a safe distance
- Pressure gauges - Verify hydraulic/pneumatic system asset performance
- Ultrasonic detector - Locate compressed air leaks, early bearing failure
- Built-in diagnostics - Run equipment self-tests, check error logs
Using maintenance logs and history to speed up troubleshooting
- Search similar issues - Filter CMMS for matching symptoms or equipment
- Review recent work - Check if problems started after maintenance
- Analyze failure patterns - Look for recurring issues or cycles
- Consult team knowledge - Ask experienced technicians about past fixes
- Document findings - Add detailed notes for future troubleshooting
How to prevent recurring maintenance problems
Recurring failures waste time, money, and resources—and they’re usually preventable. The key is building systems that focus on prevention, not just quick fixes. This section walks through how to strengthen your PM programs, get to the root of persistent issues, and create a team culture where knowledge is shared and problems get solved for good.
Setting up preventive maintenance programs
Reactive maintenance might keep equipment running in the short term, but it often leads to higher costs, more downtime, and added stress on your team. Shifting toward preventive maintenance helps you get ahead of problems and build long-term reliability into your operations. Here's how to make that transition more effective with the right strategies and tools:
- Analyze failure data. Use CMMS reports to identify your most problematic equipment. If bearing failures cause 30% of your downtime, prioritize bearing maintenance.
- Create task schedules. Base PM frequency on:
- Manufacturer recommendations
- Historical failure rates
- Operating conditions
- Criticality to production
- Use CMMS automation. Set up recurring work orders that:
- Generate automatically on schedule
- Include detailed task instructions
- Track completion rates
- Flag overdue items
- Monitor effectiveness. Track whether PMs prevent failures. Adjust frequency based on results—if you're finding nothing wrong during monthly inspections, try quarterly.
Solving the root cause of maintenance failures
Fixing the immediate problem might get equipment back online, but without addressing the underlying cause, that same issue is bound to resurface. Root cause analysis helps your team move past quick fixes and tackle the real reasons behind recurring failures.
Start by applying structured problem-solving methods to uncover the deeper causes behind recurring failures. Some of the most effective tools include:
- 5 Whys: Ask "why" repeatedly to drill down to the root cause
- Fishbone diagrams: Map out all contributing factors to visualize potential sources
- Failure mode analysis: Identify how specific components are likely to fail and why
For example, here’s how a 5 Whys process might pinpoint the reason a hydraulic pump keeps failing:
- Why? Contaminated fluid
- Why? Filter not changed
- Why? No PM schedule
- Why? Not identified as critical
- Solution: Add quarterly filter changes to your PM program
After you’ve uncovered the root cause of a failure, work towards implementing permanent fixes. This can involve:
- Updating procedures for operational problems
- Providing additional training for skill gaps
- Sourcing better parts/materials for wear issues


How teamwork and knowledge sharing boost troubleshooting
Maintenance is a team sport. When technicians share their experiences and document solutions, everyone benefits—new hires learn faster, problems get solved quicker, and critical knowledge doesn't walk out the door when experienced workers retire.
Here are some tips to foster an environment of teamwork and knowledge sharing across your maintenance team:
Foster collaboration:
- Hold brief problem-solving huddles for tough issues
- Share success stories in team meetings
- Create mentoring partnerships
- Document tribal knowledge
Build knowledge repositories:
- Use CMMS notes fields extensively
- Attach photos showing the proper assembly
- Create equipment-specific troubleshooting guides
Improve communication:
- Establish clear escalation procedures
- Use CMMS messaging to hand off maintenance information
- Create standard terminology for problems
- Share findings across facilities
Downtime is happening more and costing more. Only 21% of organizations report fewer unplanned outages, and 39% say those incidents are more expensive than they were last year. Troubleshooting speed and accuracy have never mattered more.
Mastering troubleshooting for long-term success
Effective maintenance troubleshooting combines systematic thinking, technical skills, and modern tools into a powerful problem-solving approach. By following our five-step process and leveraging CMMS capabilities for maintenance operations, you can minimize downtime impact and build long-term reliability.
Remember: Every problem solved is a learning opportunity. Document your findings, share your knowledge, and continuously refine your approach. As equipment ages and skilled workers retire, these troubleshooting fundamentals become even more critical.
The teams that master troubleshooting today will lead the maintenance organizations of tomorrow. Start implementing these techniques, invest in the right tools, and watch your downtime decrease while your team's capabilities soar.
Looking to take your maintenance strategy even further? Explore our guide on how to build an effective preventive maintenance schedule. It’s packed with actionable tips to help your team stay ahead of breakdowns and keep critical assets performing at their best.
Frequently asked questions
What are the key steps in maintenance troubleshooting?
Follow these five steps: (1) Identify the problem by gathering operator input and observing symptoms, (2) Gather information from manuals, maintenance history, and sensor data, (3) Isolate the root cause through systematic testing, (4) Test solutions one at a time, and (5) Implement the fix and verify full functionality. Document everything in your CMMS for future reference.
How can CMMS software assist in maintenance troubleshooting?
A CMMS accelerates troubleshooting by providing instant access to equipment history, manuals, and past solutions. Technicians can search previous work orders to find how similar issues were resolved, view real-time sensor data, and collaborate with specialists remotely.
What are common signs of mechanical or electrical problems I should look for?
For mechanical issues, watch for unusual vibrations, grinding noises, fluid leaks, excessive heat, or visible wear. Electrical problems often present as equipment not powering on, intermittent operation, tripped breakers, or error codes. Burning smells indicate immediate attention is needed for both electrical and mechanical issues.

The MaintainX team is made up of maintenance and manufacturing experts. They’re here to share industry knowledge, explain product features, and help workers get more done with MaintainX!


.webp)