


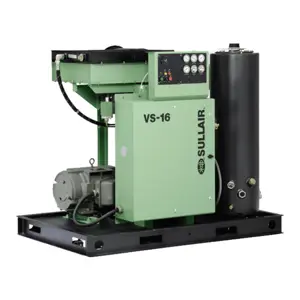
Sullair Rotary Vacuum System VS16 40HP: Encl
Need answers fast?
Explore the manual using AI.

Turn manuals into instant answers
with your AI-powered assistantTurn manuals into instant answers
with your AI-powered assistant
Complete asset maintenance, one click away
Get instant access to all the maintenance information you need. Empower technicians to perform preventive maintenance with asset packages, ready to use right out of the box.

Documents & Manuals
Find all the essential guides in one place.
 Tensioning Guide
- Belt-diagram
- C-120 pulleys
+ 13 more

Work Order Templates
Pre-built workflows to keep your asset running smoothly.
- Daily Electrical System Inspection
- Replace Roller and Pulley
- Install Engine B-120
+ 29 more

Procedures
Integrate maintenance plans directly into your work orders.
- Motion Industries
- Applied Industrial Technologies
- Electrical Brothers
+ 5 more

Parts
Access the parts list for your equipment in MaintainX.
- Drive Motor
- B2 Rollers
- Tensioning System
+ 40 more
Sullair Rotary Vacuum System VS16 40HP: Encl
Create an account to install this asset package.
Maintenance Plans for Sullair Rotary Vacuum System Model VS16 40HP: Encl
Integrate maintenance plans directly into your work orders in MaintainX.
1 Yearly Separator Element Replacement - 30-40HP/ 22-30KW
SEPARATOR ELEMENT REPLACEMENT - 30-40HP/ 22-30KW
Refer to Figure 6-3A. The separator elements) must be changed when required by the maintenance gauge or once a year, whichever occurs first.
Relieve all pressure from the sump tank.
Disconnect all piping connected to the sump cover to allow removal of return lines, discharge lines, etc.
Loosen and remove the twelve (12) hex head capscrews from the cover plate.
Lift the cover plate from the sump.
Remove the element(s).
Inspect the receiver/sump tank for rust, dirt, etc.
Scrape the old gasket material from the cover and the flange on the sump. Be careful not to let the scraps fall in the sump.

Control System Adjustment
Refer to Figure 6-4. Prior to adjusting the Control System, it is necessary to determine the desired operating vacuum range.
Enter the desired operating vacuum in in-Hg.
The vacuum regulator should be adjusted for the vacuum at which modulation of gas delivery should begin.
Is the jam nut on the end of the cone shaped spring cover of the vacuum regulator loose?
When the jam nut is loose, turn the adjusting screw clockwise to increase or counterclockwise to decrease the setting.
Enter the vacuum at which the regulator allows atmospheric pressure to flow into the control chamber of the Sullicon Control in in-Hg.
Did the Sullicon Control lever start to move?
If the vacuum unit is equipped with the optional dual control, the vacuum switch contacts should open at 23 in-Hg. (584mm) and reclose at 20 in-Hg. (508mm).
Sign off on the control system adjustment
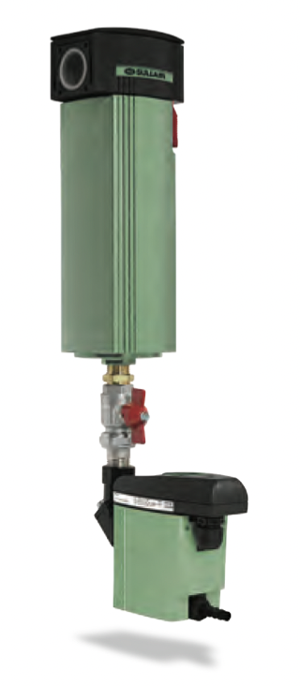
6 Monthly Inlet Filter Maintenance
INLET FILTER MAINTENANCE
Refer to Figure 6-2. Inlet filter maintenance should be performed under any of the following conditions, whichever occurs first.
1. As indicated by the filter maintenance gauges.
2. Every six (6) months.
Following, you will find procedures on how to replace and clean the air filter element.
INLET FILTER ELEMENT REPLACEMENT
1. Clean exterior of air filter housing.
2. Remove the inlet filter cover by loosening the wing nuts securing the cover.
3. Remove element and clean the base and interior of cover using a damp cloth. DO NOT blow dirt out with compressed air.
Filter Element Replacement
6.7 PARTS REPLACEMENT AND ADJUSTMENT PROCEDURES
FILTER ELEMENT REPLACEMENT
Refer to Figure 6-1.
Using a strap wrench, remove the old element and gasket.
Clean the gasket seating surface.
Apply a light film of fluid to the new gasket.
Hand tighten the new element until the new gasket is seated in the gasket groove.
Continue tightening element by hand an additional 1/2 to 3/4 turn.
Restart the machine and check for leaks.
Initial 50 Hours Vacuum System Maintenance
Maintenance after initial 50 hours of operation
Clean the return line strainer(s)
Clean the return line orifice(s) if so equipped
Clean the vacuum unit gear housing, bearing and shaft seal orifices
Warning: Care must be taken not to damage the shaft
Clean the fluid pump suction strainer
Sign off on the maintenance completion
Parts for Sullair Rotary Vacuum System VS16 40HP: Encl
Access the parts list for your equipment in MaintainX.
Vacuum Gauge
250042-041
Inlet Filter
250024-659
Vacuum Switch
02250164-176
Inlet Check Valve
250028-224
Butterfly Valve
040640
Vacuum Gauge
250042-041
Inlet Filter
250024-659
Vacuum Switch
02250164-176
Inlet Check Valve
250028-224
Butterfly Valve
040640
Vacuum Gauge
250042-041
Inlet Filter
250024-659
Vacuum Switch
02250164-176
Inlet Check Valve
250028-224
Butterfly Valve
040640
Unlock efficiency
with MaintainX CoPilot
MaintainX CoPilot is your expert colleague, on call 24/7, helping your team find the answers they need to keep equipment running.
Reduce Unplanned Downtime
Ensure your team follows consistent procedures to minimize equipment failures and costly delays.
Maximize Asset Availability
Keep your assets running longer and more reliably, with standardized maintenance workflows from OEM manuals.
Lower Maintenance Costs
Turn any technician into an expert to streamline operations, maintain more assets, and reduce overall costs.
Thousands of companies manage their assets with MaintainX

'%3e%3cpath%20fill='url(%23b)'%20d='M66.008%2080.068c-5.084-.786-9.763-3.834-12.442-8.68a16.942%2016.942%200%200%201-1.87-5.18c1.096.19%202.203.476%203.298.87%206.525%202.333%2010.836%207.68%2011.014%2012.99ZM51.47%2061.576c.488-5.524%203.62-10.716%208.847-13.597a17.132%2017.132%200%200%201%2011.335-1.882c-.798%208.145-7.43%2014.848-16.038%2015.599-1.417.119-2.799.07-4.144-.12Zm28.564-11.478a17.513%2017.513%200%200%201%203.727%204.62c4.608%208.335%201.584%2018.813-6.75%2023.409a16.988%2016.988%200%200%201-4.359%201.679%2019.624%2019.624%200%200%201-3.977-12.776c.346-7.561%204.942-13.931%2011.36-16.932Z'/%3e%3cpath%20fill='%23110F0D'%20fill-rule='evenodd'%20d='M142.831%2048.324h4.977V77.03h-4.977V48.324Zm27.278%2013.002c.322%201.048.453%202.263.453%203.62v12.073h-4.787V66.208c0-.75-.047-1.572-.154-2.143-.453-2.382-1.822-3.572-4.215-3.572-2.31%200-3.882%201.274-4.43%203.476-.143.596-.226%201.405-.226%202.25v10.8h-4.787V56.623h4.477v2.989c1.536-2.5%203.906-3.43%206.371-3.43%203.488%200%206.263%201.68%207.298%205.144Zm24.636%207.323c0%203.882-2.358%206.525-5.763%207.727-1.298.453-2.632.643-4.62.643h-10.169V48.324h9.085c1.691%200%203.156.143%204.049.38%203.465.93%205.727%203.68%205.727%207.335%200%202.441-.81%204.156-2.762%205.644%202.905%201.417%204.453%203.727%204.453%206.966Zm-15.634-8.656h4.584c1.024%200%201.917-.143%202.536-.417%201.215-.548%201.905-1.608%201.905-3.167%200-1.548-.643-2.572-1.845-3.132-.691-.31-1.762-.452-2.763-.452h-4.417v7.168Zm10.716%208.465c0-1.536-.893-3.37-3.227-3.893-.428-.095-1.036-.143-1.571-.143h-5.918v8.085h5.501c.56%200%201.429-.048%201.953-.167%201.94-.453%203.262-1.846%203.262-3.882Zm47.747-11.847-8.097%2020.408h-4.429l-8.109-20.408h5.191l5.192%2014.574%205.108-14.574h5.144Zm-20.218%2010.002c0%20.69-.036%201.262-.155%201.94h-15.943c.631%202.87%202.714%204.728%205.882%204.728%202.131%200%203.607-.882%204.703-2.525h4.87c-1.762%204.144-5.204%206.692-9.657%206.692-6.084%200-10.537-4.858-10.537-10.49%200-6.108%204.524-10.776%2010.335-10.776%206.239%200%2010.442%204.954%2010.502%2010.43Zm-4.763-1.405c-.333-2.846-2.643-4.858-5.691-4.858-2.894%200-5.287%201.929-5.621%204.858h11.312Zm-72.667%203.44c0%204.787-3.287%208.371-9.419%208.371H119.363V64.66c-1.917.274-3.87.69-5.811%201.238l4.537%2011.121h-5.418l-3.596-9.585c-5.144%202.084-10.085%205.216-14.217%209.585h-4.786L101.8%2048.312h4.56l5.68%2013.883a44.112%2044.112%200%200%201%207.323-1.774V48.312h9.084c1.703%200%203.156.143%204.061.393%203.453.929%205.727%203.667%205.727%207.323%200%201.917-.738%204.179-2.81%205.691%203.06%201.56%204.501%204.025%204.501%206.93Zm-15.634-8.667a62.664%2062.664%200%200%201%202.06-.036c1.703.012%203.239.131%204.608.37%201.441-.549%202.357-1.727%202.357-3.537%200-1.941-.881-3.144-2.488-3.667-.548-.18-1.358-.286-2.322-.286h-4.215v7.156Zm-16.55%203.905-3.715-9.894-6.394%2016.502c2.833-2.595%206.263-4.858%2010.109-6.608Zm27.254%204.74c0-2.775-3.131-4.347-8.513-4.418-.715%200-1.441.011-2.191.047v8.252h5.918c2.548%200%204.786-1.37%204.786-3.882Z'%20clip-rule='evenodd'/%3e%3c/g%3e%3cdefs%3e%3clinearGradient%20id='b'%20x1='51.47'%20x2='85.916'%20y1='62.946'%20y2='62.946'%20gradientUnits='userSpaceOnUse'%3e%3cstop%20stop-color='%23CD9F28'/%3e%3cstop%20offset='1'%20stop-color='%23ECD80B'/%3e%3c/linearGradient%3e%3cclipPath%20id='a'%3e%3cpath%20fill='%23fff'%20d='M51.47%2045.728h186.104V80.14H51.47z'/%3e%3c/clipPath%3e%3c/defs%3e%3c/svg%3e)


More from Sullair


Explore Other Assets


© 2026 MaintainX. All rights reserved.