


Caterpillar Skid Steer Loader 259B3
Need answers fast?
Explore the manual using AI.
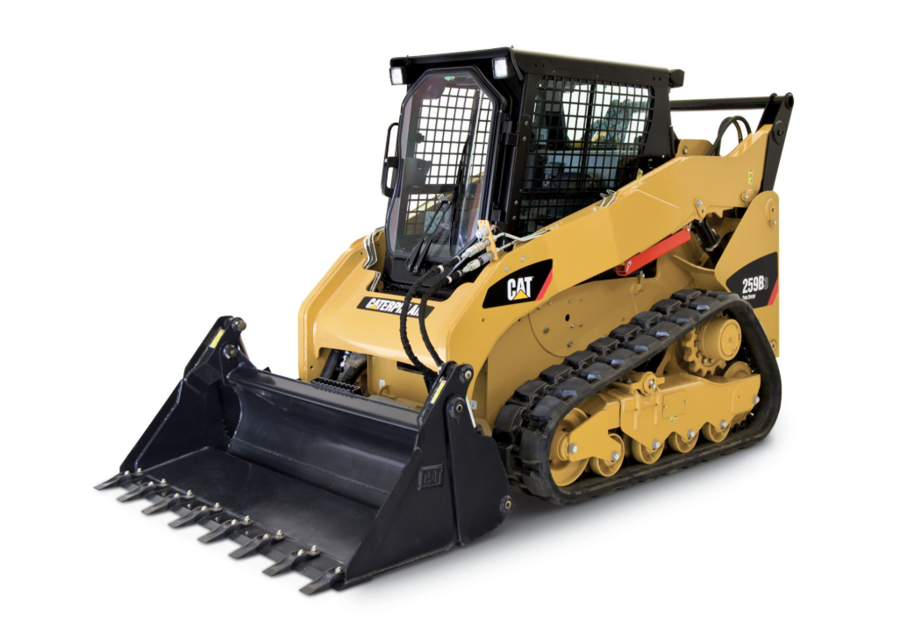
The Caterpillar Skid Steer Loader 259B3 is a versatile and powerful machine designed for various construction and landscaping tasks. Known for its compact size and exceptional maneuverability, this loader excels in tight spaces while delivering impressive performance and reliability. Ideal for both residential and commercial applications, the 259B3 is a trusted choice for operators seeking efficiency and durability.
Turn manuals into instant answers
with your AI-powered assistantTurn manuals into instant answers
with your AI-powered assistant
Manual for Caterpillar Skid Steer Loader 259B3
Complete asset maintenance, one click away
Get instant access to all the maintenance information you need. Empower technicians to perform preventive maintenance with asset packages, ready to use right out of the box.

Documents & Manuals
Find all the essential guides in one place.
 Tensioning Guide
- Belt-diagram
- C-120 pulleys
+ 13 more

Work Order Templates
Pre-built workflows to keep your asset running smoothly.
- Daily Electrical System Inspection
- Replace Roller and Pulley
- Install Engine B-120
+ 29 more

Procedures
Integrate maintenance plans directly into your work orders.
- Motion Industries
- Applied Industrial Technologies
- Electrical Brothers
+ 5 more

Parts
Access the parts list for your equipment in MaintainX.
- Drive Motor
- B2 Rollers
- Tensioning System
+ 40 more
Caterpillar Skid Steer Loader 259B3
Create an account to install this asset package.
Maintenance Plans for Caterpillar Skid Steer Loader Model 259B3
Integrate maintenance plans directly into your work orders in MaintainX.
250 Hourly Skid Steer Loader Maintenance
Final Drive Oil Level - Check
1. Position one final drive so that the oil fill/drain plug (1) is at the top.
Note: Refer to Operation and Maintenance Manual, “General Hazard Information” for information on Containing Fluid Spillage.
2. Use an 8 mm (5/16 inch) allen wrench. Remove the oil check plug (2).
3. Check the oil level. The oil should be near the bottom of the opening fo the oil check plug (2).
4. Add oil through the opening for the oil fill/drain plug (1), if necessary.
Note: Overfilling the final drive will cause the seals on the travel motor to allow hydraulic oil or water to enter the final drive. This may contaminate the final drive.
5. Clean the oil plugs.
6. Install the oil plugs. Tighten the oil plugs to a torque of 27 ± 1 N·m (20 ± 0.7 lb ft).

12000 Hourly / 6 Yearly Skid Steer Loader Maintenance
WARNING: Pressurized system: Hot coolant can cause serious burn. To open cap, stop engine, wait until radiator is cool. Then loosen cap slowly to relieve the pressure.
NOTICE: Mixing ELC with other products will reduce the effectiveness of the coolant. This could result in damage to cooling system components.
Note: The machine was shipped from the factory with Extended Life Coolant (ELC) in the cooling system.
Drain the coolant whenever the coolant is dirty or whenever the coolant is foaming.
Machine cooled down before coolant change?
Engine access door opened?
Radiator guard raised?
Radiator cap loosened slowly to relieve system pressure?
Drain plug removed or drain valve opened and coolant drained into a suitable container?
1000 Hourly / 6 Monthly Skid Steer Loader Maintenance
Drive Chain Case Oil - Change
The plugs for the drive chain cases as the plugs are viewed from the underside of the machine.
1. Remove the drain plug for the left drive chain case and the right drive chain case. Allow the oil to drain into a suitable container.
2. Apply 169-5464 Quick Cure Primer and 5P-3413 Pipe Sealant to the threads on the drain plugs. Install the drain plugs.
3. Remove the filler plug for the right side drive chain case. Fill the drive chain case with oil to the bottom of the threads on the fill port. Refer to Operation and Maintenance Manual, “Lubricant Viscosities” and Operation and Maintenance Manual, “Refill Capacities”.
4. Apply 169-5464 Quick Cure Primer and 5P-3413 Pipe Sealant to the threads on the filler plug. Install the filler plug.
5. Repeat the process for the left side drive chain case.
Drive Chain Case Breathers
The breathers for the drive chain cases are located underneath the cab (1). Refer to Operation and Maintenance Manual, “Cab Tilting”.
When Required Skid Steer Loader Maintenance
Air Conditioner Condenser - Clean
WARNING:
Personal injury can result from air pressure.
Personal injury can result without following proper procedure. When using pressure air, wear a protective face shield and protective clothing.
Maximum air pressure at the nozzle must be less than 205 kPa (30 psi) for cleaning purposes.
The air conditioner condenser is located behind the engine on the frame.
Open the engine access door.
Inspect the air conditioner condenser for the following conditions:
• Damaged fins
2000 Hourly / 1 Yearly Skid Steer Loader Maintenance
Fuel Injection Timing - Check
Fuel timing specification from the Engine Information Plate
Hydraulic System Oil - Change
Oil Change Interval
Oil Type
Oil Filters
Oil filter change interval
Monitoring the Condition of the Oil
Oil sampling program used
Parts for Caterpillar Skid Steer Loader 259B3
Access the parts list for your equipment in MaintainX.
Multipurpose Bucket with Bolt On Edge and Debris Guard 1981 mm
325-7070
General Purpose Bucket 1981 mm
279-5376
General Purpose Bucket 1524 mm
279-5364
Multipurpose Bucket with Bolt On Edge and Debris Guard 1676 mm
325-7050
Dirt Bucket with Bolt On Edge 1524 mm
152-0231
Multipurpose Bucket with Bolt On Edge and Debris Guard 1981 mm
325-7070
General Purpose Bucket 1981 mm
279-5376
General Purpose Bucket 1524 mm
279-5364
Multipurpose Bucket with Bolt On Edge and Debris Guard 1676 mm
325-7050
Dirt Bucket with Bolt On Edge 1524 mm
152-0231
Multipurpose Bucket with Bolt On Edge and Debris Guard 1981 mm
325-7070
General Purpose Bucket 1981 mm
279-5376
General Purpose Bucket 1524 mm
279-5364
Multipurpose Bucket with Bolt On Edge and Debris Guard 1676 mm
325-7050
Dirt Bucket with Bolt On Edge 1524 mm
152-0231
Unlock efficiency
with MaintainX CoPilot
MaintainX CoPilot is your expert colleague, on call 24/7, helping your team find the answers they need to keep equipment running.
Reduce Unplanned Downtime
Ensure your team follows consistent procedures to minimize equipment failures and costly delays.
Maximize Asset Availability
Keep your assets running longer and more reliably, with standardized maintenance workflows from OEM manuals.
Lower Maintenance Costs
Turn any technician into an expert to streamline operations, maintain more assets, and reduce overall costs.
Thousands of companies manage their assets with MaintainX

'%3e%3cpath%20fill='url(%23b)'%20d='M66.008%2080.068c-5.084-.786-9.763-3.834-12.442-8.68a16.942%2016.942%200%200%201-1.87-5.18c1.096.19%202.203.476%203.298.87%206.525%202.333%2010.836%207.68%2011.014%2012.99ZM51.47%2061.576c.488-5.524%203.62-10.716%208.847-13.597a17.132%2017.132%200%200%201%2011.335-1.882c-.798%208.145-7.43%2014.848-16.038%2015.599-1.417.119-2.799.07-4.144-.12Zm28.564-11.478a17.513%2017.513%200%200%201%203.727%204.62c4.608%208.335%201.584%2018.813-6.75%2023.409a16.988%2016.988%200%200%201-4.359%201.679%2019.624%2019.624%200%200%201-3.977-12.776c.346-7.561%204.942-13.931%2011.36-16.932Z'/%3e%3cpath%20fill='%23110F0D'%20fill-rule='evenodd'%20d='M142.831%2048.324h4.977V77.03h-4.977V48.324Zm27.278%2013.002c.322%201.048.453%202.263.453%203.62v12.073h-4.787V66.208c0-.75-.047-1.572-.154-2.143-.453-2.382-1.822-3.572-4.215-3.572-2.31%200-3.882%201.274-4.43%203.476-.143.596-.226%201.405-.226%202.25v10.8h-4.787V56.623h4.477v2.989c1.536-2.5%203.906-3.43%206.371-3.43%203.488%200%206.263%201.68%207.298%205.144Zm24.636%207.323c0%203.882-2.358%206.525-5.763%207.727-1.298.453-2.632.643-4.62.643h-10.169V48.324h9.085c1.691%200%203.156.143%204.049.38%203.465.93%205.727%203.68%205.727%207.335%200%202.441-.81%204.156-2.762%205.644%202.905%201.417%204.453%203.727%204.453%206.966Zm-15.634-8.656h4.584c1.024%200%201.917-.143%202.536-.417%201.215-.548%201.905-1.608%201.905-3.167%200-1.548-.643-2.572-1.845-3.132-.691-.31-1.762-.452-2.763-.452h-4.417v7.168Zm10.716%208.465c0-1.536-.893-3.37-3.227-3.893-.428-.095-1.036-.143-1.571-.143h-5.918v8.085h5.501c.56%200%201.429-.048%201.953-.167%201.94-.453%203.262-1.846%203.262-3.882Zm47.747-11.847-8.097%2020.408h-4.429l-8.109-20.408h5.191l5.192%2014.574%205.108-14.574h5.144Zm-20.218%2010.002c0%20.69-.036%201.262-.155%201.94h-15.943c.631%202.87%202.714%204.728%205.882%204.728%202.131%200%203.607-.882%204.703-2.525h4.87c-1.762%204.144-5.204%206.692-9.657%206.692-6.084%200-10.537-4.858-10.537-10.49%200-6.108%204.524-10.776%2010.335-10.776%206.239%200%2010.442%204.954%2010.502%2010.43Zm-4.763-1.405c-.333-2.846-2.643-4.858-5.691-4.858-2.894%200-5.287%201.929-5.621%204.858h11.312Zm-72.667%203.44c0%204.787-3.287%208.371-9.419%208.371H119.363V64.66c-1.917.274-3.87.69-5.811%201.238l4.537%2011.121h-5.418l-3.596-9.585c-5.144%202.084-10.085%205.216-14.217%209.585h-4.786L101.8%2048.312h4.56l5.68%2013.883a44.112%2044.112%200%200%201%207.323-1.774V48.312h9.084c1.703%200%203.156.143%204.061.393%203.453.929%205.727%203.667%205.727%207.323%200%201.917-.738%204.179-2.81%205.691%203.06%201.56%204.501%204.025%204.501%206.93Zm-15.634-8.667a62.664%2062.664%200%200%201%202.06-.036c1.703.012%203.239.131%204.608.37%201.441-.549%202.357-1.727%202.357-3.537%200-1.941-.881-3.144-2.488-3.667-.548-.18-1.358-.286-2.322-.286h-4.215v7.156Zm-16.55%203.905-3.715-9.894-6.394%2016.502c2.833-2.595%206.263-4.858%2010.109-6.608Zm27.254%204.74c0-2.775-3.131-4.347-8.513-4.418-.715%200-1.441.011-2.191.047v8.252h5.918c2.548%200%204.786-1.37%204.786-3.882Z'%20clip-rule='evenodd'/%3e%3c/g%3e%3cdefs%3e%3clinearGradient%20id='b'%20x1='51.47'%20x2='85.916'%20y1='62.946'%20y2='62.946'%20gradientUnits='userSpaceOnUse'%3e%3cstop%20stop-color='%23CD9F28'/%3e%3cstop%20offset='1'%20stop-color='%23ECD80B'/%3e%3c/linearGradient%3e%3cclipPath%20id='a'%3e%3cpath%20fill='%23fff'%20d='M51.47%2045.728h186.104V80.14H51.47z'/%3e%3c/clipPath%3e%3c/defs%3e%3c/svg%3e)


More from Caterpillar


Explore Other Assets


© 2026 MaintainX. All rights reserved.