


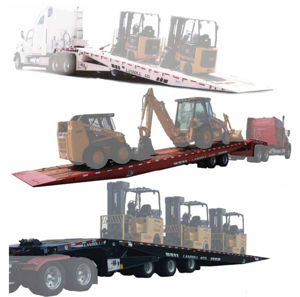
Landoll Axle Trailer 455-53'
Need answers fast?
Explore the manual using AI.

Turn manuals into instant answers
with your AI-powered assistantTurn manuals into instant answers
with your AI-powered assistant
Manual for Landoll Axle Trailer 455-53'
Complete asset maintenance, one click away
Get instant access to all the maintenance information you need. Empower technicians to perform preventive maintenance with asset packages, ready to use right out of the box.

Documents & Manuals
Find all the essential guides in one place.
 Tensioning Guide
- Belt-diagram
- C-120 pulleys
+ 13 more

Work Order Templates
Pre-built workflows to keep your asset running smoothly.
- Daily Electrical System Inspection
- Replace Roller and Pulley
- Install Engine B-120
+ 29 more

Procedures
Integrate maintenance plans directly into your work orders.
- Motion Industries
- Applied Industrial Technologies
- Electrical Brothers
+ 5 more

Parts
Access the parts list for your equipment in MaintainX.
- Drive Motor
- B2 Rollers
- Tensioning System
+ 40 more
Landoll Axle Trailer 455-53'
Create an account to install this asset package.
Maintenance Plans for Landoll Axle Trailer Model 455-53'
Integrate maintenance plans directly into your work orders in MaintainX.
Caging the Power Spring Maintenance
Chock the trailer wheels
Remove dust cap from spring brake chamber
Remove the release bolt from its holding brackets and insert it into the spring brake chamber
DO NOT USE AN IMPACT WRENCH TO CAGE THE SPRING BRAKE
Turn the bolt until the spring brake is caged. This should be 2-1/4 to 2-1/2 inches of release bolt extension
The brakes should now be totally released. Do not operate loaded trailer with brake manually released
To reset the spring brake, turn the release bolt until the spring is released. Remove the release bolt and store it in its brackets
Snap the dust cap back in place on the chamber
Sign off on the caging the power spring maintenance

Brake Assembly Maintenance
Warning: Do not allow grease to contact brake linings as this could result in reduced braking performance.
Brake linings visually inspected
Measure the thinnest portion of the lining
Is the thinnest portion of the lining 3/8 in. (9.5 mm) or less?
Did the lining rivet contact the drum?
Upload a photo of the brake assembly
Brake assembly lubricated
Sign off on the brake assembly maintenance
Initial 5 Hours / 50 Mi Axle Trailer Maintenance
LIGHTS Inspect
WIRING AND CONNECTIONS Inspect
FASTENERS Inspect
FASTENERS Tighten/Adjust Torque
KING PIN AND PLATE Inspect
BRAKE AIR SYSTEM Inspect
BRAKE ADJ & WEAR Inspect
SLACK ADJUSTERS Inspect
CAMSHAFT ASSEMBLIES Inspect
200 Hourly Axle Trailer Maintenance
Air cleaner element replaced?
Perform more often when running under severe operating conditions.
Fuel filter replaced?
Check valve clearance (standard engines)
For detailed maintenance, contact a Service Center or refer to the SERVICE MANUAL.
Clean carbon more frequently when running under continuous light load and/or on leaded fuel.
Use of carburetor and combustion cleaner is recommended every 200 hours to help reduce carbon buildup. Used?
Sign off on the 200 Hourly Axle Trailer Maintenance
Fifth Wheel Latch Adjustment
WARNING: Stand clear of fifth wheel plate when prying it down. Falling plate could cause serious injury.
To adjust fifth wheel latch assembly, support fifth wheel plate and adjust rear nut until the cam just touches the flat surface on the latch (See Figure 4-2.)
Enter the spring compression measurement
IMPORTANT: To check the tension on the latch, place a pry bar between the fifth wheel plate and the backing plate and pry down until the latch release. If it releases too easily, tighten the spring tension. If you are unable to trip it, back off the spring tension until you are able to trip the release.
Did the latch release properly?
WARNING: Too much tension will cause excessive wear on the release and possibly bend the latch rod.
Sign off on the fifth wheel latch adjustment
Unlock efficiency
with MaintainX CoPilot
MaintainX CoPilot is your expert colleague, on call 24/7, helping your team find the answers they need to keep equipment running.
Reduce Unplanned Downtime
Ensure your team follows consistent procedures to minimize equipment failures and costly delays.
Maximize Asset Availability
Keep your assets running longer and more reliably, with standardized maintenance workflows from OEM manuals.
Lower Maintenance Costs
Turn any technician into an expert to streamline operations, maintain more assets, and reduce overall costs.
Thousands of companies manage their assets with MaintainX

'%3e%3cpath%20fill='url(%23b)'%20d='M66.008%2080.068c-5.084-.786-9.763-3.834-12.442-8.68a16.942%2016.942%200%200%201-1.87-5.18c1.096.19%202.203.476%203.298.87%206.525%202.333%2010.836%207.68%2011.014%2012.99ZM51.47%2061.576c.488-5.524%203.62-10.716%208.847-13.597a17.132%2017.132%200%200%201%2011.335-1.882c-.798%208.145-7.43%2014.848-16.038%2015.599-1.417.119-2.799.07-4.144-.12Zm28.564-11.478a17.513%2017.513%200%200%201%203.727%204.62c4.608%208.335%201.584%2018.813-6.75%2023.409a16.988%2016.988%200%200%201-4.359%201.679%2019.624%2019.624%200%200%201-3.977-12.776c.346-7.561%204.942-13.931%2011.36-16.932Z'/%3e%3cpath%20fill='%23110F0D'%20fill-rule='evenodd'%20d='M142.831%2048.324h4.977V77.03h-4.977V48.324Zm27.278%2013.002c.322%201.048.453%202.263.453%203.62v12.073h-4.787V66.208c0-.75-.047-1.572-.154-2.143-.453-2.382-1.822-3.572-4.215-3.572-2.31%200-3.882%201.274-4.43%203.476-.143.596-.226%201.405-.226%202.25v10.8h-4.787V56.623h4.477v2.989c1.536-2.5%203.906-3.43%206.371-3.43%203.488%200%206.263%201.68%207.298%205.144Zm24.636%207.323c0%203.882-2.358%206.525-5.763%207.727-1.298.453-2.632.643-4.62.643h-10.169V48.324h9.085c1.691%200%203.156.143%204.049.38%203.465.93%205.727%203.68%205.727%207.335%200%202.441-.81%204.156-2.762%205.644%202.905%201.417%204.453%203.727%204.453%206.966Zm-15.634-8.656h4.584c1.024%200%201.917-.143%202.536-.417%201.215-.548%201.905-1.608%201.905-3.167%200-1.548-.643-2.572-1.845-3.132-.691-.31-1.762-.452-2.763-.452h-4.417v7.168Zm10.716%208.465c0-1.536-.893-3.37-3.227-3.893-.428-.095-1.036-.143-1.571-.143h-5.918v8.085h5.501c.56%200%201.429-.048%201.953-.167%201.94-.453%203.262-1.846%203.262-3.882Zm47.747-11.847-8.097%2020.408h-4.429l-8.109-20.408h5.191l5.192%2014.574%205.108-14.574h5.144Zm-20.218%2010.002c0%20.69-.036%201.262-.155%201.94h-15.943c.631%202.87%202.714%204.728%205.882%204.728%202.131%200%203.607-.882%204.703-2.525h4.87c-1.762%204.144-5.204%206.692-9.657%206.692-6.084%200-10.537-4.858-10.537-10.49%200-6.108%204.524-10.776%2010.335-10.776%206.239%200%2010.442%204.954%2010.502%2010.43Zm-4.763-1.405c-.333-2.846-2.643-4.858-5.691-4.858-2.894%200-5.287%201.929-5.621%204.858h11.312Zm-72.667%203.44c0%204.787-3.287%208.371-9.419%208.371H119.363V64.66c-1.917.274-3.87.69-5.811%201.238l4.537%2011.121h-5.418l-3.596-9.585c-5.144%202.084-10.085%205.216-14.217%209.585h-4.786L101.8%2048.312h4.56l5.68%2013.883a44.112%2044.112%200%200%201%207.323-1.774V48.312h9.084c1.703%200%203.156.143%204.061.393%203.453.929%205.727%203.667%205.727%207.323%200%201.917-.738%204.179-2.81%205.691%203.06%201.56%204.501%204.025%204.501%206.93Zm-15.634-8.667a62.664%2062.664%200%200%201%202.06-.036c1.703.012%203.239.131%204.608.37%201.441-.549%202.357-1.727%202.357-3.537%200-1.941-.881-3.144-2.488-3.667-.548-.18-1.358-.286-2.322-.286h-4.215v7.156Zm-16.55%203.905-3.715-9.894-6.394%2016.502c2.833-2.595%206.263-4.858%2010.109-6.608Zm27.254%204.74c0-2.775-3.131-4.347-8.513-4.418-.715%200-1.441.011-2.191.047v8.252h5.918c2.548%200%204.786-1.37%204.786-3.882Z'%20clip-rule='evenodd'/%3e%3c/g%3e%3cdefs%3e%3clinearGradient%20id='b'%20x1='51.47'%20x2='85.916'%20y1='62.946'%20y2='62.946'%20gradientUnits='userSpaceOnUse'%3e%3cstop%20stop-color='%23CD9F28'/%3e%3cstop%20offset='1'%20stop-color='%23ECD80B'/%3e%3c/linearGradient%3e%3cclipPath%20id='a'%3e%3cpath%20fill='%23fff'%20d='M51.47%2045.728h186.104V80.14H51.47z'/%3e%3c/clipPath%3e%3c/defs%3e%3c/svg%3e)


More from Landoll


Explore Other Assets


© 2026 MaintainX. All rights reserved.