


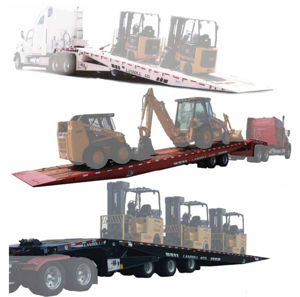
Landoll Axle Trailer 455
Need answers fast?
Explore the manual using AI.

Turn manuals into instant answers
with your AI-powered assistantTurn manuals into instant answers
with your AI-powered assistant
Manual for Landoll Axle Trailer 455
Complete asset maintenance, one click away
Get instant access to all the maintenance information you need. Empower technicians to perform preventive maintenance with asset packages, ready to use right out of the box.

Documents & Manuals
Find all the essential guides in one place.
 Tensioning Guide
- Belt-diagram
- C-120 pulleys
+ 13 more

Work Order Templates
Pre-built workflows to keep your asset running smoothly.
- Daily Electrical System Inspection
- Replace Roller and Pulley
- Install Engine B-120
+ 29 more

Procedures
Integrate maintenance plans directly into your work orders.
- Motion Industries
- Applied Industrial Technologies
- Electrical Brothers
+ 5 more

Parts
Access the parts list for your equipment in MaintainX.
- Drive Motor
- B2 Rollers
- Tensioning System
+ 40 more
Landoll Axle Trailer 455
Create an account to install this asset package.
Maintenance Plans for Landoll Axle Trailer Model 455
Integrate maintenance plans directly into your work orders in MaintainX.
Stabilizer Leg Valve Check
Remove lock valve as described in step 2 of “Leg” on page 4-33
Remove retaining plug (See Figure 4-22)
Remove o-ring plug opposite retaining plug on rectangular block
Using a drift small enough to fit through the port opened in the previous step, tap out the lock valve cartridges
Install new lock valve cartridges back to back (as illustrated). Grease o-rings
Install two new o-rings and two back-up washers on retaining plug
Thread retaining plug into body (tap gently to engage threads). Torque plug to 15 ft.lbs
Install new o-ring on plug, opposite retaining plug. Thread plug into body. Torque to 70 in.lbs
Replace spring and poppet. Replace the o-ring on plug and reinstall

Spring Air Brake Chamber Maintenance
Warning: The spring brake chamber employs a spring with high forces. Service should not be attempted. Serious injury or death may result.
Check for faulty units
Check the condensation holes on the underside of the brake chambers to make sure they are open
The spring brake has two brake chambers, a service chamber and an emergency chamber or spring chamber.
Service brake chambers disassembled and cleaned
The diaphragm and any marginal parts replaced
When replacing the service diaphragm, replaced the corresponding parts for the other chamber on the same axle (to aid in even brake application and release)
Examine yoke pin for wear and replace as necessary
The spring chamber should not be serviced.
Triple Axle Air Ride Height Adjustment
Before adjusting, the vehicle must be empty with the kingpin at operating height and have air supplied to the trailer.
Disconnect linkage at all three control arms and raise the center axle control arm to the “up” position
Raise the trailer until a spacer block can be placed between axle tube and undercarriage frame
Lower the trailer by exhausting air from the air springs by moving the control arm to the “down” position until the axle tube is resting on the block
Return the control arms slowly to the center position
Insert wood locating pins into the adjusting block and bracket on the height control valves
Loosen the 1/4” adjusting lock nuts located on the adjusting blocks
Reconnect the linkages and torque to 24-48 inch lbs
Retighten the 1/4” adjusting lock nuts at the adjusting blocks to 24-48 in. lbs
Initial 5 Hours / 50 Mi Axle Trailer Maintenance
LIGHTS Inspect
WIRING AND CONNECTIONS Inspect
FASTENERS Inspect
FASTENERS Tighten/Adjust Torque
KING PIN AND PLATE Inspect
BRAKE AIR SYSTEM Inspect
BRAKE ADJ & WEAR Inspect
SLACK ADJUSTERS Inspect
CAMSHAFT ASSEMBLIES Inspect
200 Hourly Axle Trailer Maintenance
Air cleaner element replaced?
Fuel filter replaced?
Valve clearance checked?
For detailed maintenance, contact a Service Center or refer to the SERVICE MANUAL.
Carbon cleaned?
Clean carbon more frequently when running under continuous light load and/or on leaded fuel. Use of carburetor and combustion cleaner is recommended every 200 hours to help reduce carbon buildup.
Sign off on the 200 Hourly Axle Trailer Maintenance
Unlock efficiency
with MaintainX CoPilot
MaintainX CoPilot is your expert colleague, on call 24/7, helping your team find the answers they need to keep equipment running.
Reduce Unplanned Downtime
Ensure your team follows consistent procedures to minimize equipment failures and costly delays.
Maximize Asset Availability
Keep your assets running longer and more reliably, with standardized maintenance workflows from OEM manuals.
Lower Maintenance Costs
Turn any technician into an expert to streamline operations, maintain more assets, and reduce overall costs.
Thousands of companies manage their assets with MaintainX

'%3e%3cpath%20fill='url(%23b)'%20d='M66.008%2080.068c-5.084-.786-9.763-3.834-12.442-8.68a16.942%2016.942%200%200%201-1.87-5.18c1.096.19%202.203.476%203.298.87%206.525%202.333%2010.836%207.68%2011.014%2012.99ZM51.47%2061.576c.488-5.524%203.62-10.716%208.847-13.597a17.132%2017.132%200%200%201%2011.335-1.882c-.798%208.145-7.43%2014.848-16.038%2015.599-1.417.119-2.799.07-4.144-.12Zm28.564-11.478a17.513%2017.513%200%200%201%203.727%204.62c4.608%208.335%201.584%2018.813-6.75%2023.409a16.988%2016.988%200%200%201-4.359%201.679%2019.624%2019.624%200%200%201-3.977-12.776c.346-7.561%204.942-13.931%2011.36-16.932Z'/%3e%3cpath%20fill='%23110F0D'%20fill-rule='evenodd'%20d='M142.831%2048.324h4.977V77.03h-4.977V48.324Zm27.278%2013.002c.322%201.048.453%202.263.453%203.62v12.073h-4.787V66.208c0-.75-.047-1.572-.154-2.143-.453-2.382-1.822-3.572-4.215-3.572-2.31%200-3.882%201.274-4.43%203.476-.143.596-.226%201.405-.226%202.25v10.8h-4.787V56.623h4.477v2.989c1.536-2.5%203.906-3.43%206.371-3.43%203.488%200%206.263%201.68%207.298%205.144Zm24.636%207.323c0%203.882-2.358%206.525-5.763%207.727-1.298.453-2.632.643-4.62.643h-10.169V48.324h9.085c1.691%200%203.156.143%204.049.38%203.465.93%205.727%203.68%205.727%207.335%200%202.441-.81%204.156-2.762%205.644%202.905%201.417%204.453%203.727%204.453%206.966Zm-15.634-8.656h4.584c1.024%200%201.917-.143%202.536-.417%201.215-.548%201.905-1.608%201.905-3.167%200-1.548-.643-2.572-1.845-3.132-.691-.31-1.762-.452-2.763-.452h-4.417v7.168Zm10.716%208.465c0-1.536-.893-3.37-3.227-3.893-.428-.095-1.036-.143-1.571-.143h-5.918v8.085h5.501c.56%200%201.429-.048%201.953-.167%201.94-.453%203.262-1.846%203.262-3.882Zm47.747-11.847-8.097%2020.408h-4.429l-8.109-20.408h5.191l5.192%2014.574%205.108-14.574h5.144Zm-20.218%2010.002c0%20.69-.036%201.262-.155%201.94h-15.943c.631%202.87%202.714%204.728%205.882%204.728%202.131%200%203.607-.882%204.703-2.525h4.87c-1.762%204.144-5.204%206.692-9.657%206.692-6.084%200-10.537-4.858-10.537-10.49%200-6.108%204.524-10.776%2010.335-10.776%206.239%200%2010.442%204.954%2010.502%2010.43Zm-4.763-1.405c-.333-2.846-2.643-4.858-5.691-4.858-2.894%200-5.287%201.929-5.621%204.858h11.312Zm-72.667%203.44c0%204.787-3.287%208.371-9.419%208.371H119.363V64.66c-1.917.274-3.87.69-5.811%201.238l4.537%2011.121h-5.418l-3.596-9.585c-5.144%202.084-10.085%205.216-14.217%209.585h-4.786L101.8%2048.312h4.56l5.68%2013.883a44.112%2044.112%200%200%201%207.323-1.774V48.312h9.084c1.703%200%203.156.143%204.061.393%203.453.929%205.727%203.667%205.727%207.323%200%201.917-.738%204.179-2.81%205.691%203.06%201.56%204.501%204.025%204.501%206.93Zm-15.634-8.667a62.664%2062.664%200%200%201%202.06-.036c1.703.012%203.239.131%204.608.37%201.441-.549%202.357-1.727%202.357-3.537%200-1.941-.881-3.144-2.488-3.667-.548-.18-1.358-.286-2.322-.286h-4.215v7.156Zm-16.55%203.905-3.715-9.894-6.394%2016.502c2.833-2.595%206.263-4.858%2010.109-6.608Zm27.254%204.74c0-2.775-3.131-4.347-8.513-4.418-.715%200-1.441.011-2.191.047v8.252h5.918c2.548%200%204.786-1.37%204.786-3.882Z'%20clip-rule='evenodd'/%3e%3c/g%3e%3cdefs%3e%3clinearGradient%20id='b'%20x1='51.47'%20x2='85.916'%20y1='62.946'%20y2='62.946'%20gradientUnits='userSpaceOnUse'%3e%3cstop%20stop-color='%23CD9F28'/%3e%3cstop%20offset='1'%20stop-color='%23ECD80B'/%3e%3c/linearGradient%3e%3cclipPath%20id='a'%3e%3cpath%20fill='%23fff'%20d='M51.47%2045.728h186.104V80.14H51.47z'/%3e%3c/clipPath%3e%3c/defs%3e%3c/svg%3e)


More from Landoll


Explore Other Assets


© 2026 MaintainX. All rights reserved.