


Caterpillar Lift Truck GC30K
Need answers fast?
Explore the manual using AI.

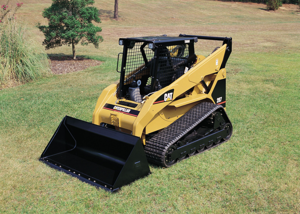
The Caterpillar Lift Truck GC30K is a robust and reliable industrial lift truck designed for heavy-duty applications. Known for its durability and efficiency, this model excels in material handling tasks, making it an essential asset for warehouses and construction sites. Experience superior performance with the GC30K.
Turn manuals into instant answers
with your AI-powered assistantTurn manuals into instant answers
with your AI-powered assistant
Manual for Caterpillar Lift Truck GC30K
Complete asset maintenance, one click away
Get instant access to all the maintenance information you need. Empower technicians to perform preventive maintenance with asset packages, ready to use right out of the box.

Documents & Manuals
Find all the essential guides in one place.
 Tensioning Guide
- Belt-diagram
- C-120 pulleys
+ 13 more

Work Order Templates
Pre-built workflows to keep your asset running smoothly.
- Daily Electrical System Inspection
- Replace Roller and Pulley
- Install Engine B-120
+ 29 more

Procedures
Integrate maintenance plans directly into your work orders.
- Motion Industries
- Applied Industrial Technologies
- Electrical Brothers
+ 5 more

Parts
Access the parts list for your equipment in MaintainX.
- Drive Motor
- B2 Rollers
- Tensioning System
+ 40 more
Caterpillar Lift Truck GC30K
Create an account to install this asset package.
Maintenance Plans for Caterpillar Lift Truck Model GC30K
Integrate maintenance plans directly into your work orders in MaintainX.
Battery Maintenance
Adjust battery accordingly
State of charge
Adjustment actions taken
Specific gravity reading and state of charge
Hydrometer readings on its electrolyte
Is addition of distilled water necessary every month?
Is addition not required for more than 3 months?
Charge Battery
Charging method

Combination Meter Bulb Replacement
Disassembly Sequence
Meter cover removed
Dial removed
Engine coolant temperature gauge removed
Service hourmeter removed
Fuel gauge removed
Meter case removed
Printed circuit removed
Bulb removed
Insprument Panel Bulbs Maintenance
- Replace the instrument panel bulbs
Disassembly:
1. Disconnect the electrical wires at connectors 1. (In the gasoline models, disconnect the choke cable on the engine side.)
2. Remove screws 2 (four) securing the cover
3. Remove screws 3 (six) and separate the front and rear panels
4. Remove screws 4 (four) securing the instrument panel
Note:
To replace the instrument panel bulbs, remove screws 3 and 4
Reassembly 1. To reassemble the console box, follow the reverse of disassembly procedure;
Fan Belt Maintenance
- Inspect Fan Belt
1. Make sure the belt is free from oil, grease or other foreign matter. Replace the belt if necessary. A slightly dirty belt can be reused by cleaning with cloth or paper. Do not clean the belt with gasoline or the like
2. At the time of overhauling the engine or adjusting the belt tension, check the belt and replace it if defective
- Adjust Fan Belt
1. Loosen the tensioner lock bolt and mounting bolt
2. Insert a small-diameter bar (or screwdriver) into the tension adjustment hole for leverage, and adjust the belt tension 3. Adjust the belt so that its deflection is 16 mm (0.6 in.) when the belt is pushed downward with 98 N (10 kgf) [22 Ibf] force exerted midway between the fan pulley and tensioner pulley
4. Tighten the tensioner lock bolt and mounting bolt
5. After the admustment, install the fan guard. If cracks or other abnormalities are found in the fan guard, replace the fan guard
Note:
Parts for Caterpillar Lift Truck GC30K
Access the parts list for your equipment in MaintainX.
Shimadzu Hydraulic Pump, 79.9l (4876 cu in.)/2400rpm, Universal Joint
SGP1-34
Mitsubishi Gasoline Engine
4G64
Lift Chains, 1067 × 125 × 45mm, (42 × 5 × 1.8in.)
BL834
Denso Spark Plugs, 14 × 1.25mm, (0.55 × 0.049in.), Gap:0.7 to 0.8mm, (0.028 to 0.031in)
W14EX-U
Daikin Torque Converter, 3-element, 1-stage, 2-phase, 3.0
DC6649
Unlock efficiency
with MaintainX CoPilot
MaintainX CoPilot is your expert colleague, on call 24/7, helping your team find the answers they need to keep equipment running.
Reduce Unplanned Downtime
Ensure your team follows consistent procedures to minimize equipment failures and costly delays.
Maximize Asset Availability
Keep your assets running longer and more reliably, with standardized maintenance workflows from OEM manuals.
Lower Maintenance Costs
Turn any technician into an expert to streamline operations, maintain more assets, and reduce overall costs.
Thousands of companies manage their assets with MaintainX

'%3e%3cpath%20fill='url(%23b)'%20d='M66.008%2080.068c-5.084-.786-9.763-3.834-12.442-8.68a16.942%2016.942%200%200%201-1.87-5.18c1.096.19%202.203.476%203.298.87%206.525%202.333%2010.836%207.68%2011.014%2012.99ZM51.47%2061.576c.488-5.524%203.62-10.716%208.847-13.597a17.132%2017.132%200%200%201%2011.335-1.882c-.798%208.145-7.43%2014.848-16.038%2015.599-1.417.119-2.799.07-4.144-.12Zm28.564-11.478a17.513%2017.513%200%200%201%203.727%204.62c4.608%208.335%201.584%2018.813-6.75%2023.409a16.988%2016.988%200%200%201-4.359%201.679%2019.624%2019.624%200%200%201-3.977-12.776c.346-7.561%204.942-13.931%2011.36-16.932Z'/%3e%3cpath%20fill='%23110F0D'%20fill-rule='evenodd'%20d='M142.831%2048.324h4.977V77.03h-4.977V48.324Zm27.278%2013.002c.322%201.048.453%202.263.453%203.62v12.073h-4.787V66.208c0-.75-.047-1.572-.154-2.143-.453-2.382-1.822-3.572-4.215-3.572-2.31%200-3.882%201.274-4.43%203.476-.143.596-.226%201.405-.226%202.25v10.8h-4.787V56.623h4.477v2.989c1.536-2.5%203.906-3.43%206.371-3.43%203.488%200%206.263%201.68%207.298%205.144Zm24.636%207.323c0%203.882-2.358%206.525-5.763%207.727-1.298.453-2.632.643-4.62.643h-10.169V48.324h9.085c1.691%200%203.156.143%204.049.38%203.465.93%205.727%203.68%205.727%207.335%200%202.441-.81%204.156-2.762%205.644%202.905%201.417%204.453%203.727%204.453%206.966Zm-15.634-8.656h4.584c1.024%200%201.917-.143%202.536-.417%201.215-.548%201.905-1.608%201.905-3.167%200-1.548-.643-2.572-1.845-3.132-.691-.31-1.762-.452-2.763-.452h-4.417v7.168Zm10.716%208.465c0-1.536-.893-3.37-3.227-3.893-.428-.095-1.036-.143-1.571-.143h-5.918v8.085h5.501c.56%200%201.429-.048%201.953-.167%201.94-.453%203.262-1.846%203.262-3.882Zm47.747-11.847-8.097%2020.408h-4.429l-8.109-20.408h5.191l5.192%2014.574%205.108-14.574h5.144Zm-20.218%2010.002c0%20.69-.036%201.262-.155%201.94h-15.943c.631%202.87%202.714%204.728%205.882%204.728%202.131%200%203.607-.882%204.703-2.525h4.87c-1.762%204.144-5.204%206.692-9.657%206.692-6.084%200-10.537-4.858-10.537-10.49%200-6.108%204.524-10.776%2010.335-10.776%206.239%200%2010.442%204.954%2010.502%2010.43Zm-4.763-1.405c-.333-2.846-2.643-4.858-5.691-4.858-2.894%200-5.287%201.929-5.621%204.858h11.312Zm-72.667%203.44c0%204.787-3.287%208.371-9.419%208.371H119.363V64.66c-1.917.274-3.87.69-5.811%201.238l4.537%2011.121h-5.418l-3.596-9.585c-5.144%202.084-10.085%205.216-14.217%209.585h-4.786L101.8%2048.312h4.56l5.68%2013.883a44.112%2044.112%200%200%201%207.323-1.774V48.312h9.084c1.703%200%203.156.143%204.061.393%203.453.929%205.727%203.667%205.727%207.323%200%201.917-.738%204.179-2.81%205.691%203.06%201.56%204.501%204.025%204.501%206.93Zm-15.634-8.667a62.664%2062.664%200%200%201%202.06-.036c1.703.012%203.239.131%204.608.37%201.441-.549%202.357-1.727%202.357-3.537%200-1.941-.881-3.144-2.488-3.667-.548-.18-1.358-.286-2.322-.286h-4.215v7.156Zm-16.55%203.905-3.715-9.894-6.394%2016.502c2.833-2.595%206.263-4.858%2010.109-6.608Zm27.254%204.74c0-2.775-3.131-4.347-8.513-4.418-.715%200-1.441.011-2.191.047v8.252h5.918c2.548%200%204.786-1.37%204.786-3.882Z'%20clip-rule='evenodd'/%3e%3c/g%3e%3cdefs%3e%3clinearGradient%20id='b'%20x1='51.47'%20x2='85.916'%20y1='62.946'%20y2='62.946'%20gradientUnits='userSpaceOnUse'%3e%3cstop%20stop-color='%23CD9F28'/%3e%3cstop%20offset='1'%20stop-color='%23ECD80B'/%3e%3c/linearGradient%3e%3cclipPath%20id='a'%3e%3cpath%20fill='%23fff'%20d='M51.47%2045.728h186.104V80.14H51.47z'/%3e%3c/clipPath%3e%3c/defs%3e%3c/svg%3e)


More from Caterpillar


Explore Other Assets


© 2026 MaintainX. All rights reserved.