


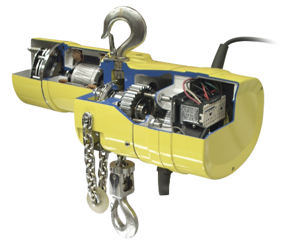
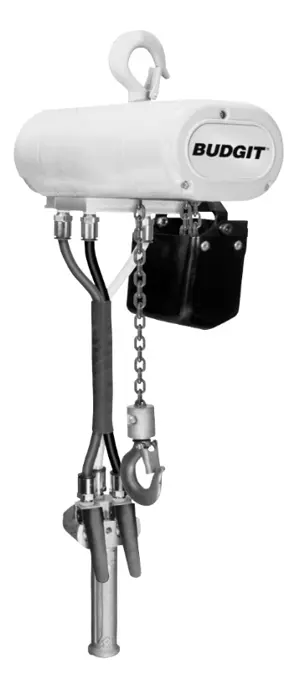
Budgit Portable Electric Hoist 2-Ton
Need answers fast?
Explore the manual using AI.

Turn manuals into instant answers
with your AI-powered assistantTurn manuals into instant answers
with your AI-powered assistant
Manual for Budgit Portable Electric Hoist 2-Ton
Complete asset maintenance, one click away
Get instant access to all the maintenance information you need. Empower technicians to perform preventive maintenance with asset packages, ready to use right out of the box.

Documents & Manuals
Find all the essential guides in one place.
 Tensioning Guide
- Belt-diagram
- C-120 pulleys
+ 13 more

Work Order Templates
Pre-built workflows to keep your asset running smoothly.
- Daily Electrical System Inspection
- Replace Roller and Pulley
- Install Engine B-120
+ 29 more

Procedures
Integrate maintenance plans directly into your work orders.
- Motion Industries
- Applied Industrial Technologies
- Electrical Brothers
+ 5 more

Parts
Access the parts list for your equipment in MaintainX.
- Drive Motor
- B2 Rollers
- Tensioning System
+ 40 more
Budgit Portable Electric Hoist 2-Ton
Create an account to install this asset package.
Maintenance Plans for Budgit Portable Electric Hoist Model 2-Ton
Integrate maintenance plans directly into your work orders in MaintainX.
1 Weekly Coil Chain Lubrication
Coil Chain
Under ordinary conditions only weekly attention will be necessary.
Under hot and dirty conditions it may be necessary to clean chain at least once a day and lubricate it several times between cleanings.
Thoroughly clean chain with an oil solvent
Re-lubricate by coating it lightly with oil
Make sure that lubricant coats wear surfaces between links
Sign off on the coil chain lubrication

1 Monthly Hoist Inspection
THIRTY-DAY INSPECTION.
Hoist may be left suspended.
d. Inspect Motor, Frame and Electrical Compartment Cover.
(1) Check to see that bolts securing motor to frame are tight.
Also check for any visible damage to motor, such as a cracked end bell or dented stator housing.
Replace damaged parts.
(2) Check hoist frame for signs of visible damage.
If frame shows evidence of fracture, the hoist should be disassembled and inspected for further signs of damage from possible overloading.
Replace damaged parts.
Solenoid Maintence
Remove the two support bracket screws (35), and lift the bracket assembly (3) off the brake.
Remove the plunger guide (140) from the inside of the coil.
Remove both thru-bolts (160) from the solenoid assembly (79).
Remove the coil (12) from the solenoid frame (79) by pushing down on the coil locking tab on the side opposite the leadwires. Push the coil out of the frame.
Insert the coil into the new solenoid frame in reverse of the steps of removal. Insert the new plunger guide (140) into the coil, locking tab first.
Position the new shock mount pad (150) on both sides of the solenoid mounting bracket, and reinsert the tap-bolts (160) through the shock pads and bracket.
Slide the flat washers (170) over the bolt, and tighten the locknut down until the shock pads begin to flatten.
Remove the plunger nut (29N) and screw (29S), and lift plunger (29) from lever arm (17). Install the new plunger to the lever arm using the new screw and nut provided. Tighten to 40 in-lb.
Position the solenoid and bracket assembly (3) over the plunger (29) and slide into place. Tighten the bracket mounting screws (35) to 50 in-lb.
500 Hourly / 6 Monthly Load Chain Lubrication
SIX-MONTH INSPECTION OR 500-750 HOURS OF OPERATION.
Hoist may be left suspended.
Same as thirty-day inspection plus the following.
c. Relubricate Load Chain.
See Section IV, paragraph 4-3.
4-3. LUBRICATE LOAD CHAIN.
A small amount of lubricant will greatly increase load chain life, therefore, chain should not be allowed to run without lubricant.
Chain should be cleaned and lubricated as directed in paragraph a below.
User should set up a regular schedule for chain lubrication after observing operating conditions for a few days.
Push Button Staition, Conductor Cable Assembly Rebuild
Disassembly
Remove seven pan head machine screws and lockwashers from back of push button station and lift off rear cover
Loosen three terminal screws and remove strain cable screw, lockwasher and plain washer
Remove two pan head machine screws and lockwashers from housing cap and remove cap, grommet and cable assembly
Remove two pan head screws, contact assembly and button assembly
Reassembly
Before assembly, all parts should be thoroughly cleaned and inspected to determine their serviceability. Replace all parts that are worn or damaged
Reassemble push button station and conductor cable following a reverse procedure of the disassembly steps listed above
NOTE: Do not attempt to shorten or lengthen push button conductor cable. Odd length conductor cable assemblies for other than standard 10 ft. lift hoists can be procured from the factory
Parts for Budgit Portable Electric Hoist 2-Ton
Access the parts list for your equipment in MaintainX.
Hook Assembly-Upper With Latch (Includes Item 51) (Thru 1 Ton)
BH4007A
Hook Assembly-Upper With Latch (Includes Item 51) (Thru 1 Ton) Plated
BH-5027
Pin-Support, Chain Guide
BH-5009
Retaining Clip, Chain Guide Pin
BH-4008
Gasket-Gearcase
BH-1007
Hook Assembly-Upper With Latch (Includes Item 51) (Thru 1 Ton)
BH4007A
Hook Assembly-Upper With Latch (Includes Item 51) (Thru 1 Ton) Plated
BH-5027
Pin-Support, Chain Guide
BH-5009
Retaining Clip, Chain Guide Pin
BH-4008
Gasket-Gearcase
BH-1007
Hook Assembly-Upper With Latch (Includes Item 51) (Thru 1 Ton)
BH4007A
Hook Assembly-Upper With Latch (Includes Item 51) (Thru 1 Ton) Plated
BH-5027
Pin-Support, Chain Guide
BH-5009
Retaining Clip, Chain Guide Pin
BH-4008
Gasket-Gearcase
BH-1007
Unlock efficiency
with MaintainX CoPilot
MaintainX CoPilot is your expert colleague, on call 24/7, helping your team find the answers they need to keep equipment running.
Reduce Unplanned Downtime
Ensure your team follows consistent procedures to minimize equipment failures and costly delays.
Maximize Asset Availability
Keep your assets running longer and more reliably, with standardized maintenance workflows from OEM manuals.
Lower Maintenance Costs
Turn any technician into an expert to streamline operations, maintain more assets, and reduce overall costs.
Thousands of companies manage their assets with MaintainX

'%3e%3cpath%20fill='url(%23b)'%20d='M66.008%2080.068c-5.084-.786-9.763-3.834-12.442-8.68a16.942%2016.942%200%200%201-1.87-5.18c1.096.19%202.203.476%203.298.87%206.525%202.333%2010.836%207.68%2011.014%2012.99ZM51.47%2061.576c.488-5.524%203.62-10.716%208.847-13.597a17.132%2017.132%200%200%201%2011.335-1.882c-.798%208.145-7.43%2014.848-16.038%2015.599-1.417.119-2.799.07-4.144-.12Zm28.564-11.478a17.513%2017.513%200%200%201%203.727%204.62c4.608%208.335%201.584%2018.813-6.75%2023.409a16.988%2016.988%200%200%201-4.359%201.679%2019.624%2019.624%200%200%201-3.977-12.776c.346-7.561%204.942-13.931%2011.36-16.932Z'/%3e%3cpath%20fill='%23110F0D'%20fill-rule='evenodd'%20d='M142.831%2048.324h4.977V77.03h-4.977V48.324Zm27.278%2013.002c.322%201.048.453%202.263.453%203.62v12.073h-4.787V66.208c0-.75-.047-1.572-.154-2.143-.453-2.382-1.822-3.572-4.215-3.572-2.31%200-3.882%201.274-4.43%203.476-.143.596-.226%201.405-.226%202.25v10.8h-4.787V56.623h4.477v2.989c1.536-2.5%203.906-3.43%206.371-3.43%203.488%200%206.263%201.68%207.298%205.144Zm24.636%207.323c0%203.882-2.358%206.525-5.763%207.727-1.298.453-2.632.643-4.62.643h-10.169V48.324h9.085c1.691%200%203.156.143%204.049.38%203.465.93%205.727%203.68%205.727%207.335%200%202.441-.81%204.156-2.762%205.644%202.905%201.417%204.453%203.727%204.453%206.966Zm-15.634-8.656h4.584c1.024%200%201.917-.143%202.536-.417%201.215-.548%201.905-1.608%201.905-3.167%200-1.548-.643-2.572-1.845-3.132-.691-.31-1.762-.452-2.763-.452h-4.417v7.168Zm10.716%208.465c0-1.536-.893-3.37-3.227-3.893-.428-.095-1.036-.143-1.571-.143h-5.918v8.085h5.501c.56%200%201.429-.048%201.953-.167%201.94-.453%203.262-1.846%203.262-3.882Zm47.747-11.847-8.097%2020.408h-4.429l-8.109-20.408h5.191l5.192%2014.574%205.108-14.574h5.144Zm-20.218%2010.002c0%20.69-.036%201.262-.155%201.94h-15.943c.631%202.87%202.714%204.728%205.882%204.728%202.131%200%203.607-.882%204.703-2.525h4.87c-1.762%204.144-5.204%206.692-9.657%206.692-6.084%200-10.537-4.858-10.537-10.49%200-6.108%204.524-10.776%2010.335-10.776%206.239%200%2010.442%204.954%2010.502%2010.43Zm-4.763-1.405c-.333-2.846-2.643-4.858-5.691-4.858-2.894%200-5.287%201.929-5.621%204.858h11.312Zm-72.667%203.44c0%204.787-3.287%208.371-9.419%208.371H119.363V64.66c-1.917.274-3.87.69-5.811%201.238l4.537%2011.121h-5.418l-3.596-9.585c-5.144%202.084-10.085%205.216-14.217%209.585h-4.786L101.8%2048.312h4.56l5.68%2013.883a44.112%2044.112%200%200%201%207.323-1.774V48.312h9.084c1.703%200%203.156.143%204.061.393%203.453.929%205.727%203.667%205.727%207.323%200%201.917-.738%204.179-2.81%205.691%203.06%201.56%204.501%204.025%204.501%206.93Zm-15.634-8.667a62.664%2062.664%200%200%201%202.06-.036c1.703.012%203.239.131%204.608.37%201.441-.549%202.357-1.727%202.357-3.537%200-1.941-.881-3.144-2.488-3.667-.548-.18-1.358-.286-2.322-.286h-4.215v7.156Zm-16.55%203.905-3.715-9.894-6.394%2016.502c2.833-2.595%206.263-4.858%2010.109-6.608Zm27.254%204.74c0-2.775-3.131-4.347-8.513-4.418-.715%200-1.441.011-2.191.047v8.252h5.918c2.548%200%204.786-1.37%204.786-3.882Z'%20clip-rule='evenodd'/%3e%3c/g%3e%3cdefs%3e%3clinearGradient%20id='b'%20x1='51.47'%20x2='85.916'%20y1='62.946'%20y2='62.946'%20gradientUnits='userSpaceOnUse'%3e%3cstop%20stop-color='%23CD9F28'/%3e%3cstop%20offset='1'%20stop-color='%23ECD80B'/%3e%3c/linearGradient%3e%3cclipPath%20id='a'%3e%3cpath%20fill='%23fff'%20d='M51.47%2045.728h186.104V80.14H51.47z'/%3e%3c/clipPath%3e%3c/defs%3e%3c/svg%3e)


More from Budgit


Explore Other Assets


© 2026 MaintainX. All rights reserved.