


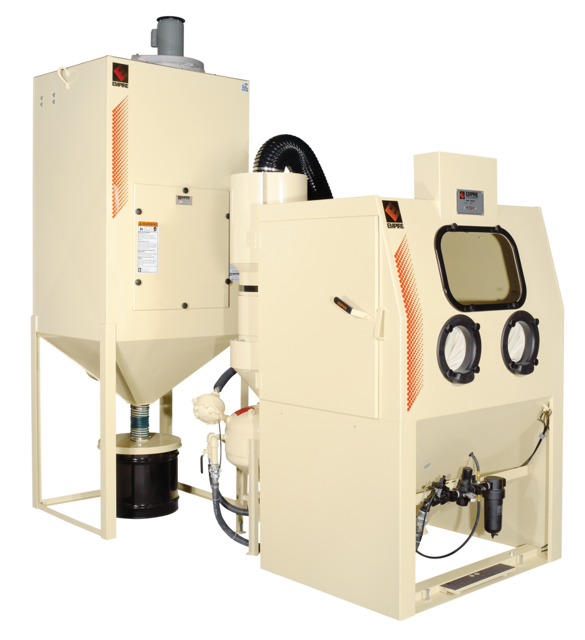
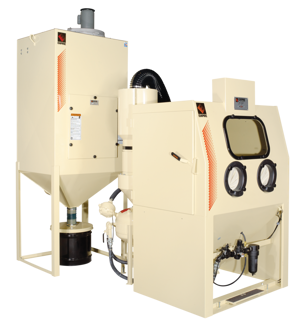
Empire Abrasive Equipment Pro-Finish Cabinet System 7272
Need answers fast?
Explore the manual using AI.
Turn manuals into instant answers
with your AI-powered assistantTurn manuals into instant answers
with your AI-powered assistant
Manual for Empire Abrasive Equipment Pro-Finish Cabinet System 7272
Complete asset maintenance, one click away
Get instant access to all the maintenance information you need. Empower technicians to perform preventive maintenance with asset packages, ready to use right out of the box.

Documents & Manuals
Find all the essential guides in one place.
 Tensioning Guide
- Belt-diagram
- C-120 pulleys
+ 13 more

Work Order Templates
Pre-built workflows to keep your asset running smoothly.
- Daily Electrical System Inspection
- Replace Roller and Pulley
- Install Engine B-120
+ 29 more

Procedures
Integrate maintenance plans directly into your work orders.
- Motion Industries
- Applied Industrial Technologies
- Electrical Brothers
+ 5 more

Parts
Access the parts list for your equipment in MaintainX.
- Drive Motor
- B2 Rollers
- Tensioning System
+ 40 more
Empire Abrasive Equipment Pro-Finish Cabinet System 7272
Create an account to install this asset package.
Maintenance Plans for Empire Abrasive Equipment Pro-Finish Cabinet System Model 7272
Integrate maintenance plans directly into your work orders in MaintainX.
2 Hourly Filter Bag / Dust Collector Bags Cleaning
4.1 Daily Maintenance
Step 3: Clean the filter bag or shake the dust collector bags after every 2-4 hours of operation.
A. For a single dust bag, remove the bottom bag clip and shake the accumulated dust through the bag bottom into an appropriate container.
B. For systems equipped with a (baghouse) dust collectors, turn off the cabinet power switch and remove the dust from the bags by pressing the bag-shake button 15 to 20 times.
C. Cartridge collector (CDC), empty the dust drum when 2/3 full. Dispose of the waste properly.;

1 Weekly Cabinet System Maintenance
4.2 Weekly Maintenance
Step 1: Repeat the daily maintenance procedures.
Step 2: Inspect all media-carrying hoses for wear by feeling along the length of the hose for soft spots. Hoses with soft spots should be replaced.
Step 3: Check the nozzle for wear. When the nozzle is worn 1/8" oversize, replace it. A drill bit can be inserted into the nozzle to check its size.
Step 4: On suction systems, check the air jet for wear.
Step 5: Loosen the set screw in the side of the gun body and remove the air jet. See Figure 14.
Step 6: If the air jet shows wear, rotate it 90° and reinsert it into the gun.
Step 7: Re-tighten the set screw.
IMPORTANT
1 Daily Cabinet System Maintenance
4.1 Daily Maintenance
Step 1: Check the condition of the media. If the media is contaminated or broken down into dust, thoroughly clean the inside of the cabinet and recovery system and reload with new media.
Step 2: Adjust the reclaimer tuning band if you observe a dusty condition. See section 3.6 Equipment Adjustments.
Step 3: Clean the filter bag or shake the dust collector bags after every 2-4 hours of operation.
A. For a single dust bag, remove the bottom bag clip and shake the accumulated dust through the bag bottom into an appropriate container.
B. For systems equipped with a (baghouse) dust collectors, turn off he cabinet power switch anc emove the dust from the bags bj pressing the bag-shake button 15 to 20 times.
C. Cartridge collector (CDC), empty the dust drum when 2/3 full. Dispose of the waste properly.
Step 4: Check light bulbs and gloves
Step 5: Remove debris from the reclaimer screen.
Parts for Empire Abrasive Equipment Pro-Finish Cabinet System 7272
Access the parts list for your equipment in MaintainX.
1/4″ Di-Carb Nozzle (Suction)
501331
5/16″ Di-Carb Nozzle (Suction)
501341
7/16″ Di-Carb Nozzle (Suction)
401351
1/8″ Di-Carb Nozzle (Pressure)
501272
3/16″ Di-Carb Nozzle (Pressure)
501282
1/4″ Di-Carb Nozzle (Suction)
501331
5/16″ Di-Carb Nozzle (Suction)
501341
7/16″ Di-Carb Nozzle (Suction)
401351
1/8″ Di-Carb Nozzle (Pressure)
501272
3/16″ Di-Carb Nozzle (Pressure)
501282
1/4″ Di-Carb Nozzle (Suction)
501331
5/16″ Di-Carb Nozzle (Suction)
501341
7/16″ Di-Carb Nozzle (Suction)
401351
1/8″ Di-Carb Nozzle (Pressure)
501272
3/16″ Di-Carb Nozzle (Pressure)
501282
Unlock efficiency
with MaintainX CoPilot
MaintainX CoPilot is your expert colleague, on call 24/7, helping your team find the answers they need to keep equipment running.
Reduce Unplanned Downtime
Ensure your team follows consistent procedures to minimize equipment failures and costly delays.
Maximize Asset Availability
Keep your assets running longer and more reliably, with standardized maintenance workflows from OEM manuals.
Lower Maintenance Costs
Turn any technician into an expert to streamline operations, maintain more assets, and reduce overall costs.
Thousands of companies manage their assets with MaintainX

'%3e%3cpath%20fill='url(%23b)'%20d='M66.008%2080.068c-5.084-.786-9.763-3.834-12.442-8.68a16.942%2016.942%200%200%201-1.87-5.18c1.096.19%202.203.476%203.298.87%206.525%202.333%2010.836%207.68%2011.014%2012.99ZM51.47%2061.576c.488-5.524%203.62-10.716%208.847-13.597a17.132%2017.132%200%200%201%2011.335-1.882c-.798%208.145-7.43%2014.848-16.038%2015.599-1.417.119-2.799.07-4.144-.12Zm28.564-11.478a17.513%2017.513%200%200%201%203.727%204.62c4.608%208.335%201.584%2018.813-6.75%2023.409a16.988%2016.988%200%200%201-4.359%201.679%2019.624%2019.624%200%200%201-3.977-12.776c.346-7.561%204.942-13.931%2011.36-16.932Z'/%3e%3cpath%20fill='%23110F0D'%20fill-rule='evenodd'%20d='M142.831%2048.324h4.977V77.03h-4.977V48.324Zm27.278%2013.002c.322%201.048.453%202.263.453%203.62v12.073h-4.787V66.208c0-.75-.047-1.572-.154-2.143-.453-2.382-1.822-3.572-4.215-3.572-2.31%200-3.882%201.274-4.43%203.476-.143.596-.226%201.405-.226%202.25v10.8h-4.787V56.623h4.477v2.989c1.536-2.5%203.906-3.43%206.371-3.43%203.488%200%206.263%201.68%207.298%205.144Zm24.636%207.323c0%203.882-2.358%206.525-5.763%207.727-1.298.453-2.632.643-4.62.643h-10.169V48.324h9.085c1.691%200%203.156.143%204.049.38%203.465.93%205.727%203.68%205.727%207.335%200%202.441-.81%204.156-2.762%205.644%202.905%201.417%204.453%203.727%204.453%206.966Zm-15.634-8.656h4.584c1.024%200%201.917-.143%202.536-.417%201.215-.548%201.905-1.608%201.905-3.167%200-1.548-.643-2.572-1.845-3.132-.691-.31-1.762-.452-2.763-.452h-4.417v7.168Zm10.716%208.465c0-1.536-.893-3.37-3.227-3.893-.428-.095-1.036-.143-1.571-.143h-5.918v8.085h5.501c.56%200%201.429-.048%201.953-.167%201.94-.453%203.262-1.846%203.262-3.882Zm47.747-11.847-8.097%2020.408h-4.429l-8.109-20.408h5.191l5.192%2014.574%205.108-14.574h5.144Zm-20.218%2010.002c0%20.69-.036%201.262-.155%201.94h-15.943c.631%202.87%202.714%204.728%205.882%204.728%202.131%200%203.607-.882%204.703-2.525h4.87c-1.762%204.144-5.204%206.692-9.657%206.692-6.084%200-10.537-4.858-10.537-10.49%200-6.108%204.524-10.776%2010.335-10.776%206.239%200%2010.442%204.954%2010.502%2010.43Zm-4.763-1.405c-.333-2.846-2.643-4.858-5.691-4.858-2.894%200-5.287%201.929-5.621%204.858h11.312Zm-72.667%203.44c0%204.787-3.287%208.371-9.419%208.371H119.363V64.66c-1.917.274-3.87.69-5.811%201.238l4.537%2011.121h-5.418l-3.596-9.585c-5.144%202.084-10.085%205.216-14.217%209.585h-4.786L101.8%2048.312h4.56l5.68%2013.883a44.112%2044.112%200%200%201%207.323-1.774V48.312h9.084c1.703%200%203.156.143%204.061.393%203.453.929%205.727%203.667%205.727%207.323%200%201.917-.738%204.179-2.81%205.691%203.06%201.56%204.501%204.025%204.501%206.93Zm-15.634-8.667a62.664%2062.664%200%200%201%202.06-.036c1.703.012%203.239.131%204.608.37%201.441-.549%202.357-1.727%202.357-3.537%200-1.941-.881-3.144-2.488-3.667-.548-.18-1.358-.286-2.322-.286h-4.215v7.156Zm-16.55%203.905-3.715-9.894-6.394%2016.502c2.833-2.595%206.263-4.858%2010.109-6.608Zm27.254%204.74c0-2.775-3.131-4.347-8.513-4.418-.715%200-1.441.011-2.191.047v8.252h5.918c2.548%200%204.786-1.37%204.786-3.882Z'%20clip-rule='evenodd'/%3e%3c/g%3e%3cdefs%3e%3clinearGradient%20id='b'%20x1='51.47'%20x2='85.916'%20y1='62.946'%20y2='62.946'%20gradientUnits='userSpaceOnUse'%3e%3cstop%20stop-color='%23CD9F28'/%3e%3cstop%20offset='1'%20stop-color='%23ECD80B'/%3e%3c/linearGradient%3e%3cclipPath%20id='a'%3e%3cpath%20fill='%23fff'%20d='M51.47%2045.728h186.104V80.14H51.47z'/%3e%3c/clipPath%3e%3c/defs%3e%3c/svg%3e)


More from Empire Abrasive Equipment


Explore Other Assets


© 2026 MaintainX. All rights reserved.