


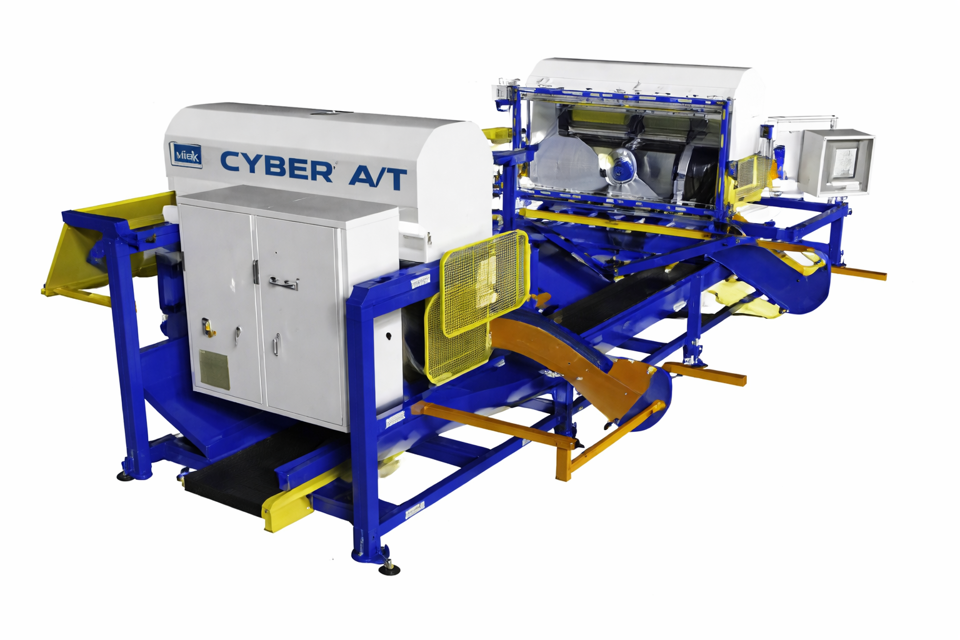
Mitek Automated Component Saw Cyber A/T
Need answers fast?
Explore the manual using AI.
Turn manuals into instant answers
with your AI-powered assistantTurn manuals into instant answers
with your AI-powered assistant
Manual for Mitek Automated Component Saw Cyber A/T
Complete asset maintenance, one click away
Get instant access to all the maintenance information you need. Empower technicians to perform preventive maintenance with asset packages, ready to use right out of the box.

Documents & Manuals
Find all the essential guides in one place.
 Tensioning Guide
- Belt-diagram
- C-120 pulleys
+ 13 more

Work Order Templates
Pre-built workflows to keep your asset running smoothly.
- Daily Electrical System Inspection
- Replace Roller and Pulley
- Install Engine B-120
+ 29 more

Procedures
Integrate maintenance plans directly into your work orders.
- Motion Industries
- Applied Industrial Technologies
- Electrical Brothers
+ 5 more

Parts
Access the parts list for your equipment in MaintainX.
- Drive Motor
- B2 Rollers
- Tensioning System
+ 40 more
Mitek Automated Component Saw Cyber A/T
Create an account to install this asset package.
Maintenance Plans for Mitek Automated Component Saw Model Cyber A/T
Integrate maintenance plans directly into your work orders in MaintainX.
3 Yearly Conveyor Belt Replacement
The waste conveyor and optional incline conveyor belting usually needs replacing every 3 years, depending on use and maintenance. Use the following steps as a guide for replacing either the main belt or the incline belt.
1. Place the saw in the Semiautomatic Mode by pressing the SEMI-AUTO button on the touch screen’s Main Menu.
2. Use the WASTE CONVEYOR button to run the conveyor until the lacing connection is near the head roller at the drive end.
3. Turn off all power to the saw, following approved lockout/tagout procedures.
4. Relieve the tension on the belt using the tensioning bolts (next to the roller).
5. Using a pair of pliers, remove the wire that is threaded through the lacing and save the wire for reassembly.
6. Remove the old belt.
7. Clean the sawdust and chips from the entire length of the metal conveyor bed.
Assembly:

1 Monthly Automated Component Saw Check
Lubricate the lumber stop rack and pinion with a kerosene and oil mixture
Check that all labels can be easily read
Check external wiring for kinks and wear
Check that heel cut skid bars, center lumber support, and floor truss web riser bars are in good condition and height is properly adjusted
Clean the following components with a rag and light cleaning solvent: Square drive shaft, Length scale, Angulation scales, Slides and castings
Check saw blade taper lock bushings
Check oil levels in the unsealed gearboxes and add oil if necessary
Lubricate bearings
Sign off on the saw check
Hold-Down Alignment Check
Place the saw in the Semiautomatic Mode by pressing the SEMI-AUTO button on the touch screen’s Main Menu.
Enter 90° for all blade angles.
Place a board on the conveyor so that it will not touch the blades as it passes them.
Use the infeed conveyor FORWARD jog button to move the board until it is under the hold-down and on the lumber guide.
Press an E-stop.
Mark the board on both sides of the flight on both sides of the machine.
Move the board to the exit side and stop it before it leaves the lumber guide.
Measure the distance between the mark and the flights.
If the measurement is more than 1/16 in., continue with this procedure.
Blade Draft Check
Blade draft refers to the correct angle of a saw blade so that the leading edge of the blade contacts the lumber and the trailing edge does not. An accurate blade draft prevents splintering of the lumber. Figure 2-29 illustrates proper blade draft.
The angle should be very slight and is set by MiTek during manufacturing. Small adjustments may be necessary after certain maintenance is performed.
Checking the Blade Draft at 90°:
1. Place the saw in the Semiautomatic Mode by pressing the SEMI-AUTO button on the touch screen’s Main Menu.
2. Enter 90° for all blade angles.
3. Enter 1-3/4 for all the blade centerlines.
4. Enter the board length.
5. Press the INITIATE SETUP button.
6. Press the START button to start the blades.
Computer Replacement
Cable Connections
Upload a photo of the original cable connections
Configuring the Integrated NIC for Your Plant Network
Enter the configuration details for the integrated NIC
Configuring the Saw’s Internal Communication NIC
Enter the configuration details for the saw’s internal communication NIC
Are the icons displaying correctly on your monitor?
My Network Places
Enter the properties of the NIC that will be connected to the saw’s PLC
Parts for Mitek Automated Component Saw Cyber A/T
Access the parts list for your equipment in MaintainX.
Book 1 Operation Manual
001055-OP
Book 2 Maintenance Manual
001055-MA
Book 3 Installation Manual
001055-IN
Drawing Set
001069
Binder
0014069
Book 1 Operation Manual
001055-OP
Book 2 Maintenance Manual
001055-MA
Book 3 Installation Manual
001055-IN
Drawing Set
001069
Binder
0014069
Book 1 Operation Manual
001055-OP
Book 2 Maintenance Manual
001055-MA
Book 3 Installation Manual
001055-IN
Drawing Set
001069
Binder
0014069
Unlock efficiency
with MaintainX CoPilot
MaintainX CoPilot is your expert colleague, on call 24/7, helping your team find the answers they need to keep equipment running.
Reduce Unplanned Downtime
Ensure your team follows consistent procedures to minimize equipment failures and costly delays.
Maximize Asset Availability
Keep your assets running longer and more reliably, with standardized maintenance workflows from OEM manuals.
Lower Maintenance Costs
Turn any technician into an expert to streamline operations, maintain more assets, and reduce overall costs.
Thousands of companies manage their assets with MaintainX

'%3e%3cpath%20fill='url(%23b)'%20d='M66.008%2080.068c-5.084-.786-9.763-3.834-12.442-8.68a16.942%2016.942%200%200%201-1.87-5.18c1.096.19%202.203.476%203.298.87%206.525%202.333%2010.836%207.68%2011.014%2012.99ZM51.47%2061.576c.488-5.524%203.62-10.716%208.847-13.597a17.132%2017.132%200%200%201%2011.335-1.882c-.798%208.145-7.43%2014.848-16.038%2015.599-1.417.119-2.799.07-4.144-.12Zm28.564-11.478a17.513%2017.513%200%200%201%203.727%204.62c4.608%208.335%201.584%2018.813-6.75%2023.409a16.988%2016.988%200%200%201-4.359%201.679%2019.624%2019.624%200%200%201-3.977-12.776c.346-7.561%204.942-13.931%2011.36-16.932Z'/%3e%3cpath%20fill='%23110F0D'%20fill-rule='evenodd'%20d='M142.831%2048.324h4.977V77.03h-4.977V48.324Zm27.278%2013.002c.322%201.048.453%202.263.453%203.62v12.073h-4.787V66.208c0-.75-.047-1.572-.154-2.143-.453-2.382-1.822-3.572-4.215-3.572-2.31%200-3.882%201.274-4.43%203.476-.143.596-.226%201.405-.226%202.25v10.8h-4.787V56.623h4.477v2.989c1.536-2.5%203.906-3.43%206.371-3.43%203.488%200%206.263%201.68%207.298%205.144Zm24.636%207.323c0%203.882-2.358%206.525-5.763%207.727-1.298.453-2.632.643-4.62.643h-10.169V48.324h9.085c1.691%200%203.156.143%204.049.38%203.465.93%205.727%203.68%205.727%207.335%200%202.441-.81%204.156-2.762%205.644%202.905%201.417%204.453%203.727%204.453%206.966Zm-15.634-8.656h4.584c1.024%200%201.917-.143%202.536-.417%201.215-.548%201.905-1.608%201.905-3.167%200-1.548-.643-2.572-1.845-3.132-.691-.31-1.762-.452-2.763-.452h-4.417v7.168Zm10.716%208.465c0-1.536-.893-3.37-3.227-3.893-.428-.095-1.036-.143-1.571-.143h-5.918v8.085h5.501c.56%200%201.429-.048%201.953-.167%201.94-.453%203.262-1.846%203.262-3.882Zm47.747-11.847-8.097%2020.408h-4.429l-8.109-20.408h5.191l5.192%2014.574%205.108-14.574h5.144Zm-20.218%2010.002c0%20.69-.036%201.262-.155%201.94h-15.943c.631%202.87%202.714%204.728%205.882%204.728%202.131%200%203.607-.882%204.703-2.525h4.87c-1.762%204.144-5.204%206.692-9.657%206.692-6.084%200-10.537-4.858-10.537-10.49%200-6.108%204.524-10.776%2010.335-10.776%206.239%200%2010.442%204.954%2010.502%2010.43Zm-4.763-1.405c-.333-2.846-2.643-4.858-5.691-4.858-2.894%200-5.287%201.929-5.621%204.858h11.312Zm-72.667%203.44c0%204.787-3.287%208.371-9.419%208.371H119.363V64.66c-1.917.274-3.87.69-5.811%201.238l4.537%2011.121h-5.418l-3.596-9.585c-5.144%202.084-10.085%205.216-14.217%209.585h-4.786L101.8%2048.312h4.56l5.68%2013.883a44.112%2044.112%200%200%201%207.323-1.774V48.312h9.084c1.703%200%203.156.143%204.061.393%203.453.929%205.727%203.667%205.727%207.323%200%201.917-.738%204.179-2.81%205.691%203.06%201.56%204.501%204.025%204.501%206.93Zm-15.634-8.667a62.664%2062.664%200%200%201%202.06-.036c1.703.012%203.239.131%204.608.37%201.441-.549%202.357-1.727%202.357-3.537%200-1.941-.881-3.144-2.488-3.667-.548-.18-1.358-.286-2.322-.286h-4.215v7.156Zm-16.55%203.905-3.715-9.894-6.394%2016.502c2.833-2.595%206.263-4.858%2010.109-6.608Zm27.254%204.74c0-2.775-3.131-4.347-8.513-4.418-.715%200-1.441.011-2.191.047v8.252h5.918c2.548%200%204.786-1.37%204.786-3.882Z'%20clip-rule='evenodd'/%3e%3c/g%3e%3cdefs%3e%3clinearGradient%20id='b'%20x1='51.47'%20x2='85.916'%20y1='62.946'%20y2='62.946'%20gradientUnits='userSpaceOnUse'%3e%3cstop%20stop-color='%23CD9F28'/%3e%3cstop%20offset='1'%20stop-color='%23ECD80B'/%3e%3c/linearGradient%3e%3cclipPath%20id='a'%3e%3cpath%20fill='%23fff'%20d='M51.47%2045.728h186.104V80.14H51.47z'/%3e%3c/clipPath%3e%3c/defs%3e%3c/svg%3e)


More from Mitek
Explore Other Assets


© 2026 MaintainX. All rights reserved.