


Caterpillar Excavator 349D2
Need answers fast?
Explore the manual using AI.
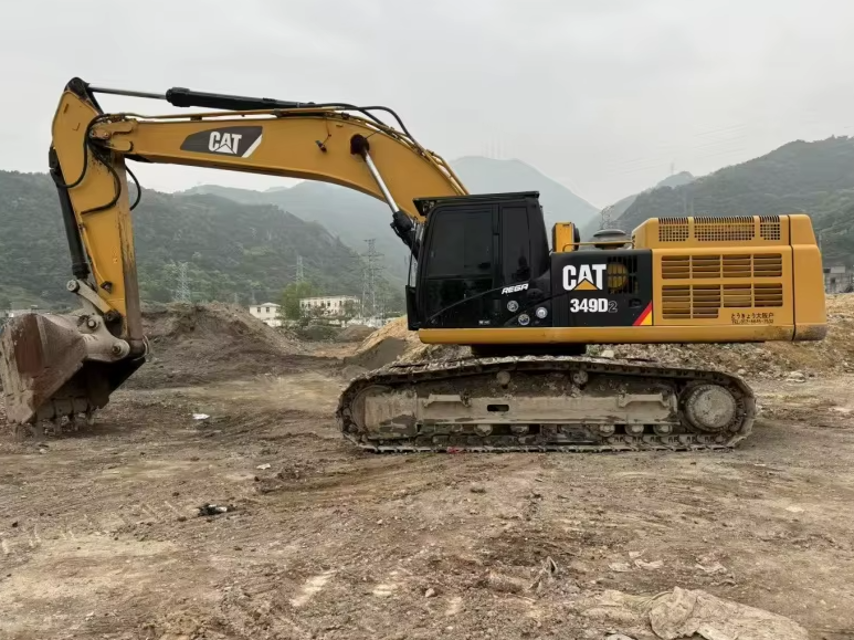
The Caterpillar Excavator 349D2 is a robust and versatile piece of heavy machinery designed for various construction and excavation tasks. Known for its reliability and efficiency, this model offers advanced hydraulic systems and powerful performance, making it an essential asset for any construction site.
Turn manuals into instant answers
with your AI-powered assistantTurn manuals into instant answers
with your AI-powered assistant
Manual for Caterpillar Excavator 349D2
Complete asset maintenance, one click away
Get instant access to all the maintenance information you need. Empower technicians to perform preventive maintenance with asset packages, ready to use right out of the box.

Documents & Manuals
Find all the essential guides in one place.
 Tensioning Guide
- Belt-diagram
- C-120 pulleys
+ 13 more

Work Order Templates
Pre-built workflows to keep your asset running smoothly.
- Daily Electrical System Inspection
- Replace Roller and Pulley
- Install Engine B-120
+ 29 more

Procedures
Integrate maintenance plans directly into your work orders.
- Motion Industries
- Applied Industrial Technologies
- Electrical Brothers
+ 5 more

Parts
Access the parts list for your equipment in MaintainX.
- Drive Motor
- B2 Rollers
- Tensioning System
+ 40 more
Caterpillar Excavator 349D2
Create an account to install this asset package.
Maintenance Plans for Caterpillar Excavator Model 349D2
Integrate maintenance plans directly into your work orders in MaintainX.
Initial 250 Hours Excavator Maintenance
Engine Valve Lash and Fuel Injector Timing - Check
Refer to the Service Manual for the complete procedure for checking the engine valve lash. This procedure lists the steps for the engine valve lash adjustment and the steps in order to check the engine valve lash.
Note: Make sure that a qualified mechanic works on the injector fuel timing. Special tools and training are required.
Refer to the Service Manual for the complete procedure for checking the injector fuel timing or for adjusting the injector fuel timing.
Note: The correct fuel timing specification is given on the Engine Information Plate. Fuel timing specifications may differ for distinct engine applications and/or power ratings.
Final Drive Oil - Change
WARNING: Hot oil and hot components can cause personal injury. Do not allow hot oil or hot components to contact skin.
1. Position one final drive so that oil drain plug (2) is at the bottom.
Note: Refer to Operation and Maintenance Manual, “General Hazard Information” for information on Containing Fluid Spillage.

2000 Hourly or 1 Yearly Excavator Maintenance
Engine Valve Lash and Fuel Injector Timing - Check
Refer to the Service Manual for the complete procedure for checking the engine valve lash. This procedure lists the steps for the engine valve lash adjustment and the steps in order to check the engine valve lash.
Note: Make sure that a qualified mechanic works on the injector fuel timing. Special tools and training are required.
Refer to the Service Manual for the complete procedure for checking the injector fuel timing or for adjusting the injector fuel timing.
Note: The correct fuel timing specification is given on the Engine Information Plate. Fuel timing specifications may differ for distinct engine applications and/or power ratings.
Engine Valve Rotators - Inspect
WARNING: When inspecting the valve rotators, protective glasses or face shield and protective clothing must be worn to prevent being burned by hot oil spray.
1. Start the engine and run the engine at low idle.
2. Watch the top surface on each valve rotator. Each valve rotator should turn slightly whenever the cylinder valve closes.
1000 Hourly or 6 Monthly Excavator Maintenance
Battery - Clean
Clean the battery surface with a clean cloth. Keep the terminals clean and keep the terminals coated with petroleum jelly. Install the post cover after you coat the terminal post with petroleum jelly
Battery Hold-Down - Tighten
Tighten the hold-downs for the battery in order to prevent the batteries from moving during machine operation.
Rollover Protective Structure (ROPS) - Inspect
Inspect the ROPS for loose bolts or for damaged bolts. Replace any damaged bolts or missing bolts with original equipment parts only.
• Tighten the M16 bolt (1) to125 ± 20 N·m (92 ± 15 lb ft).
• Tighten the M24 bolt (2) to 425 ± 50 N·m (315 ± 40 lb ft).
Do not straighten the ROPS. Do not repair the ROPS by welding reinforcement plates to the ROPS.
250 Hourly or 1 Monthly Excavator Maintenance
Belt - Inspect/Adjust/Replace
Note: This engine is equipped with a belt tightener that automatically adjusts the belt to the correct tension.
1. Unlatch the engine hood and raise the engine hood.
2. Inspect the belt for wear and for cracking.
3. If the belt requires replacement, perform Step 3a through Step 3c.
a. Turn the belt tensioner in order to release the tension from the belt.
b. Remove the belt.
c. Install a new belt.
d. Close the engine hood.
When Required Excavator Maintenance
Air Conditioner/Cab Heater Filter (Recirculation) - Inspect/Replace
NOTICE:
An air recirculation filter element plugged with dust will result in decreased performance and service life to the air conditioner or cab heater.
To prevent decreased performance, clean the filter element, as required.
The air conditioner filter is located on the lower left side of the cab behind the seat.
1. Slide the operator seat forward.
2. Slide the filter element upward.
3. Tap the air filter against the palm of one’s hand in order to remove the dirt. Do not use compressed air to clean the filter.
4. After you clean the filter element, inspect the filter element. If the filter element is damaged or badly contaminated, use a new filter element. Make sure that the filter element is dry.
Unlock efficiency
with MaintainX CoPilot
MaintainX CoPilot is your expert colleague, on call 24/7, helping your team find the answers they need to keep equipment running.
Reduce Unplanned Downtime
Ensure your team follows consistent procedures to minimize equipment failures and costly delays.
Maximize Asset Availability
Keep your assets running longer and more reliably, with standardized maintenance workflows from OEM manuals.
Lower Maintenance Costs
Turn any technician into an expert to streamline operations, maintain more assets, and reduce overall costs.
Thousands of companies manage their assets with MaintainX

'%3e%3cpath%20fill='url(%23b)'%20d='M66.008%2080.068c-5.084-.786-9.763-3.834-12.442-8.68a16.942%2016.942%200%200%201-1.87-5.18c1.096.19%202.203.476%203.298.87%206.525%202.333%2010.836%207.68%2011.014%2012.99ZM51.47%2061.576c.488-5.524%203.62-10.716%208.847-13.597a17.132%2017.132%200%200%201%2011.335-1.882c-.798%208.145-7.43%2014.848-16.038%2015.599-1.417.119-2.799.07-4.144-.12Zm28.564-11.478a17.513%2017.513%200%200%201%203.727%204.62c4.608%208.335%201.584%2018.813-6.75%2023.409a16.988%2016.988%200%200%201-4.359%201.679%2019.624%2019.624%200%200%201-3.977-12.776c.346-7.561%204.942-13.931%2011.36-16.932Z'/%3e%3cpath%20fill='%23110F0D'%20fill-rule='evenodd'%20d='M142.831%2048.324h4.977V77.03h-4.977V48.324Zm27.278%2013.002c.322%201.048.453%202.263.453%203.62v12.073h-4.787V66.208c0-.75-.047-1.572-.154-2.143-.453-2.382-1.822-3.572-4.215-3.572-2.31%200-3.882%201.274-4.43%203.476-.143.596-.226%201.405-.226%202.25v10.8h-4.787V56.623h4.477v2.989c1.536-2.5%203.906-3.43%206.371-3.43%203.488%200%206.263%201.68%207.298%205.144Zm24.636%207.323c0%203.882-2.358%206.525-5.763%207.727-1.298.453-2.632.643-4.62.643h-10.169V48.324h9.085c1.691%200%203.156.143%204.049.38%203.465.93%205.727%203.68%205.727%207.335%200%202.441-.81%204.156-2.762%205.644%202.905%201.417%204.453%203.727%204.453%206.966Zm-15.634-8.656h4.584c1.024%200%201.917-.143%202.536-.417%201.215-.548%201.905-1.608%201.905-3.167%200-1.548-.643-2.572-1.845-3.132-.691-.31-1.762-.452-2.763-.452h-4.417v7.168Zm10.716%208.465c0-1.536-.893-3.37-3.227-3.893-.428-.095-1.036-.143-1.571-.143h-5.918v8.085h5.501c.56%200%201.429-.048%201.953-.167%201.94-.453%203.262-1.846%203.262-3.882Zm47.747-11.847-8.097%2020.408h-4.429l-8.109-20.408h5.191l5.192%2014.574%205.108-14.574h5.144Zm-20.218%2010.002c0%20.69-.036%201.262-.155%201.94h-15.943c.631%202.87%202.714%204.728%205.882%204.728%202.131%200%203.607-.882%204.703-2.525h4.87c-1.762%204.144-5.204%206.692-9.657%206.692-6.084%200-10.537-4.858-10.537-10.49%200-6.108%204.524-10.776%2010.335-10.776%206.239%200%2010.442%204.954%2010.502%2010.43Zm-4.763-1.405c-.333-2.846-2.643-4.858-5.691-4.858-2.894%200-5.287%201.929-5.621%204.858h11.312Zm-72.667%203.44c0%204.787-3.287%208.371-9.419%208.371H119.363V64.66c-1.917.274-3.87.69-5.811%201.238l4.537%2011.121h-5.418l-3.596-9.585c-5.144%202.084-10.085%205.216-14.217%209.585h-4.786L101.8%2048.312h4.56l5.68%2013.883a44.112%2044.112%200%200%201%207.323-1.774V48.312h9.084c1.703%200%203.156.143%204.061.393%203.453.929%205.727%203.667%205.727%207.323%200%201.917-.738%204.179-2.81%205.691%203.06%201.56%204.501%204.025%204.501%206.93Zm-15.634-8.667a62.664%2062.664%200%200%201%202.06-.036c1.703.012%203.239.131%204.608.37%201.441-.549%202.357-1.727%202.357-3.537%200-1.941-.881-3.144-2.488-3.667-.548-.18-1.358-.286-2.322-.286h-4.215v7.156Zm-16.55%203.905-3.715-9.894-6.394%2016.502c2.833-2.595%206.263-4.858%2010.109-6.608Zm27.254%204.74c0-2.775-3.131-4.347-8.513-4.418-.715%200-1.441.011-2.191.047v8.252h5.918c2.548%200%204.786-1.37%204.786-3.882Z'%20clip-rule='evenodd'/%3e%3c/g%3e%3cdefs%3e%3clinearGradient%20id='b'%20x1='51.47'%20x2='85.916'%20y1='62.946'%20y2='62.946'%20gradientUnits='userSpaceOnUse'%3e%3cstop%20stop-color='%23CD9F28'/%3e%3cstop%20offset='1'%20stop-color='%23ECD80B'/%3e%3c/linearGradient%3e%3cclipPath%20id='a'%3e%3cpath%20fill='%23fff'%20d='M51.47%2045.728h186.104V80.14H51.47z'/%3e%3c/clipPath%3e%3c/defs%3e%3c/svg%3e)


More from Caterpillar


Explore Other Assets


© 2026 MaintainX. All rights reserved.