


TGW Shoe Sorter Natrix
Need answers fast?
Explore the manual using AI.
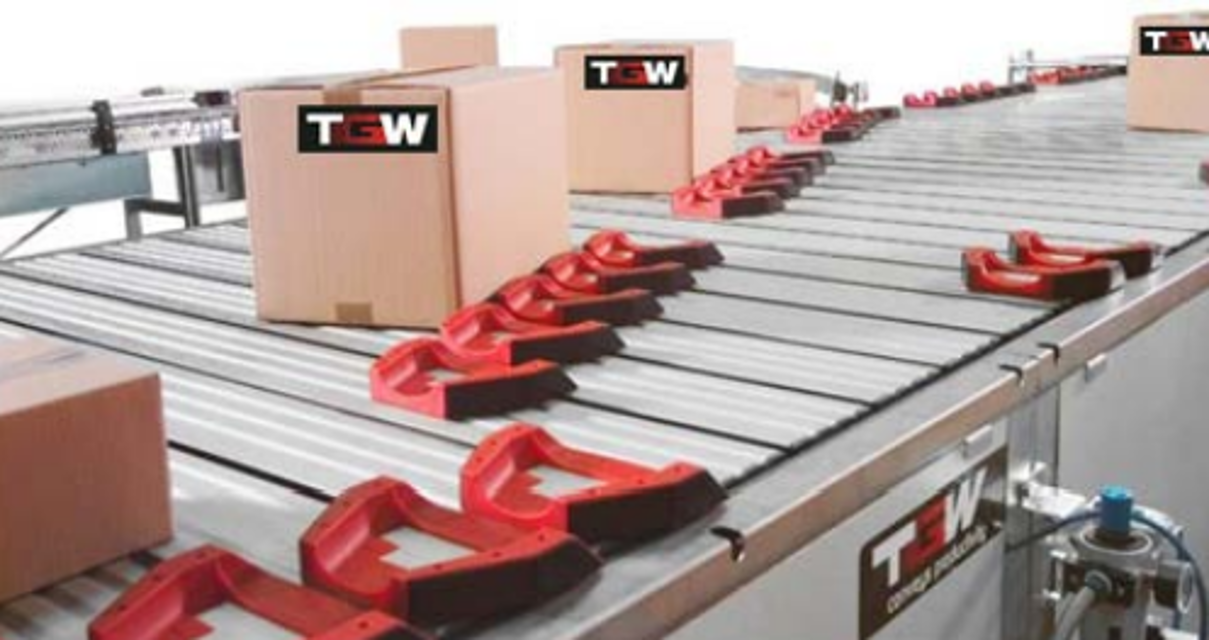
The TGW Shoe Sorter Natrix is a highly efficient automated sorting system designed for high-speed logistics operations. This advanced asset optimizes material handling processes, ensuring precise sorting and distribution in warehouses and distribution centers. With its robust design and reliable performance, the Natrix model enhances productivity and operational efficiency.
Turn manuals into instant answers
with your AI-powered assistantTurn manuals into instant answers
with your AI-powered assistant
Manual for TGW Shoe Sorter Natrix
Complete asset maintenance, one click away
Get instant access to all the maintenance information you need. Empower technicians to perform preventive maintenance with asset packages, ready to use right out of the box.

Documents & Manuals
Find all the essential guides in one place.
 Tensioning Guide
- Belt-diagram
- C-120 pulleys
+ 13 more

Work Order Templates
Pre-built workflows to keep your asset running smoothly.
- Daily Electrical System Inspection
- Replace Roller and Pulley
- Install Engine B-120
+ 29 more

Procedures
Integrate maintenance plans directly into your work orders.
- Motion Industries
- Applied Industrial Technologies
- Electrical Brothers
+ 5 more

Parts
Access the parts list for your equipment in MaintainX.
- Drive Motor
- B2 Rollers
- Tensioning System
+ 40 more
TGW Shoe Sorter Natrix
Create an account to install this asset package.
Maintenance Plans for TGW Shoe Sorter Model Natrix
Integrate maintenance plans directly into your work orders in MaintainX.
Return Pulley ∅ 63.5Mm Replacement
Warning: Ensure the machine is powered off before starting the procedure
Bottom cover removed
Tension from conveyor belt removed
Screws on both sides removed
Return pulley removed
New return pulley installed
Sign off on the pulley replacement

Sorter Link Chain Replacement
Tension removed from sorter link chain and screws [1]
Protective cover [2] removed on both sides
Sorter run in maintenance mode until two master links are visible on the chain strand [6] at a distance of 1371.6 mm (4’ 6”) in the working area
Screws [3] loosened and profile aluminum slat [4] above connecting link [6] removed
Master chain links and profile sorter slats removed
New sorter profile slats and chain installed in reverse order
Drive Chain tensioned
The closed side of the master link locking spring [5] points in the conveying direction
Sorter profiles aligned in a 90° angle to the framework (see Drive Chain Adjustments)
Intermediate Roller Replacement
Warning: Ensure the machine is powered off before starting the procedure
Support roller [1] removed
Screws [5] on both sides loosened
Cover [6] removed
Intermediate roller [2] removed by disengaging spring [3]
New intermediate roller installed
Sign off on the roller replacement
Tension Timing Belt
Loosen screws [3] and remove cover [4]
Loosen screws [6]
Tension the timing belt using tightening screw [7]
After belt adjustment is completed tighten screws [6]
Press measuring spring scale [1] (00078151) in the middle on the back of the belt between the pulleys and adjust tension until the timing belt touches the aluminum strut with a spring force of 7 ± 1kg (15 ± 2Lbs.) [2] (see sketch)
Position frequency measuring device [8] (00074597) in the middle on the back of the belt between the pulleys and pluck the belt
Read the measured value and compare it to 90 Hz ± 10
If the two values do not match, adjust tension up or down as needed
ATTENTION: The fixing screws of the motor flange must be tightened when reading off the test load!
Crossing Replacement
Warning: Ensure you have the correct replacement parts before starting the procedure
Loosen corresponding screws [1] and remove side panel [2] and screw nuts [3]
Pull off crossing [4] downwards
Install new crossing again in reverse order
Attention: Check transitions [5]; remove some sorter slats to be able to see the crossing
Ensure there are no protruding edges in conveying direction
Check crossing for correct functioning during first diverts
Ensure all transitions are smooth
Sign off on the crossing replacement
Parts for TGW Shoe Sorter Natrix
Access the parts list for your equipment in MaintainX.
Natrix Central Lubricating Unit, Natrix Central Lubricat. Unit Installation Drawing
00254680
Plastic Tube Pl-13(Blue)
00028573
Centring Block Right, Centring Block Right Symmetrical Pas-80X
00212025
Pulley D=62 Compl. L=620
00079774
Tension Spring 0.8 X 7.1 X 19.2
00072674
Natrix Central Lubricating Unit, Natrix Central Lubricat. Unit Installation Drawing
00254680
Plastic Tube Pl-13(Blue)
00028573
Centring Block Right, Centring Block Right Symmetrical Pas-80X
00212025
Pulley D=62 Compl. L=620
00079774
Tension Spring 0.8 X 7.1 X 19.2
00072674
Natrix Central Lubricating Unit, Natrix Central Lubricat. Unit Installation Drawing
00254680
Plastic Tube Pl-13(Blue)
00028573
Centring Block Right, Centring Block Right Symmetrical Pas-80X
00212025
Pulley D=62 Compl. L=620
00079774
Tension Spring 0.8 X 7.1 X 19.2
00072674
Unlock efficiency
with MaintainX CoPilot
MaintainX CoPilot is your expert colleague, on call 24/7, helping your team find the answers they need to keep equipment running.
Reduce Unplanned Downtime
Ensure your team follows consistent procedures to minimize equipment failures and costly delays.
Maximize Asset Availability
Keep your assets running longer and more reliably, with standardized maintenance workflows from OEM manuals.
Lower Maintenance Costs
Turn any technician into an expert to streamline operations, maintain more assets, and reduce overall costs.
Thousands of companies manage their assets with MaintainX

'%3e%3cpath%20fill='url(%23b)'%20d='M66.008%2080.068c-5.084-.786-9.763-3.834-12.442-8.68a16.942%2016.942%200%200%201-1.87-5.18c1.096.19%202.203.476%203.298.87%206.525%202.333%2010.836%207.68%2011.014%2012.99ZM51.47%2061.576c.488-5.524%203.62-10.716%208.847-13.597a17.132%2017.132%200%200%201%2011.335-1.882c-.798%208.145-7.43%2014.848-16.038%2015.599-1.417.119-2.799.07-4.144-.12Zm28.564-11.478a17.513%2017.513%200%200%201%203.727%204.62c4.608%208.335%201.584%2018.813-6.75%2023.409a16.988%2016.988%200%200%201-4.359%201.679%2019.624%2019.624%200%200%201-3.977-12.776c.346-7.561%204.942-13.931%2011.36-16.932Z'/%3e%3cpath%20fill='%23110F0D'%20fill-rule='evenodd'%20d='M142.831%2048.324h4.977V77.03h-4.977V48.324Zm27.278%2013.002c.322%201.048.453%202.263.453%203.62v12.073h-4.787V66.208c0-.75-.047-1.572-.154-2.143-.453-2.382-1.822-3.572-4.215-3.572-2.31%200-3.882%201.274-4.43%203.476-.143.596-.226%201.405-.226%202.25v10.8h-4.787V56.623h4.477v2.989c1.536-2.5%203.906-3.43%206.371-3.43%203.488%200%206.263%201.68%207.298%205.144Zm24.636%207.323c0%203.882-2.358%206.525-5.763%207.727-1.298.453-2.632.643-4.62.643h-10.169V48.324h9.085c1.691%200%203.156.143%204.049.38%203.465.93%205.727%203.68%205.727%207.335%200%202.441-.81%204.156-2.762%205.644%202.905%201.417%204.453%203.727%204.453%206.966Zm-15.634-8.656h4.584c1.024%200%201.917-.143%202.536-.417%201.215-.548%201.905-1.608%201.905-3.167%200-1.548-.643-2.572-1.845-3.132-.691-.31-1.762-.452-2.763-.452h-4.417v7.168Zm10.716%208.465c0-1.536-.893-3.37-3.227-3.893-.428-.095-1.036-.143-1.571-.143h-5.918v8.085h5.501c.56%200%201.429-.048%201.953-.167%201.94-.453%203.262-1.846%203.262-3.882Zm47.747-11.847-8.097%2020.408h-4.429l-8.109-20.408h5.191l5.192%2014.574%205.108-14.574h5.144Zm-20.218%2010.002c0%20.69-.036%201.262-.155%201.94h-15.943c.631%202.87%202.714%204.728%205.882%204.728%202.131%200%203.607-.882%204.703-2.525h4.87c-1.762%204.144-5.204%206.692-9.657%206.692-6.084%200-10.537-4.858-10.537-10.49%200-6.108%204.524-10.776%2010.335-10.776%206.239%200%2010.442%204.954%2010.502%2010.43Zm-4.763-1.405c-.333-2.846-2.643-4.858-5.691-4.858-2.894%200-5.287%201.929-5.621%204.858h11.312Zm-72.667%203.44c0%204.787-3.287%208.371-9.419%208.371H119.363V64.66c-1.917.274-3.87.69-5.811%201.238l4.537%2011.121h-5.418l-3.596-9.585c-5.144%202.084-10.085%205.216-14.217%209.585h-4.786L101.8%2048.312h4.56l5.68%2013.883a44.112%2044.112%200%200%201%207.323-1.774V48.312h9.084c1.703%200%203.156.143%204.061.393%203.453.929%205.727%203.667%205.727%207.323%200%201.917-.738%204.179-2.81%205.691%203.06%201.56%204.501%204.025%204.501%206.93Zm-15.634-8.667a62.664%2062.664%200%200%201%202.06-.036c1.703.012%203.239.131%204.608.37%201.441-.549%202.357-1.727%202.357-3.537%200-1.941-.881-3.144-2.488-3.667-.548-.18-1.358-.286-2.322-.286h-4.215v7.156Zm-16.55%203.905-3.715-9.894-6.394%2016.502c2.833-2.595%206.263-4.858%2010.109-6.608Zm27.254%204.74c0-2.775-3.131-4.347-8.513-4.418-.715%200-1.441.011-2.191.047v8.252h5.918c2.548%200%204.786-1.37%204.786-3.882Z'%20clip-rule='evenodd'/%3e%3c/g%3e%3cdefs%3e%3clinearGradient%20id='b'%20x1='51.47'%20x2='85.916'%20y1='62.946'%20y2='62.946'%20gradientUnits='userSpaceOnUse'%3e%3cstop%20stop-color='%23CD9F28'/%3e%3cstop%20offset='1'%20stop-color='%23ECD80B'/%3e%3c/linearGradient%3e%3cclipPath%20id='a'%3e%3cpath%20fill='%23fff'%20d='M51.47%2045.728h186.104V80.14H51.47z'/%3e%3c/clipPath%3e%3c/defs%3e%3c/svg%3e)


More from TGW


Explore Other Assets


© 2026 MaintainX. All rights reserved.