


Hussmann Open Fish Sevice Case DSFM-EP-CNP-45OR W/LIGHTS & TIMER
Need answers fast?
Explore the manual using AI.
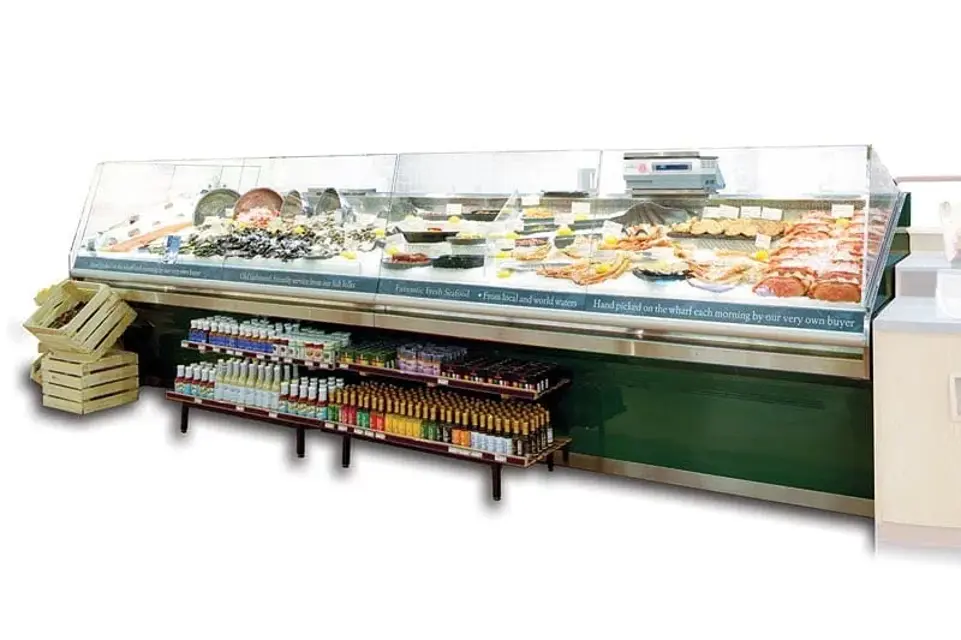
The Hussmann Open Fish Service Case DSFM-EP-CNP-45OR is designed for optimal display and preservation of seafood. Featuring integrated lights and a timer, this case ensures freshness while enhancing product visibility, making it an ideal choice for retail environments.
Turn manuals into instant answers
with your AI-powered assistantTurn manuals into instant answers
with your AI-powered assistant
Manual for Hussmann Open Fish Sevice Case DSFM-EP-CNP-45OR W/LIGHTS & TIMER
Complete asset maintenance, one click away
Get instant access to all the maintenance information you need. Empower technicians to perform preventive maintenance with asset packages, ready to use right out of the box.

Documents & Manuals
Find all the essential guides in one place.
 Tensioning Guide
- Belt-diagram
- C-120 pulleys
+ 13 more

Work Order Templates
Pre-built workflows to keep your asset running smoothly.
- Daily Electrical System Inspection
- Replace Roller and Pulley
- Install Engine B-120
+ 29 more

Procedures
Integrate maintenance plans directly into your work orders.
- Motion Industries
- Applied Industrial Technologies
- Electrical Brothers
+ 5 more

Parts
Access the parts list for your equipment in MaintainX.
- Drive Motor
- B2 Rollers
- Tensioning System
+ 40 more
Hussmann Open Fish Sevice Case DSFM-EP-CNP-45OR W/LIGHTS & TIMER
Create an account to install this asset package.
Maintenance Plans for Hussmann Open Fish Sevice Case Model DSFM-EP-CNP-45OR W/LIGHTS & TIMER
Integrate maintenance plans directly into your work orders in MaintainX.
Fan Blade Replacement
WARNING! ALWAYS DISCONNECT THE ELECTRICAL POWER AT THE MAIN DISCONNECT WHEN SERVICING OR REPLACING ANY ELECTRICAL COMPONENT OF THIS REFRIGERATOR. THIS INCLUDES, BUT IS NOT LIMITED TO SUCH ITEMS AS FANS AND THERMOSTATS.
The evaporator fan is located directly under the deck pan.
Fan blade needs servicing?
ALWAYS REPLACE THE FAN BLADE WITH THE RAISED EMBOSSING SIDE OF THE BLADE INSTALLED TOWARD THE MOTOR.
Sign off on the fan blade replacement

Ballast Replacement
Warning: Ensure the power supply is turned off before starting the procedure
Upload a photo of the LED fixture before starting the procedure
Body panels removed
Screws to grille removed
Electrical conduit exposed
Ballast replaced or serviced
Canopy replaced in reverse order of removal
Sign off on the ballast replacement
Honeycomb Removal & Cleaning
CAUTION: DO NOT TEAR THE HONEYCOMB
Remove the honeycomb assembly
Describe the condition of the honeycomb after removal
Amount of powdered detergent used in tablespoons
Clean the honeycomb
Describe the condition of the honeycomb after cleaning
Dry the honeycomb
Install the honeycomb
Describe the condition of the honeycomb after installation
Non-Glare Glass Cleaning
1. The high optical clarity of this glass is possible due to special coatings on the glass surface itself.
2. To preserve this coating and the optical clarity, keep the glass clean. 3. Water is the only solution recommended to be used to clean the non-glare glass.
4. The damage to the glass from improper, caustic solutions is irreparable.
5. In addition to cleaning the glass with the recommended product, there are precautions that should be taken when working and cleaning the inside of the case.
• When cleaning the inside of the cases, we recommend that the glass be fully opened and covered to prevent to prevent solutions from splashing onto the glass and ruining the coating on the inside.;
Case Cleaning
Warning: Shut off fan before cleaning. Do not use water hoses, chlorinated cleaner, abrasives or steel wool scouring pads, cleaning or sanitizing solution that has an oil base or an ammonia base.
Fan shut off before cleaning?
Interior bottom wiped with domestic soap or detergent based cleaners?
Exterior cleaned with water and a mild detergent?
Interior wiped with damp non-abrasive cloth?
Sanitizing solution used to eliminate bacteria?
Visible debris surrounding or on top of the drain location cleaned?
Scrubbed thoroughly, cleaning all surfaces, with soap and hot water?
Rinsed with hot water, but not flooded?
Unlock efficiency
with MaintainX CoPilot
MaintainX CoPilot is your expert colleague, on call 24/7, helping your team find the answers they need to keep equipment running.
Reduce Unplanned Downtime
Ensure your team follows consistent procedures to minimize equipment failures and costly delays.
Maximize Asset Availability
Keep your assets running longer and more reliably, with standardized maintenance workflows from OEM manuals.
Lower Maintenance Costs
Turn any technician into an expert to streamline operations, maintain more assets, and reduce overall costs.
Thousands of companies manage their assets with MaintainX

'%3e%3cpath%20fill='url(%23b)'%20d='M66.008%2080.068c-5.084-.786-9.763-3.834-12.442-8.68a16.942%2016.942%200%200%201-1.87-5.18c1.096.19%202.203.476%203.298.87%206.525%202.333%2010.836%207.68%2011.014%2012.99ZM51.47%2061.576c.488-5.524%203.62-10.716%208.847-13.597a17.132%2017.132%200%200%201%2011.335-1.882c-.798%208.145-7.43%2014.848-16.038%2015.599-1.417.119-2.799.07-4.144-.12Zm28.564-11.478a17.513%2017.513%200%200%201%203.727%204.62c4.608%208.335%201.584%2018.813-6.75%2023.409a16.988%2016.988%200%200%201-4.359%201.679%2019.624%2019.624%200%200%201-3.977-12.776c.346-7.561%204.942-13.931%2011.36-16.932Z'/%3e%3cpath%20fill='%23110F0D'%20fill-rule='evenodd'%20d='M142.831%2048.324h4.977V77.03h-4.977V48.324Zm27.278%2013.002c.322%201.048.453%202.263.453%203.62v12.073h-4.787V66.208c0-.75-.047-1.572-.154-2.143-.453-2.382-1.822-3.572-4.215-3.572-2.31%200-3.882%201.274-4.43%203.476-.143.596-.226%201.405-.226%202.25v10.8h-4.787V56.623h4.477v2.989c1.536-2.5%203.906-3.43%206.371-3.43%203.488%200%206.263%201.68%207.298%205.144Zm24.636%207.323c0%203.882-2.358%206.525-5.763%207.727-1.298.453-2.632.643-4.62.643h-10.169V48.324h9.085c1.691%200%203.156.143%204.049.38%203.465.93%205.727%203.68%205.727%207.335%200%202.441-.81%204.156-2.762%205.644%202.905%201.417%204.453%203.727%204.453%206.966Zm-15.634-8.656h4.584c1.024%200%201.917-.143%202.536-.417%201.215-.548%201.905-1.608%201.905-3.167%200-1.548-.643-2.572-1.845-3.132-.691-.31-1.762-.452-2.763-.452h-4.417v7.168Zm10.716%208.465c0-1.536-.893-3.37-3.227-3.893-.428-.095-1.036-.143-1.571-.143h-5.918v8.085h5.501c.56%200%201.429-.048%201.953-.167%201.94-.453%203.262-1.846%203.262-3.882Zm47.747-11.847-8.097%2020.408h-4.429l-8.109-20.408h5.191l5.192%2014.574%205.108-14.574h5.144Zm-20.218%2010.002c0%20.69-.036%201.262-.155%201.94h-15.943c.631%202.87%202.714%204.728%205.882%204.728%202.131%200%203.607-.882%204.703-2.525h4.87c-1.762%204.144-5.204%206.692-9.657%206.692-6.084%200-10.537-4.858-10.537-10.49%200-6.108%204.524-10.776%2010.335-10.776%206.239%200%2010.442%204.954%2010.502%2010.43Zm-4.763-1.405c-.333-2.846-2.643-4.858-5.691-4.858-2.894%200-5.287%201.929-5.621%204.858h11.312Zm-72.667%203.44c0%204.787-3.287%208.371-9.419%208.371H119.363V64.66c-1.917.274-3.87.69-5.811%201.238l4.537%2011.121h-5.418l-3.596-9.585c-5.144%202.084-10.085%205.216-14.217%209.585h-4.786L101.8%2048.312h4.56l5.68%2013.883a44.112%2044.112%200%200%201%207.323-1.774V48.312h9.084c1.703%200%203.156.143%204.061.393%203.453.929%205.727%203.667%205.727%207.323%200%201.917-.738%204.179-2.81%205.691%203.06%201.56%204.501%204.025%204.501%206.93Zm-15.634-8.667a62.664%2062.664%200%200%201%202.06-.036c1.703.012%203.239.131%204.608.37%201.441-.549%202.357-1.727%202.357-3.537%200-1.941-.881-3.144-2.488-3.667-.548-.18-1.358-.286-2.322-.286h-4.215v7.156Zm-16.55%203.905-3.715-9.894-6.394%2016.502c2.833-2.595%206.263-4.858%2010.109-6.608Zm27.254%204.74c0-2.775-3.131-4.347-8.513-4.418-.715%200-1.441.011-2.191.047v8.252h5.918c2.548%200%204.786-1.37%204.786-3.882Z'%20clip-rule='evenodd'/%3e%3c/g%3e%3cdefs%3e%3clinearGradient%20id='b'%20x1='51.47'%20x2='85.916'%20y1='62.946'%20y2='62.946'%20gradientUnits='userSpaceOnUse'%3e%3cstop%20stop-color='%23CD9F28'/%3e%3cstop%20offset='1'%20stop-color='%23ECD80B'/%3e%3c/linearGradient%3e%3cclipPath%20id='a'%3e%3cpath%20fill='%23fff'%20d='M51.47%2045.728h186.104V80.14H51.47z'/%3e%3c/clipPath%3e%3c/defs%3e%3c/svg%3e)


More from Hussmann


Explore Other Assets


© 2026 MaintainX. All rights reserved.