


Hussmann Low and Medium Temperature Self Contained Island Merchandiser ISMGG-5B
Need answers fast?
Explore the manual using AI.
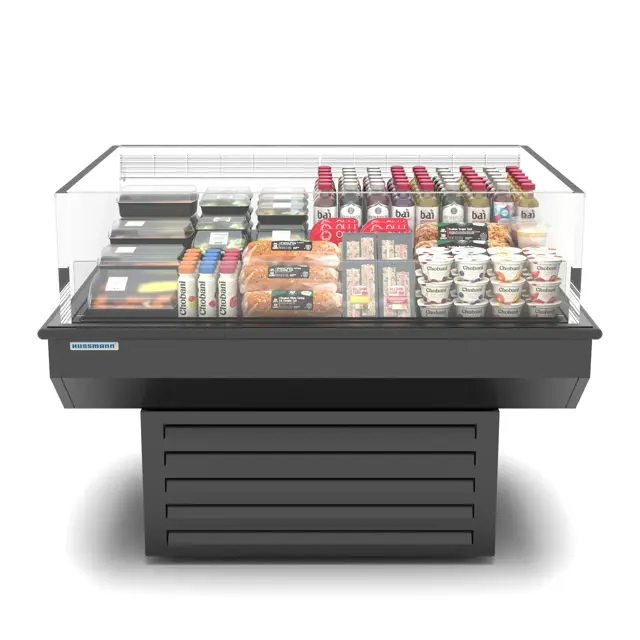
The Hussmann Low and Medium Temperature Self Contained Island Merchandiser ISMGG-5B is designed for optimal product display and preservation. This reliable unit combines energy efficiency with advanced refrigeration technology, making it ideal for retail environments seeking to enhance customer experience while maintaining product quality.
Turn manuals into instant answers
with your AI-powered assistantTurn manuals into instant answers
with your AI-powered assistant
Complete asset maintenance, one click away
Get instant access to all the maintenance information you need. Empower technicians to perform preventive maintenance with asset packages, ready to use right out of the box.

Documents & Manuals
Find all the essential guides in one place.
 Tensioning Guide
- Belt-diagram
- C-120 pulleys
+ 13 more

Work Order Templates
Pre-built workflows to keep your asset running smoothly.
- Daily Electrical System Inspection
- Replace Roller and Pulley
- Install Engine B-120
+ 29 more

Procedures
Integrate maintenance plans directly into your work orders.
- Motion Industries
- Applied Industrial Technologies
- Electrical Brothers
+ 5 more

Parts
Access the parts list for your equipment in MaintainX.
- Drive Motor
- B2 Rollers
- Tensioning System
+ 40 more
Hussmann Low and Medium Temperature Self Contained Island Merchandiser ISMGG-5B
Create an account to install this asset package.
Maintenance Plans for Hussmann Low and Medium Temperature Self Contained Island Merchandiser Model ISMGG-5B
Integrate maintenance plans directly into your work orders in MaintainX.
Evaporation Pan Cleaning
CAUTION! Evaporation Pan is Hot! and poses risk of bodily injury - Always Wear glove and protective eye wear when servicing. Turn off evaporation pan heater, and allow pan to cool.
PRECAUTION! CLEANING PRECAUTIONS
The condensate water outlet for self contained models empties into a limited capacity evaporation pan.
Debris or dirt accumulation inside the condensate evaporation pan or on the heater coil will reduce the pan's evaporation capacity and cause premature heater failure.
The evaporation pan waste water will overflow and spill onto the floor if the heater is not properly operating.
Remove accumulated debris from the evaporation pan.
Wipe down heater coil with a cloth and warm water. Be sure to remove any dirt, debris or liquids from the heater coil.
Water introduced during cleaning will cause the evaporation pan to overflow.
Do not use high pressure water hoses

1 Monthly Coils Cleaning
Warning: Always wear gloves and protective eye wear when cleaning near sharp coil fins and dust particles.
Check if the condenser coils are clean
If the condenser coils are dirty, proceed with the following steps
Use a vacuum cleaner with a wand attachment to clean the coils
Use a soft (non-metallic) brush to remove dirt and debris
Ensure not to bend coil fins during the cleaning process
Sign off on the monthly coils cleaning
Stainless Steel Surfaces Cleaning
CAUTION! DO NOT FLOOD! Use only enough water necessary to clean surface. Water must not drip down the case! Never use ammonia based cleansers, abrasive cleansers, or scouring pads.
Used non-abrasive cleaning materials and polished with grain of the steel?
Used warm water or added a mild detergent to the water and applied with a cloth? Wiped rails dry after wetting?
Type of cleaner used
Did you avoid cleaners containing salts?
Did you avoid using bleach?
Sign off on the cleaning procedure
Fan Motor and Blades Replacement
Warning: Product will be degraded and may spoil if allowed to sit in a non-refrigerated area.
Warning: LOCK OUT / TAG OUT - To avoid serious injury or death from electrical shock, always disconnect the electrical power at the main disconnect when servicing or replacing any electrical component.
Fan blades reinstalled correctly with raised embossing positioned as indicated on the parts list
Product removed and placed in a refrigerated area
Power to the merchandiser turned off
Bottom display pans removed
Fan disconnected from wiring harness
Fan blade removed
Fan plenum lifted and screws holding bottom of motor to fan basket removed
Removing Scratches From Bumper
WARNING! Do NOT use HOT water on Cold glass Surfaces. This can cause the glass to shatter and could result in personal injury. Allow glass fronts, to warm before applying hot water.
Use steel wool to smooth out the surface area of the bumper.
Clean area.
Apply vinyl or car wax and polish surface for a smooth glossy finish.
Upload a photo of the bumper after the procedure
Sign off on the procedure
Parts for Hussmann Low and Medium Temperature Self Contained Island Merchandiser ISMGG-5B
Access the parts list for your equipment in MaintainX.
Condensate Pan 570W 120V
HE.4850152
Pressure Control
SW.4441070
Air Sensor, Black, SS TIP
EP.4482541
Expansion Valve
VR.4613895
Defrost Sensor, Yellow
CC.4482929
Condensate Pan 570W 120V
HE.4850152
Pressure Control
SW.4441070
Air Sensor, Black, SS TIP
EP.4482541
Expansion Valve
VR.4613895
Defrost Sensor, Yellow
CC.4482929
Condensate Pan 570W 120V
HE.4850152
Pressure Control
SW.4441070
Air Sensor, Black, SS TIP
EP.4482541
Expansion Valve
VR.4613895
Defrost Sensor, Yellow
CC.4482929
Unlock efficiency
with MaintainX CoPilot
MaintainX CoPilot is your expert colleague, on call 24/7, helping your team find the answers they need to keep equipment running.
Reduce Unplanned Downtime
Ensure your team follows consistent procedures to minimize equipment failures and costly delays.
Maximize Asset Availability
Keep your assets running longer and more reliably, with standardized maintenance workflows from OEM manuals.
Lower Maintenance Costs
Turn any technician into an expert to streamline operations, maintain more assets, and reduce overall costs.
Thousands of companies manage their assets with MaintainX

'%3e%3cpath%20fill='url(%23b)'%20d='M66.008%2080.068c-5.084-.786-9.763-3.834-12.442-8.68a16.942%2016.942%200%200%201-1.87-5.18c1.096.19%202.203.476%203.298.87%206.525%202.333%2010.836%207.68%2011.014%2012.99ZM51.47%2061.576c.488-5.524%203.62-10.716%208.847-13.597a17.132%2017.132%200%200%201%2011.335-1.882c-.798%208.145-7.43%2014.848-16.038%2015.599-1.417.119-2.799.07-4.144-.12Zm28.564-11.478a17.513%2017.513%200%200%201%203.727%204.62c4.608%208.335%201.584%2018.813-6.75%2023.409a16.988%2016.988%200%200%201-4.359%201.679%2019.624%2019.624%200%200%201-3.977-12.776c.346-7.561%204.942-13.931%2011.36-16.932Z'/%3e%3cpath%20fill='%23110F0D'%20fill-rule='evenodd'%20d='M142.831%2048.324h4.977V77.03h-4.977V48.324Zm27.278%2013.002c.322%201.048.453%202.263.453%203.62v12.073h-4.787V66.208c0-.75-.047-1.572-.154-2.143-.453-2.382-1.822-3.572-4.215-3.572-2.31%200-3.882%201.274-4.43%203.476-.143.596-.226%201.405-.226%202.25v10.8h-4.787V56.623h4.477v2.989c1.536-2.5%203.906-3.43%206.371-3.43%203.488%200%206.263%201.68%207.298%205.144Zm24.636%207.323c0%203.882-2.358%206.525-5.763%207.727-1.298.453-2.632.643-4.62.643h-10.169V48.324h9.085c1.691%200%203.156.143%204.049.38%203.465.93%205.727%203.68%205.727%207.335%200%202.441-.81%204.156-2.762%205.644%202.905%201.417%204.453%203.727%204.453%206.966Zm-15.634-8.656h4.584c1.024%200%201.917-.143%202.536-.417%201.215-.548%201.905-1.608%201.905-3.167%200-1.548-.643-2.572-1.845-3.132-.691-.31-1.762-.452-2.763-.452h-4.417v7.168Zm10.716%208.465c0-1.536-.893-3.37-3.227-3.893-.428-.095-1.036-.143-1.571-.143h-5.918v8.085h5.501c.56%200%201.429-.048%201.953-.167%201.94-.453%203.262-1.846%203.262-3.882Zm47.747-11.847-8.097%2020.408h-4.429l-8.109-20.408h5.191l5.192%2014.574%205.108-14.574h5.144Zm-20.218%2010.002c0%20.69-.036%201.262-.155%201.94h-15.943c.631%202.87%202.714%204.728%205.882%204.728%202.131%200%203.607-.882%204.703-2.525h4.87c-1.762%204.144-5.204%206.692-9.657%206.692-6.084%200-10.537-4.858-10.537-10.49%200-6.108%204.524-10.776%2010.335-10.776%206.239%200%2010.442%204.954%2010.502%2010.43Zm-4.763-1.405c-.333-2.846-2.643-4.858-5.691-4.858-2.894%200-5.287%201.929-5.621%204.858h11.312Zm-72.667%203.44c0%204.787-3.287%208.371-9.419%208.371H119.363V64.66c-1.917.274-3.87.69-5.811%201.238l4.537%2011.121h-5.418l-3.596-9.585c-5.144%202.084-10.085%205.216-14.217%209.585h-4.786L101.8%2048.312h4.56l5.68%2013.883a44.112%2044.112%200%200%201%207.323-1.774V48.312h9.084c1.703%200%203.156.143%204.061.393%203.453.929%205.727%203.667%205.727%207.323%200%201.917-.738%204.179-2.81%205.691%203.06%201.56%204.501%204.025%204.501%206.93Zm-15.634-8.667a62.664%2062.664%200%200%201%202.06-.036c1.703.012%203.239.131%204.608.37%201.441-.549%202.357-1.727%202.357-3.537%200-1.941-.881-3.144-2.488-3.667-.548-.18-1.358-.286-2.322-.286h-4.215v7.156Zm-16.55%203.905-3.715-9.894-6.394%2016.502c2.833-2.595%206.263-4.858%2010.109-6.608Zm27.254%204.74c0-2.775-3.131-4.347-8.513-4.418-.715%200-1.441.011-2.191.047v8.252h5.918c2.548%200%204.786-1.37%204.786-3.882Z'%20clip-rule='evenodd'/%3e%3c/g%3e%3cdefs%3e%3clinearGradient%20id='b'%20x1='51.47'%20x2='85.916'%20y1='62.946'%20y2='62.946'%20gradientUnits='userSpaceOnUse'%3e%3cstop%20stop-color='%23CD9F28'/%3e%3cstop%20offset='1'%20stop-color='%23ECD80B'/%3e%3c/linearGradient%3e%3cclipPath%20id='a'%3e%3cpath%20fill='%23fff'%20d='M51.47%2045.728h186.104V80.14H51.47z'/%3e%3c/clipPath%3e%3c/defs%3e%3c/svg%3e)


More from Hussmann


Explore Other Assets


© 2026 MaintainX. All rights reserved.