


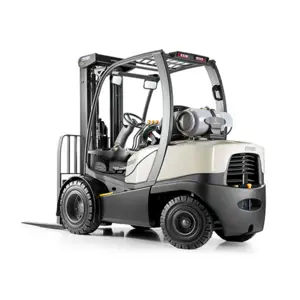
Hussmann Low and Medium Temperature Self Contained Island Merchandiser ISFGG-5G
Need answers fast?
Explore the manual using AI.
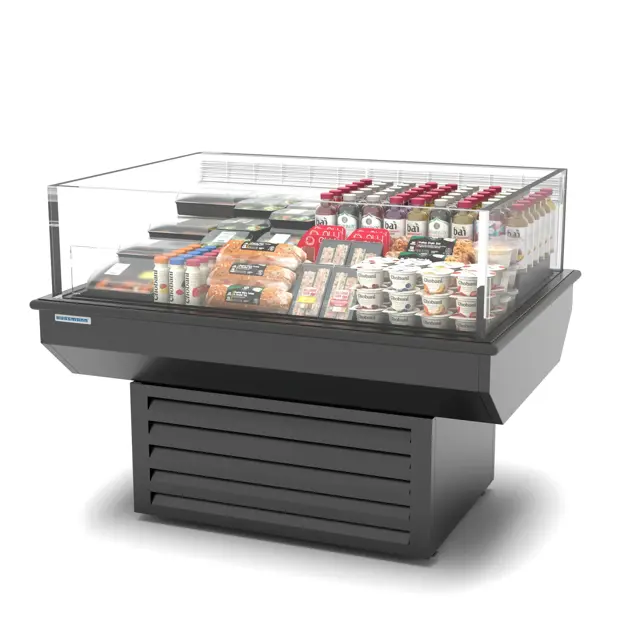
The Hussmann Low and Medium Temperature Self Contained Island Merchandiser ISFGG-5G is designed for optimal food preservation and display. This energy-efficient unit features advanced refrigeration technology, ensuring consistent temperature control and reliability in retail environments. Ideal for supermarkets and convenience stores, it enhances product visibility while maintaining freshness.
Turn manuals into instant answers
with your AI-powered assistantTurn manuals into instant answers
with your AI-powered assistant
Complete asset maintenance, one click away
Get instant access to all the maintenance information you need. Empower technicians to perform preventive maintenance with asset packages, ready to use right out of the box.

Documents & Manuals
Find all the essential guides in one place.
 Tensioning Guide
- Belt-diagram
- C-120 pulleys
+ 13 more

Work Order Templates
Pre-built workflows to keep your asset running smoothly.
- Daily Electrical System Inspection
- Replace Roller and Pulley
- Install Engine B-120
+ 29 more

Procedures
Integrate maintenance plans directly into your work orders.
- Motion Industries
- Applied Industrial Technologies
- Electrical Brothers
+ 5 more

Parts
Access the parts list for your equipment in MaintainX.
- Drive Motor
- B2 Rollers
- Tensioning System
+ 40 more
Hussmann Low and Medium Temperature Self Contained Island Merchandiser ISFGG-5G
Create an account to install this asset package.
Maintenance Plans for Hussmann Low and Medium Temperature Self Contained Island Merchandiser Model ISFGG-5G
Integrate maintenance plans directly into your work orders in MaintainX.
1 Weekly Merchandiser Cleaning
• Long life and satisfactory performance of any equipment is dependent upon the care it receives. To ensure long life, proper sanitation and minimum maintenance costs, these merchandisers should be thoroughly cleaned, all debris removed and the interiors washed down, weekly.
- Exterior Surfaces
• The exterior surfaces must be cleaned with a mild detergent and warm water to protect and maintain their attractive finish. NEVER USE ABRASIVE CLEANSERS OR SCOURING PADS.
- Interior Surfaces
• The interior surfaces may be cleaned with most domestic detergents, ammonia based cleaners and sanitizing solutions with no harm to the surface. Self contained models empty into a limited capacity evaporation pan, which will overflow if excess water is used in cleaning.
Do NOT Use:
• Abrasive cleansers and scouring pads, as these will mar the finish.
• Coarse paper towels on coated glass.
• Ammonia-based cleaners on acrylic parts.

Fan Motor and Blades Replacement
• Should it ever be necessary to service or replace the fan motors or blades be certain that the fan blades are reinstalled correctly.
• THE BLADES MUST BE INSTALLED WITH RAISED EMBOSSING (PART NUMBER ON PLASTIC BLADES) POSITIONED AS INDICATED ON THE PARTS LIST.
For access to these fans:
1. Remove product and place in a refrigerated area. Turn off power to the merchandiser.
2. Remove bottom display pans.
3. Disconnect fan from wiring harness.
4. Remove fan blade.
5. Lift fan plenum and remove screws holding bottom of motor to fan basket.
6. Replace fan motor and blade.
Repairing Aluminium Coil
Warning: This procedure requires trained personnel with PPE!
Locate Leak
REMOVE ALL PRESSURE
Brush area UNDER HEAT
Use PRESTOLITE TORCH ONLY. Number 6 tip
Maintain separate set of stainless steel brushes, and USE ONLY ON ALUMINUM
Tin surface around area
Brush tinned surface UNDER HEAT, thoroughly filling the open pores around leak
Repair leak. Let aluminum melt solder, NOT the torch
6 Monthly Discharge Air Louvers Cleaning
Warning: Be careful not to damage the louvers during cleaning.
Are the louvers dirty?
If the louvers are dirty, proceed with the following steps.
Upload a photo of the dirty louvers before cleaning.
Were you able to remove the honeycomb from its retainer using a flat object?
Upload a photo of the removed honeycomb.
Were you able to clean and dry the air louvers?
Upload a photo of the cleaned louvers.
Were you able to replace the honeycomb in reverse order?
Nosing Anti-Sweat Heater Replacement
Product removed and placed in a refrigerated area
Power to the merchandiser turned off
Interior panels from under the nosing heater removed
Interior panel support bracket removed
Existing screws from sheet metal nosing panel removed
Insulation removed
Existing anti-sweat heater unplugged and removed
Anti-sweat heater taped as shown in the illustrations
Plug routed to jumper harness
Parts for Hussmann Low and Medium Temperature Self Contained Island Merchandiser ISFGG-5G
Access the parts list for your equipment in MaintainX.
Pressure Control
SW.4441070
Anti-sweat Heaters,140 in.
HE.4851197
Defrost Sensor, Yellow
CC.4482929
Safe Net III Display (°F)
EP.4482541
Defrost Heater, 208/230V 800W
HE.4851195
Pressure Control
SW.4441070
Anti-sweat Heaters,140 in.
HE.4851197
Defrost Sensor, Yellow
CC.4482929
Safe Net III Display (°F)
EP.4482541
Defrost Heater, 208/230V 800W
HE.4851195
Pressure Control
SW.4441070
Anti-sweat Heaters,140 in.
HE.4851197
Defrost Sensor, Yellow
CC.4482929
Safe Net III Display (°F)
EP.4482541
Defrost Heater, 208/230V 800W
HE.4851195
Unlock efficiency
with MaintainX CoPilot
MaintainX CoPilot is your expert colleague, on call 24/7, helping your team find the answers they need to keep equipment running.
Reduce Unplanned Downtime
Ensure your team follows consistent procedures to minimize equipment failures and costly delays.
Maximize Asset Availability
Keep your assets running longer and more reliably, with standardized maintenance workflows from OEM manuals.
Lower Maintenance Costs
Turn any technician into an expert to streamline operations, maintain more assets, and reduce overall costs.
Thousands of companies manage their assets with MaintainX

'%3e%3cpath%20fill='url(%23b)'%20d='M66.008%2080.068c-5.084-.786-9.763-3.834-12.442-8.68a16.942%2016.942%200%200%201-1.87-5.18c1.096.19%202.203.476%203.298.87%206.525%202.333%2010.836%207.68%2011.014%2012.99ZM51.47%2061.576c.488-5.524%203.62-10.716%208.847-13.597a17.132%2017.132%200%200%201%2011.335-1.882c-.798%208.145-7.43%2014.848-16.038%2015.599-1.417.119-2.799.07-4.144-.12Zm28.564-11.478a17.513%2017.513%200%200%201%203.727%204.62c4.608%208.335%201.584%2018.813-6.75%2023.409a16.988%2016.988%200%200%201-4.359%201.679%2019.624%2019.624%200%200%201-3.977-12.776c.346-7.561%204.942-13.931%2011.36-16.932Z'/%3e%3cpath%20fill='%23110F0D'%20fill-rule='evenodd'%20d='M142.831%2048.324h4.977V77.03h-4.977V48.324Zm27.278%2013.002c.322%201.048.453%202.263.453%203.62v12.073h-4.787V66.208c0-.75-.047-1.572-.154-2.143-.453-2.382-1.822-3.572-4.215-3.572-2.31%200-3.882%201.274-4.43%203.476-.143.596-.226%201.405-.226%202.25v10.8h-4.787V56.623h4.477v2.989c1.536-2.5%203.906-3.43%206.371-3.43%203.488%200%206.263%201.68%207.298%205.144Zm24.636%207.323c0%203.882-2.358%206.525-5.763%207.727-1.298.453-2.632.643-4.62.643h-10.169V48.324h9.085c1.691%200%203.156.143%204.049.38%203.465.93%205.727%203.68%205.727%207.335%200%202.441-.81%204.156-2.762%205.644%202.905%201.417%204.453%203.727%204.453%206.966Zm-15.634-8.656h4.584c1.024%200%201.917-.143%202.536-.417%201.215-.548%201.905-1.608%201.905-3.167%200-1.548-.643-2.572-1.845-3.132-.691-.31-1.762-.452-2.763-.452h-4.417v7.168Zm10.716%208.465c0-1.536-.893-3.37-3.227-3.893-.428-.095-1.036-.143-1.571-.143h-5.918v8.085h5.501c.56%200%201.429-.048%201.953-.167%201.94-.453%203.262-1.846%203.262-3.882Zm47.747-11.847-8.097%2020.408h-4.429l-8.109-20.408h5.191l5.192%2014.574%205.108-14.574h5.144Zm-20.218%2010.002c0%20.69-.036%201.262-.155%201.94h-15.943c.631%202.87%202.714%204.728%205.882%204.728%202.131%200%203.607-.882%204.703-2.525h4.87c-1.762%204.144-5.204%206.692-9.657%206.692-6.084%200-10.537-4.858-10.537-10.49%200-6.108%204.524-10.776%2010.335-10.776%206.239%200%2010.442%204.954%2010.502%2010.43Zm-4.763-1.405c-.333-2.846-2.643-4.858-5.691-4.858-2.894%200-5.287%201.929-5.621%204.858h11.312Zm-72.667%203.44c0%204.787-3.287%208.371-9.419%208.371H119.363V64.66c-1.917.274-3.87.69-5.811%201.238l4.537%2011.121h-5.418l-3.596-9.585c-5.144%202.084-10.085%205.216-14.217%209.585h-4.786L101.8%2048.312h4.56l5.68%2013.883a44.112%2044.112%200%200%201%207.323-1.774V48.312h9.084c1.703%200%203.156.143%204.061.393%203.453.929%205.727%203.667%205.727%207.323%200%201.917-.738%204.179-2.81%205.691%203.06%201.56%204.501%204.025%204.501%206.93Zm-15.634-8.667a62.664%2062.664%200%200%201%202.06-.036c1.703.012%203.239.131%204.608.37%201.441-.549%202.357-1.727%202.357-3.537%200-1.941-.881-3.144-2.488-3.667-.548-.18-1.358-.286-2.322-.286h-4.215v7.156Zm-16.55%203.905-3.715-9.894-6.394%2016.502c2.833-2.595%206.263-4.858%2010.109-6.608Zm27.254%204.74c0-2.775-3.131-4.347-8.513-4.418-.715%200-1.441.011-2.191.047v8.252h5.918c2.548%200%204.786-1.37%204.786-3.882Z'%20clip-rule='evenodd'/%3e%3c/g%3e%3cdefs%3e%3clinearGradient%20id='b'%20x1='51.47'%20x2='85.916'%20y1='62.946'%20y2='62.946'%20gradientUnits='userSpaceOnUse'%3e%3cstop%20stop-color='%23CD9F28'/%3e%3cstop%20offset='1'%20stop-color='%23ECD80B'/%3e%3c/linearGradient%3e%3cclipPath%20id='a'%3e%3cpath%20fill='%23fff'%20d='M51.47%2045.728h186.104V80.14H51.47z'/%3e%3c/clipPath%3e%3c/defs%3e%3c/svg%3e)


More from Hussmann


Explore Other Assets


© 2026 MaintainX. All rights reserved.