


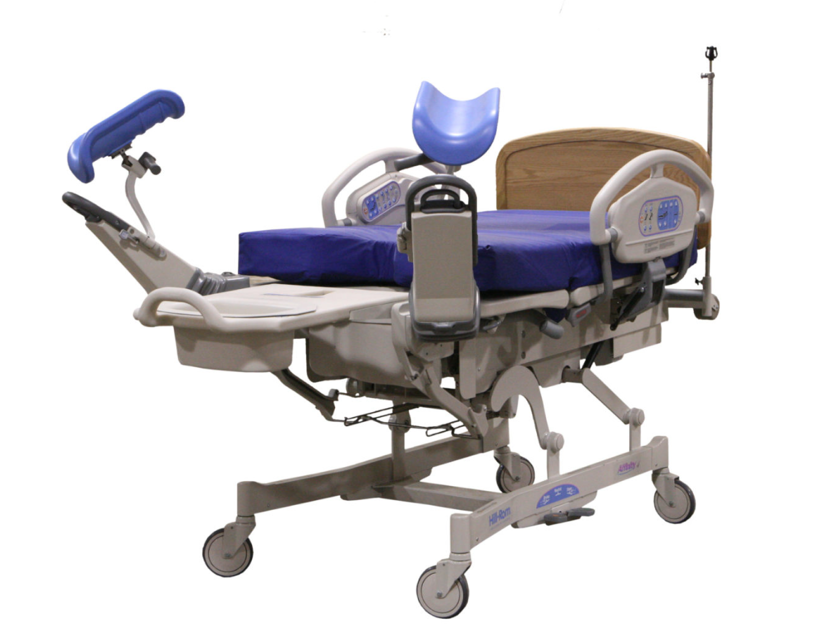
Hill-Rom Birthing Bed P3700
Need answers fast?
Explore the manual using AI.
Turn manuals into instant answers
with your AI-powered assistantTurn manuals into instant answers
with your AI-powered assistant
Manual for Hill-Rom Birthing Bed P3700
Complete asset maintenance, one click away
Get instant access to all the maintenance information you need. Empower technicians to perform preventive maintenance with asset packages, ready to use right out of the box.

Documents & Manuals
Find all the essential guides in one place.
 Tensioning Guide
- Belt-diagram
- C-120 pulleys
+ 13 more

Work Order Templates
Pre-built workflows to keep your asset running smoothly.
- Daily Electrical System Inspection
- Replace Roller and Pulley
- Install Engine B-120
+ 29 more

Procedures
Integrate maintenance plans directly into your work orders.
- Motion Industries
- Applied Industrial Technologies
- Electrical Brothers
+ 5 more

Parts
Access the parts list for your equipment in MaintainX.
- Drive Motor
- B2 Rollers
- Tensioning System
+ 40 more
Hill-Rom Birthing Bed P3700
Create an account to install this asset package.
Maintenance Plans for Hill-Rom Birthing Bed Model P3700
Integrate maintenance plans directly into your work orders in MaintainX.
Wood Component Maintenance
Warning: Only use recommended cleaning solutions and methods.
Check if the wood surface is clean
Any liquid spills on the surface?
If yes, wipe it off immediately.
Check if the surface is dry
Upload a photo of the wood surface
Describe any visible nicks or scrapes
Check if the nicks or scrapes have been repaired
Apply liquid furniture polish

Mattress Assembly Removal
Set the brake/steer pedal to the brake position
Ensure that the bed is out of the Trend-Like position
Carefully lift the mattress from the head end of the bed
CAUTION: Do not pull on the mattress material when unfastening the mattress retaining snaps. Unfasten the mattress retaining snaps at the snap location. Failure to do so could result in equipment damage.
Locate and unfasten the two mattress retaining snaps beneath the seat section
Does the mattress have air bladders?
If the mattress has air bladders, disconnect the two hoses located beneath the seat section
Lift the side panels on the foot section and unfasten the four snaps on the foot mattress
Sign off on the mattress assembly removal
Line Voltage Fuses Removal
WARNING: Adhere to all electrical safety precautions when servicing the bed's electrical system. Failure to do so could result in personal injury or equipment damage.
Set the brake/steer pedal to the brake position.
Ensure that the bed is out of the Trend-Like position.
Using the head function, raise the head section to the high position.
Using the hilow function, raise the bed to the high position.
SHOCK HAZARD: Unplug the unit from its power source. Failure to do so could result in personal injury or equipment damage.
Unplug the bed from its power source, and engage the lockout control.
Remove the top motor cover (refer to procedure 4.1).
Using the screwdriver, remove the fuse housing (A) from the power entry module (B) (see figure 4-21 on page 4-47).
CPR Release Adjustment
Set the brake/steer pedal to the brake position
Ensure that the bed is out of the Trend-Like position
Using the hilow function, place the bed in a mid-height position
Using the head function, raise the head section to its highest position
Ensure that the siderails are in the up position
SHOCK HAZARD: Unplug the unit from its power source. Failure to do so could result in personal injury or equipment damage
Unplug the bed from its power source, and engage the lockout control
Remove the top motor cover (refer to procedure 4.1)
Ensure that the CPR cables (A) are routed inside the head section weldment (B) (see figure 4-11 on page 4-27)
Brake / Steer Caster Adjustment
Set the brake/steer pedal to place the system in neutral
Perform step 1 through step 3 in “Removal” on page 4-82
Using the 5/32\ AllenTM wrench
Turn the setscrew (D) counterclockwise until the ratcheting stops
Set the brake/steer pedal to place the system in the brake position
Ensure that the caster (C) tire does not roll
If the caster (C) tire rolls, tighten the setscrew (D) slightly
If, after performing step 7, the brake still seems to slip, check the caster (C) tire for wax buildup. Clean the tire with turpentine if necessary
Set the brake/steer pedal to place the system in steer
Parts for Hill-Rom Birthing Bed P3700
Access the parts list for your equipment in MaintainX.
Caster, 6" Swivel
450846048 (3700)
Caster, 8" Swivel
450848048 (3700)
Caster, 6" Brake
45084-6648 (3700)
Caster, 8" Brake
450848648 (3700)
Caster, 6" Brake/Steer
450846448 (3700)
Caster, 6" Swivel
450846048 (3700)
Caster, 8" Swivel
450848048 (3700)
Caster, 6" Brake
45084-6648 (3700)
Caster, 8" Brake
450848648 (3700)
Caster, 6" Brake/Steer
450846448 (3700)
Caster, 6" Swivel
450846048 (3700)
Caster, 8" Swivel
450848048 (3700)
Caster, 6" Brake
45084-6648 (3700)
Caster, 8" Brake
450848648 (3700)
Caster, 6" Brake/Steer
450846448 (3700)
Unlock efficiency
with MaintainX CoPilot
MaintainX CoPilot is your expert colleague, on call 24/7, helping your team find the answers they need to keep equipment running.
Reduce Unplanned Downtime
Ensure your team follows consistent procedures to minimize equipment failures and costly delays.
Maximize Asset Availability
Keep your assets running longer and more reliably, with standardized maintenance workflows from OEM manuals.
Lower Maintenance Costs
Turn any technician into an expert to streamline operations, maintain more assets, and reduce overall costs.
Thousands of companies manage their assets with MaintainX

'%3e%3cpath%20fill='url(%23b)'%20d='M66.008%2080.068c-5.084-.786-9.763-3.834-12.442-8.68a16.942%2016.942%200%200%201-1.87-5.18c1.096.19%202.203.476%203.298.87%206.525%202.333%2010.836%207.68%2011.014%2012.99ZM51.47%2061.576c.488-5.524%203.62-10.716%208.847-13.597a17.132%2017.132%200%200%201%2011.335-1.882c-.798%208.145-7.43%2014.848-16.038%2015.599-1.417.119-2.799.07-4.144-.12Zm28.564-11.478a17.513%2017.513%200%200%201%203.727%204.62c4.608%208.335%201.584%2018.813-6.75%2023.409a16.988%2016.988%200%200%201-4.359%201.679%2019.624%2019.624%200%200%201-3.977-12.776c.346-7.561%204.942-13.931%2011.36-16.932Z'/%3e%3cpath%20fill='%23110F0D'%20fill-rule='evenodd'%20d='M142.831%2048.324h4.977V77.03h-4.977V48.324Zm27.278%2013.002c.322%201.048.453%202.263.453%203.62v12.073h-4.787V66.208c0-.75-.047-1.572-.154-2.143-.453-2.382-1.822-3.572-4.215-3.572-2.31%200-3.882%201.274-4.43%203.476-.143.596-.226%201.405-.226%202.25v10.8h-4.787V56.623h4.477v2.989c1.536-2.5%203.906-3.43%206.371-3.43%203.488%200%206.263%201.68%207.298%205.144Zm24.636%207.323c0%203.882-2.358%206.525-5.763%207.727-1.298.453-2.632.643-4.62.643h-10.169V48.324h9.085c1.691%200%203.156.143%204.049.38%203.465.93%205.727%203.68%205.727%207.335%200%202.441-.81%204.156-2.762%205.644%202.905%201.417%204.453%203.727%204.453%206.966Zm-15.634-8.656h4.584c1.024%200%201.917-.143%202.536-.417%201.215-.548%201.905-1.608%201.905-3.167%200-1.548-.643-2.572-1.845-3.132-.691-.31-1.762-.452-2.763-.452h-4.417v7.168Zm10.716%208.465c0-1.536-.893-3.37-3.227-3.893-.428-.095-1.036-.143-1.571-.143h-5.918v8.085h5.501c.56%200%201.429-.048%201.953-.167%201.94-.453%203.262-1.846%203.262-3.882Zm47.747-11.847-8.097%2020.408h-4.429l-8.109-20.408h5.191l5.192%2014.574%205.108-14.574h5.144Zm-20.218%2010.002c0%20.69-.036%201.262-.155%201.94h-15.943c.631%202.87%202.714%204.728%205.882%204.728%202.131%200%203.607-.882%204.703-2.525h4.87c-1.762%204.144-5.204%206.692-9.657%206.692-6.084%200-10.537-4.858-10.537-10.49%200-6.108%204.524-10.776%2010.335-10.776%206.239%200%2010.442%204.954%2010.502%2010.43Zm-4.763-1.405c-.333-2.846-2.643-4.858-5.691-4.858-2.894%200-5.287%201.929-5.621%204.858h11.312Zm-72.667%203.44c0%204.787-3.287%208.371-9.419%208.371H119.363V64.66c-1.917.274-3.87.69-5.811%201.238l4.537%2011.121h-5.418l-3.596-9.585c-5.144%202.084-10.085%205.216-14.217%209.585h-4.786L101.8%2048.312h4.56l5.68%2013.883a44.112%2044.112%200%200%201%207.323-1.774V48.312h9.084c1.703%200%203.156.143%204.061.393%203.453.929%205.727%203.667%205.727%207.323%200%201.917-.738%204.179-2.81%205.691%203.06%201.56%204.501%204.025%204.501%206.93Zm-15.634-8.667a62.664%2062.664%200%200%201%202.06-.036c1.703.012%203.239.131%204.608.37%201.441-.549%202.357-1.727%202.357-3.537%200-1.941-.881-3.144-2.488-3.667-.548-.18-1.358-.286-2.322-.286h-4.215v7.156Zm-16.55%203.905-3.715-9.894-6.394%2016.502c2.833-2.595%206.263-4.858%2010.109-6.608Zm27.254%204.74c0-2.775-3.131-4.347-8.513-4.418-.715%200-1.441.011-2.191.047v8.252h5.918c2.548%200%204.786-1.37%204.786-3.882Z'%20clip-rule='evenodd'/%3e%3c/g%3e%3cdefs%3e%3clinearGradient%20id='b'%20x1='51.47'%20x2='85.916'%20y1='62.946'%20y2='62.946'%20gradientUnits='userSpaceOnUse'%3e%3cstop%20stop-color='%23CD9F28'/%3e%3cstop%20offset='1'%20stop-color='%23ECD80B'/%3e%3c/linearGradient%3e%3cclipPath%20id='a'%3e%3cpath%20fill='%23fff'%20d='M51.47%2045.728h186.104V80.14H51.47z'/%3e%3c/clipPath%3e%3c/defs%3e%3c/svg%3e)


More from Hill-Rom

Explore Other Assets


© 2026 MaintainX. All rights reserved.