


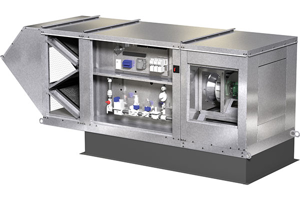
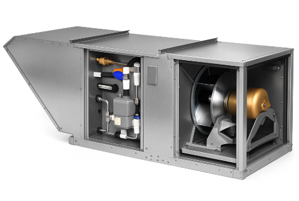
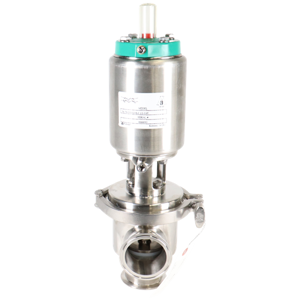
Greenheck Warehouse Make Up Air Unit DGX-112
Need answers fast?
Explore the manual using AI.

The Greenheck Warehouse Make Up Air Unit DGX-112 is designed for efficient air handling in industrial settings. This robust unit ensures optimal indoor air quality and temperature control, making it essential for warehouses and manufacturing facilities. With reliable performance and easy maintenance, the DGX-112 is a top choice for effective air management solutions.
Turn manuals into instant answers
with your AI-powered assistantTurn manuals into instant answers
with your AI-powered assistant
Manual for Greenheck Warehouse Make Up Air Unit DGX-112
Complete asset maintenance, one click away
Get instant access to all the maintenance information you need. Empower technicians to perform preventive maintenance with asset packages, ready to use right out of the box.

Documents & Manuals
Find all the essential guides in one place.
 Tensioning Guide
- Belt-diagram
- C-120 pulleys
+ 13 more

Work Order Templates
Pre-built workflows to keep your asset running smoothly.
- Daily Electrical System Inspection
- Replace Roller and Pulley
- Install Engine B-120
+ 29 more

Procedures
Integrate maintenance plans directly into your work orders.
- Motion Industries
- Applied Industrial Technologies
- Electrical Brothers
+ 5 more

Parts
Access the parts list for your equipment in MaintainX.
- Drive Motor
- B2 Rollers
- Tensioning System
+ 40 more
Greenheck Warehouse Make Up Air Unit DGX-112
Create an account to install this asset package.
Maintenance Plans for Greenheck Warehouse Make Up Air Unit Model DGX-112
Integrate maintenance plans directly into your work orders in MaintainX.
Chilled Water Coil Maintenance
Test the circulating fluid for sediment, corrosive products and biological contaminants
Describe the corrective measures taken if any contaminants were found
Maintain adequate fluid velocities and proper filtering of the fluid
Are automatic air vents utilized?
If automatic air vents are not utilized, periodic venting of the coil is recommended to remove accumulated air
Sign off on the chilled water coil maintenance

Supply Wheel Service
Warning: This service requires trained personnel with PPE!
Is the supply wheel operational?
If the supply wheel is not operational, report the issues to the maintenance team and stop the procedure
Check for oil and dust accumulation on the wheel
Upload a photo of the supply wheel before cleaning
Clean the wheel and housing
Upload a photo of the supply wheel after cleaning
Enter the balance reading of the wheel after cleaning
Sign off on the supply wheel service
Blowing-Out Coils
Warning: This procedure should be performed by trained personnel only.
Close valves on the supply and return lines
Open drain valves and/or drain plug
Remove vent plug to allow coil to drain faster
After coil is fully drained, connect a blower to the caps. Do not connect the blower to the air vent or drain plug
Close the vent plug on the header that the blower is connected to. Open the drain valve or cap on the other header
Turn on blower for 30 minutes
Place mirror at discharge. If the mirror fogs up, repeat procedure until no fog appears on the mirror
After drying the coil, wait a few minutes then repeat Step #5
Burner Maintenance
Warning: Ensure the burner is turned off and cooled down before starting the maintenance.
Inspect the burner for accumulation of scale on both the upstream and downstream sides of the mixing plates
Remove foreign material with a wire brush
Visually check that all holes in the mixing plates are clear
If any burner ports are plugged (even partially), clear them with a piece of wire or another appropriate tool. Do not enlarge burner ports when clearing a blockage as performance could be affected
Replace or tighten any loose or missing fasteners on the mixing plates
Always use appropriate fasteners
Inspect and clean the flame rod or UV scanner
Occasional replacement of the flame rod and spark rod may be necessary to ensure optimum unit performance
Evaporative Cooling Module Maintenance
Media Maintenance
Is there a large amount of mineral build-up?
If there is a large amount of mineral build-up, clean or replace the media and increase the water bleed-off or drain and fill rate.
Is the cooling media older than 5 years?
If the cooling media is older than 5 years, replace it.
Select the type of media used for replacement
Sign off on the evaporative cooling module maintenance
Parts for Greenheck Warehouse Make Up Air Unit DGX-112
Access the parts list for your equipment in MaintainX.
Auto Drain & Fill Valve 3/4"
461264
Auto Drain & Fill Valve 1/4"
461263
Auto Drain & Fill Valve 1/2"
461262
Auto Drain & Fill Valve 3/4"
461264
Auto Drain & Fill Valve 1/4"
461263
Auto Drain & Fill Valve 1/2"
461262
Auto Drain & Fill Valve 3/4"
461264
Auto Drain & Fill Valve 1/4"
461263
Auto Drain & Fill Valve 1/2"
461262
Unlock efficiency
with MaintainX CoPilot
MaintainX CoPilot is your expert colleague, on call 24/7, helping your team find the answers they need to keep equipment running.
Reduce Unplanned Downtime
Ensure your team follows consistent procedures to minimize equipment failures and costly delays.
Maximize Asset Availability
Keep your assets running longer and more reliably, with standardized maintenance workflows from OEM manuals.
Lower Maintenance Costs
Turn any technician into an expert to streamline operations, maintain more assets, and reduce overall costs.
Thousands of companies manage their assets with MaintainX

'%3e%3cpath%20fill='url(%23b)'%20d='M66.008%2080.068c-5.084-.786-9.763-3.834-12.442-8.68a16.942%2016.942%200%200%201-1.87-5.18c1.096.19%202.203.476%203.298.87%206.525%202.333%2010.836%207.68%2011.014%2012.99ZM51.47%2061.576c.488-5.524%203.62-10.716%208.847-13.597a17.132%2017.132%200%200%201%2011.335-1.882c-.798%208.145-7.43%2014.848-16.038%2015.599-1.417.119-2.799.07-4.144-.12Zm28.564-11.478a17.513%2017.513%200%200%201%203.727%204.62c4.608%208.335%201.584%2018.813-6.75%2023.409a16.988%2016.988%200%200%201-4.359%201.679%2019.624%2019.624%200%200%201-3.977-12.776c.346-7.561%204.942-13.931%2011.36-16.932Z'/%3e%3cpath%20fill='%23110F0D'%20fill-rule='evenodd'%20d='M142.831%2048.324h4.977V77.03h-4.977V48.324Zm27.278%2013.002c.322%201.048.453%202.263.453%203.62v12.073h-4.787V66.208c0-.75-.047-1.572-.154-2.143-.453-2.382-1.822-3.572-4.215-3.572-2.31%200-3.882%201.274-4.43%203.476-.143.596-.226%201.405-.226%202.25v10.8h-4.787V56.623h4.477v2.989c1.536-2.5%203.906-3.43%206.371-3.43%203.488%200%206.263%201.68%207.298%205.144Zm24.636%207.323c0%203.882-2.358%206.525-5.763%207.727-1.298.453-2.632.643-4.62.643h-10.169V48.324h9.085c1.691%200%203.156.143%204.049.38%203.465.93%205.727%203.68%205.727%207.335%200%202.441-.81%204.156-2.762%205.644%202.905%201.417%204.453%203.727%204.453%206.966Zm-15.634-8.656h4.584c1.024%200%201.917-.143%202.536-.417%201.215-.548%201.905-1.608%201.905-3.167%200-1.548-.643-2.572-1.845-3.132-.691-.31-1.762-.452-2.763-.452h-4.417v7.168Zm10.716%208.465c0-1.536-.893-3.37-3.227-3.893-.428-.095-1.036-.143-1.571-.143h-5.918v8.085h5.501c.56%200%201.429-.048%201.953-.167%201.94-.453%203.262-1.846%203.262-3.882Zm47.747-11.847-8.097%2020.408h-4.429l-8.109-20.408h5.191l5.192%2014.574%205.108-14.574h5.144Zm-20.218%2010.002c0%20.69-.036%201.262-.155%201.94h-15.943c.631%202.87%202.714%204.728%205.882%204.728%202.131%200%203.607-.882%204.703-2.525h4.87c-1.762%204.144-5.204%206.692-9.657%206.692-6.084%200-10.537-4.858-10.537-10.49%200-6.108%204.524-10.776%2010.335-10.776%206.239%200%2010.442%204.954%2010.502%2010.43Zm-4.763-1.405c-.333-2.846-2.643-4.858-5.691-4.858-2.894%200-5.287%201.929-5.621%204.858h11.312Zm-72.667%203.44c0%204.787-3.287%208.371-9.419%208.371H119.363V64.66c-1.917.274-3.87.69-5.811%201.238l4.537%2011.121h-5.418l-3.596-9.585c-5.144%202.084-10.085%205.216-14.217%209.585h-4.786L101.8%2048.312h4.56l5.68%2013.883a44.112%2044.112%200%200%201%207.323-1.774V48.312h9.084c1.703%200%203.156.143%204.061.393%203.453.929%205.727%203.667%205.727%207.323%200%201.917-.738%204.179-2.81%205.691%203.06%201.56%204.501%204.025%204.501%206.93Zm-15.634-8.667a62.664%2062.664%200%200%201%202.06-.036c1.703.012%203.239.131%204.608.37%201.441-.549%202.357-1.727%202.357-3.537%200-1.941-.881-3.144-2.488-3.667-.548-.18-1.358-.286-2.322-.286h-4.215v7.156Zm-16.55%203.905-3.715-9.894-6.394%2016.502c2.833-2.595%206.263-4.858%2010.109-6.608Zm27.254%204.74c0-2.775-3.131-4.347-8.513-4.418-.715%200-1.441.011-2.191.047v8.252h5.918c2.548%200%204.786-1.37%204.786-3.882Z'%20clip-rule='evenodd'/%3e%3c/g%3e%3cdefs%3e%3clinearGradient%20id='b'%20x1='51.47'%20x2='85.916'%20y1='62.946'%20y2='62.946'%20gradientUnits='userSpaceOnUse'%3e%3cstop%20stop-color='%23CD9F28'/%3e%3cstop%20offset='1'%20stop-color='%23ECD80B'/%3e%3c/linearGradient%3e%3cclipPath%20id='a'%3e%3cpath%20fill='%23fff'%20d='M51.47%2045.728h186.104V80.14H51.47z'/%3e%3c/clipPath%3e%3c/defs%3e%3c/svg%3e)


More from Greenheck


Explore Other Assets


© 2026 MaintainX. All rights reserved.