


Graco Spray Gun 26B513
Need answers fast?
Explore the manual using AI.
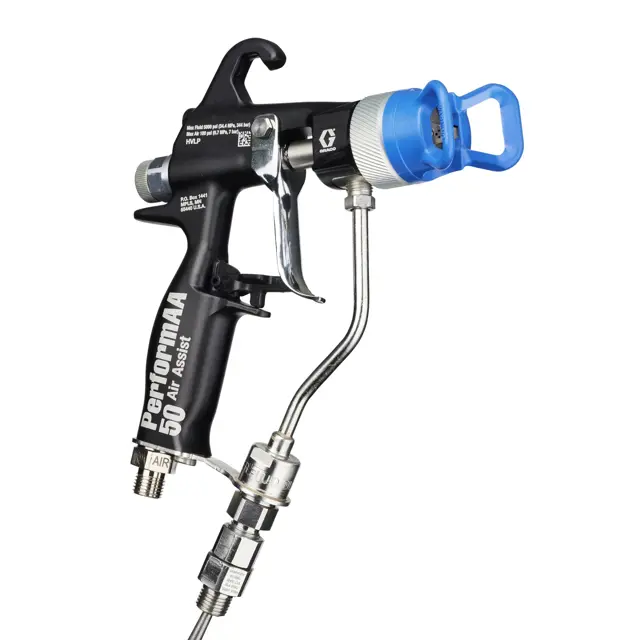
The Graco Spray Gun 26B513 is a high-performance industrial spray gun designed for efficient paint application. Known for its durability and precision, this model is ideal for various coating tasks, ensuring a smooth finish and reliable operation in demanding environments. Optimize your maintenance with proven procedures and quality spare parts for longevity.
Turn manuals into instant answers
with your AI-powered assistantTurn manuals into instant answers
with your AI-powered assistant
Manual for Graco Spray Gun 26B513
Complete asset maintenance, one click away
Get instant access to all the maintenance information you need. Empower technicians to perform preventive maintenance with asset packages, ready to use right out of the box.

Documents & Manuals
Find all the essential guides in one place.
 Tensioning Guide
- Belt-diagram
- C-120 pulleys
+ 13 more

Work Order Templates
Pre-built workflows to keep your asset running smoothly.
- Daily Electrical System Inspection
- Replace Roller and Pulley
- Install Engine B-120
+ 29 more

Procedures
Integrate maintenance plans directly into your work orders.
- Motion Industries
- Applied Industrial Technologies
- Electrical Brothers
+ 5 more

Parts
Access the parts list for your equipment in MaintainX.
- Drive Motor
- B2 Rollers
- Tensioning System
+ 40 more
Graco Spray Gun 26B513
Create an account to install this asset package.
Maintenance Plans for Graco Spray Gun Model 26B513
Integrate maintenance plans directly into your work orders in MaintainX.
1 Yearly Interlock Testing
Step 1: Inspect Ventilation System
Ensure that the spray booth ventilation system is functioning properly.
Confirm that the ventilating air flow is above the minimum required value.
Step 2: Test the Interlock Function
Simulate or induce a condition where the air flow drops below the minimum level.
Verify that the gun fluid supply automatically shuts off and the gun cannot be operated.
This confirms that the interlock is correctly preventing gun operation during insufficient ventilation.
Step 3: Perform Annual Verification
Conduct this interlock test at least once per year.

Spray Gun Flushing
Warning: To avoid fire and explosion, always ground equipment and waste container.
To avoid static sparking and injury from splashing fluid, always flush at the lowest possible pressure.
Flush before changing colors, before fluid can dry in the equipment, at the end of the day, before storing, and before repairing equipment.
Flush at the lowest pressure possible. Check connectors for leaks and tighten as necessary.
Flush with a fluid that is compatible with the fluid being dispensed and the equipment wetted parts.
Follow the Pressure Relief Procedure, page 15.
Remove the retaining ring (8b), air cap (8a), and spray tip (7).
Shut off the air supply.
Optional: Disconnect the air supply hose (H) from the gun.
Reverse-A-Clean (RAC) Tip Maintenance
Reverse-A-Clean (RAC) Tip Maintenance
WARNING
To avoid serious injury from skin injection, do not put your hand in front of the spray tip when removing, installing, or maintaining the air cap assembly.
NOTE: Do not soak the RAC tip seat gasket (33a) in solvent for extended periods of time or swelling may occur.
Clear a clogged RAC tip
1. Release the trigger, and engage the trigger lock (3).
2. Rotate the SwitchTip and tighten the retaining ring.
3. Disengage the trigger lock (3).
4. Trigger the gun into a pail to clear the clog.
Inline Fluid Filter Cleaning
Unscrew the fluid inlet fitting (15)
Fluid inlet fitting (15) unscrewed
Remove the inline fluid filter (14) from the fluid tube assembly (13)
Inline fluid filter (14) removed
Clean or replace the inline fluid filter (14)
Install the fluid inlet fitting (15). Torque to 175–185 in-lb (20–21 N•m)
Fluid inlet fitting (15) installed and torqued correctly
Sign off on the Inline Fluid Filter Cleaning
1 Daily Spray Gun Maintenance
Follow the Pressure Relief Procedure, page 15.
Remove the air cap assembly (8) and spray tip (7)
Flush the gun with a compatible solvent. Follow the Flushing Procedure, page 21.
NOTICE: Methylene chloride with formic or propionic acid will damage aluminum and nylon components. Do not use to flush or clean the gun.
Soak the spray tip (7) in a compatible solvent.
Clean the air cap (8a), spray tip (7), and the outside of the fluid cartridge (6) with a soft-bristle brush. See Cleaning Procedure, page 22.
NOTE: Always point the gun down during cleaning to prevent solvent entering the gun air passages. Solvent left in gun air passages could result in a poor quality paint finish.
Clean the outside of the gun with a soft cloth.
Clean or replace the inline fluid filter (14). See Inline Fluid Filter Cleaning Procedure.
Parts for Graco Spray Gun 26B513
Access the parts list for your equipment in MaintainX.
Air Cap
2HV042
Air Cap
2HV042
Air Cap
2HV042
Unlock efficiency
with MaintainX CoPilot
MaintainX CoPilot is your expert colleague, on call 24/7, helping your team find the answers they need to keep equipment running.
Reduce Unplanned Downtime
Ensure your team follows consistent procedures to minimize equipment failures and costly delays.
Maximize Asset Availability
Keep your assets running longer and more reliably, with standardized maintenance workflows from OEM manuals.
Lower Maintenance Costs
Turn any technician into an expert to streamline operations, maintain more assets, and reduce overall costs.
Thousands of companies manage their assets with MaintainX

'%3e%3cpath%20fill='url(%23b)'%20d='M66.008%2080.068c-5.084-.786-9.763-3.834-12.442-8.68a16.942%2016.942%200%200%201-1.87-5.18c1.096.19%202.203.476%203.298.87%206.525%202.333%2010.836%207.68%2011.014%2012.99ZM51.47%2061.576c.488-5.524%203.62-10.716%208.847-13.597a17.132%2017.132%200%200%201%2011.335-1.882c-.798%208.145-7.43%2014.848-16.038%2015.599-1.417.119-2.799.07-4.144-.12Zm28.564-11.478a17.513%2017.513%200%200%201%203.727%204.62c4.608%208.335%201.584%2018.813-6.75%2023.409a16.988%2016.988%200%200%201-4.359%201.679%2019.624%2019.624%200%200%201-3.977-12.776c.346-7.561%204.942-13.931%2011.36-16.932Z'/%3e%3cpath%20fill='%23110F0D'%20fill-rule='evenodd'%20d='M142.831%2048.324h4.977V77.03h-4.977V48.324Zm27.278%2013.002c.322%201.048.453%202.263.453%203.62v12.073h-4.787V66.208c0-.75-.047-1.572-.154-2.143-.453-2.382-1.822-3.572-4.215-3.572-2.31%200-3.882%201.274-4.43%203.476-.143.596-.226%201.405-.226%202.25v10.8h-4.787V56.623h4.477v2.989c1.536-2.5%203.906-3.43%206.371-3.43%203.488%200%206.263%201.68%207.298%205.144Zm24.636%207.323c0%203.882-2.358%206.525-5.763%207.727-1.298.453-2.632.643-4.62.643h-10.169V48.324h9.085c1.691%200%203.156.143%204.049.38%203.465.93%205.727%203.68%205.727%207.335%200%202.441-.81%204.156-2.762%205.644%202.905%201.417%204.453%203.727%204.453%206.966Zm-15.634-8.656h4.584c1.024%200%201.917-.143%202.536-.417%201.215-.548%201.905-1.608%201.905-3.167%200-1.548-.643-2.572-1.845-3.132-.691-.31-1.762-.452-2.763-.452h-4.417v7.168Zm10.716%208.465c0-1.536-.893-3.37-3.227-3.893-.428-.095-1.036-.143-1.571-.143h-5.918v8.085h5.501c.56%200%201.429-.048%201.953-.167%201.94-.453%203.262-1.846%203.262-3.882Zm47.747-11.847-8.097%2020.408h-4.429l-8.109-20.408h5.191l5.192%2014.574%205.108-14.574h5.144Zm-20.218%2010.002c0%20.69-.036%201.262-.155%201.94h-15.943c.631%202.87%202.714%204.728%205.882%204.728%202.131%200%203.607-.882%204.703-2.525h4.87c-1.762%204.144-5.204%206.692-9.657%206.692-6.084%200-10.537-4.858-10.537-10.49%200-6.108%204.524-10.776%2010.335-10.776%206.239%200%2010.442%204.954%2010.502%2010.43Zm-4.763-1.405c-.333-2.846-2.643-4.858-5.691-4.858-2.894%200-5.287%201.929-5.621%204.858h11.312Zm-72.667%203.44c0%204.787-3.287%208.371-9.419%208.371H119.363V64.66c-1.917.274-3.87.69-5.811%201.238l4.537%2011.121h-5.418l-3.596-9.585c-5.144%202.084-10.085%205.216-14.217%209.585h-4.786L101.8%2048.312h4.56l5.68%2013.883a44.112%2044.112%200%200%201%207.323-1.774V48.312h9.084c1.703%200%203.156.143%204.061.393%203.453.929%205.727%203.667%205.727%207.323%200%201.917-.738%204.179-2.81%205.691%203.06%201.56%204.501%204.025%204.501%206.93Zm-15.634-8.667a62.664%2062.664%200%200%201%202.06-.036c1.703.012%203.239.131%204.608.37%201.441-.549%202.357-1.727%202.357-3.537%200-1.941-.881-3.144-2.488-3.667-.548-.18-1.358-.286-2.322-.286h-4.215v7.156Zm-16.55%203.905-3.715-9.894-6.394%2016.502c2.833-2.595%206.263-4.858%2010.109-6.608Zm27.254%204.74c0-2.775-3.131-4.347-8.513-4.418-.715%200-1.441.011-2.191.047v8.252h5.918c2.548%200%204.786-1.37%204.786-3.882Z'%20clip-rule='evenodd'/%3e%3c/g%3e%3cdefs%3e%3clinearGradient%20id='b'%20x1='51.47'%20x2='85.916'%20y1='62.946'%20y2='62.946'%20gradientUnits='userSpaceOnUse'%3e%3cstop%20stop-color='%23CD9F28'/%3e%3cstop%20offset='1'%20stop-color='%23ECD80B'/%3e%3c/linearGradient%3e%3cclipPath%20id='a'%3e%3cpath%20fill='%23fff'%20d='M51.47%2045.728h186.104V80.14H51.47z'/%3e%3c/clipPath%3e%3c/defs%3e%3c/svg%3e)


More from Graco


Explore Other Assets


© 2026 MaintainX. All rights reserved.