


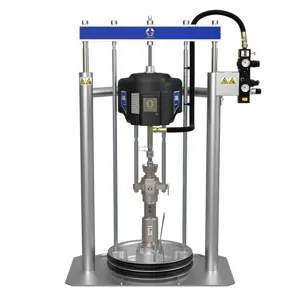
Graco Advanced Glazing Proportioner 24R811
Need answers fast?
Explore the manual using AI.

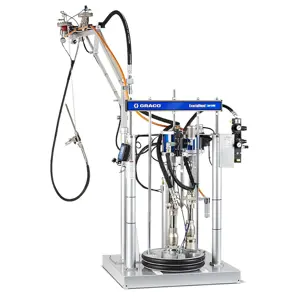
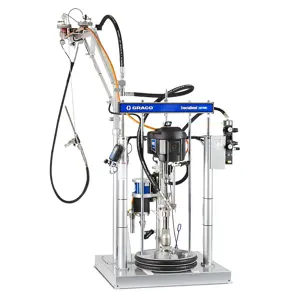
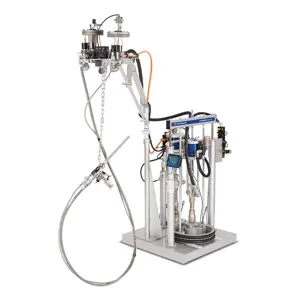
The Graco Advanced Glazing Proportioner 24R811 is a high-performance industrial asset designed for precise material dispensing in glazing applications. This proportioner ensures optimal mixing and application of materials, enhancing efficiency and quality in production processes.
Turn manuals into instant answers
with your AI-powered assistantTurn manuals into instant answers
with your AI-powered assistant
Manual for Graco Advanced Glazing Proportioner 24R811
Complete asset maintenance, one click away
Get instant access to all the maintenance information you need. Empower technicians to perform preventive maintenance with asset packages, ready to use right out of the box.

Documents & Manuals
Find all the essential guides in one place.
 Tensioning Guide
- Belt-diagram
- C-120 pulleys
+ 13 more

Work Order Templates
Pre-built workflows to keep your asset running smoothly.
- Daily Electrical System Inspection
- Replace Roller and Pulley
- Install Engine B-120
+ 29 more

Procedures
Integrate maintenance plans directly into your work orders.
- Motion Industries
- Applied Industrial Technologies
- Electrical Brothers
+ 5 more

Parts
Access the parts list for your equipment in MaintainX.
- Drive Motor
- B2 Rollers
- Tensioning System
+ 40 more
Graco Advanced Glazing Proportioner 24R811
Create an account to install this asset package.
Maintenance Plans for Graco Advanced Glazing Proportioner Model 24R811
Integrate maintenance plans directly into your work orders in MaintainX.
1 Weekly Advanced Glazing Proportioner Maintenance
• Check catalyst B filter assembly to prevent crystallization.
Filters
Once a week check, clean, and replace (if needed) the following filters.
• S100 and U100 Models:
Catalyst pump outlet filter comes with a 60 mesh filter. Two pack 60 mesh filter replacement kit, 224459, is available.
• P100 Models:
Catalyst pump outlet filter comes with a 30 mesh filter. Two pack 30 mesh filter replacement kit, 224458, is available.
Seals
Once a week, check and tighten throat seals on the pumps and dosing valve.

Display Module Maintenance
Battery Replacement
A lithium battery maintains the DM clock when power is not connected.
To replace the battery:
1. Disconnect power to the DM.
NOTE: This can be done by removing the CAN cable from the bottom of the DM.
2. Remove rear access panel.
3. Remove the old battery and replace with a new CR2032 battery.
4. Properly dispose the old lithium battery according to local codes.
5. Replace rear access panel.
Packing Nuts Maintenance
NOTE: There must be no pressure when adjusting the packing nuts. Air pressure in the feed tanks is too much.
Followed Pressure Relief Procedure, including relieving air pressure in the tanks
Upload a photo of the metering pump packing nuts filled with throat seal liquid TSL
Enter the torque of metering pump packing nuts in ft-lb
Upload a photo of the dosing valve packing nut filled with throat seal liquid TSL
Enter the tightness of dosing valve packing nuts in in-lb
Sign off on the packing nuts maintenance
1 Daily Advanced Glazing Proportioner Check
• U100: Check iso lube bottle for discoloration.
• Perform Shutdown and install nightcap.
Shutdown
1. Perform Pressure Relief Procedure:
This equipment stays pressurized until pressure is manually relieved. To help prevent serious injury from pressurized fluid, such as skin injection, splashing fluid and moving parts, follow the Pressure Relief Procedure when you stop dispensing and before cleaning, checking, or servicing the equipment.
1.1 If electrical power is supplied to the machine, perform Base Purge:
Base purge results in the purging of the base A chemical through the dispense valve. Base purging prevents mixed material within the dispense applicator from curing. The machine will remain pressurized and electrically connected.
1.1.1 Navigate to the Purge/Prime screen.
NOTE: Verify both pumps are activate.
Calibration Check
Perform Base Purge, page 46
Navigate to the Home screen
Activate OK on the DM
Remove the static mixer
MD2 Only: Install the calibration nozzle onto the dispense applicator
Open the catalyst B ball valve located near the dispense applicator
Calibration Check Assembly Only: Dispense material into a waste container at the calibration check assembly to verify the V/P shown on the DM is at the correct value
NOTE: A restrictor pin for the catalyst B restrictor housing may be required to obtain 5 psi 35 kPa, 0.3 bar or above for the V/P shown on the DM
Disengage the trigger lock
Parts for Graco Advanced Glazing Proportioner 24R811
Access the parts list for your equipment in MaintainX.
Hose Kit #1
24R832
Hose Kit #7
24U253
Hose Kit #8
24X094
Fitting, 03jic x 1/4npt
124846
Calibration Check Assembly
24R777
Hose Kit #1
24R832
Hose Kit #7
24U253
Hose Kit #8
24X094
Fitting, 03jic x 1/4npt
124846
Calibration Check Assembly
24R777
Hose Kit #1
24R832
Hose Kit #7
24U253
Hose Kit #8
24X094
Fitting, 03jic x 1/4npt
124846
Calibration Check Assembly
24R777
Unlock efficiency
with MaintainX CoPilot
MaintainX CoPilot is your expert colleague, on call 24/7, helping your team find the answers they need to keep equipment running.
Reduce Unplanned Downtime
Ensure your team follows consistent procedures to minimize equipment failures and costly delays.
Maximize Asset Availability
Keep your assets running longer and more reliably, with standardized maintenance workflows from OEM manuals.
Lower Maintenance Costs
Turn any technician into an expert to streamline operations, maintain more assets, and reduce overall costs.
Thousands of companies manage their assets with MaintainX

'%3e%3cpath%20fill='url(%23b)'%20d='M66.008%2080.068c-5.084-.786-9.763-3.834-12.442-8.68a16.942%2016.942%200%200%201-1.87-5.18c1.096.19%202.203.476%203.298.87%206.525%202.333%2010.836%207.68%2011.014%2012.99ZM51.47%2061.576c.488-5.524%203.62-10.716%208.847-13.597a17.132%2017.132%200%200%201%2011.335-1.882c-.798%208.145-7.43%2014.848-16.038%2015.599-1.417.119-2.799.07-4.144-.12Zm28.564-11.478a17.513%2017.513%200%200%201%203.727%204.62c4.608%208.335%201.584%2018.813-6.75%2023.409a16.988%2016.988%200%200%201-4.359%201.679%2019.624%2019.624%200%200%201-3.977-12.776c.346-7.561%204.942-13.931%2011.36-16.932Z'/%3e%3cpath%20fill='%23110F0D'%20fill-rule='evenodd'%20d='M142.831%2048.324h4.977V77.03h-4.977V48.324Zm27.278%2013.002c.322%201.048.453%202.263.453%203.62v12.073h-4.787V66.208c0-.75-.047-1.572-.154-2.143-.453-2.382-1.822-3.572-4.215-3.572-2.31%200-3.882%201.274-4.43%203.476-.143.596-.226%201.405-.226%202.25v10.8h-4.787V56.623h4.477v2.989c1.536-2.5%203.906-3.43%206.371-3.43%203.488%200%206.263%201.68%207.298%205.144Zm24.636%207.323c0%203.882-2.358%206.525-5.763%207.727-1.298.453-2.632.643-4.62.643h-10.169V48.324h9.085c1.691%200%203.156.143%204.049.38%203.465.93%205.727%203.68%205.727%207.335%200%202.441-.81%204.156-2.762%205.644%202.905%201.417%204.453%203.727%204.453%206.966Zm-15.634-8.656h4.584c1.024%200%201.917-.143%202.536-.417%201.215-.548%201.905-1.608%201.905-3.167%200-1.548-.643-2.572-1.845-3.132-.691-.31-1.762-.452-2.763-.452h-4.417v7.168Zm10.716%208.465c0-1.536-.893-3.37-3.227-3.893-.428-.095-1.036-.143-1.571-.143h-5.918v8.085h5.501c.56%200%201.429-.048%201.953-.167%201.94-.453%203.262-1.846%203.262-3.882Zm47.747-11.847-8.097%2020.408h-4.429l-8.109-20.408h5.191l5.192%2014.574%205.108-14.574h5.144Zm-20.218%2010.002c0%20.69-.036%201.262-.155%201.94h-15.943c.631%202.87%202.714%204.728%205.882%204.728%202.131%200%203.607-.882%204.703-2.525h4.87c-1.762%204.144-5.204%206.692-9.657%206.692-6.084%200-10.537-4.858-10.537-10.49%200-6.108%204.524-10.776%2010.335-10.776%206.239%200%2010.442%204.954%2010.502%2010.43Zm-4.763-1.405c-.333-2.846-2.643-4.858-5.691-4.858-2.894%200-5.287%201.929-5.621%204.858h11.312Zm-72.667%203.44c0%204.787-3.287%208.371-9.419%208.371H119.363V64.66c-1.917.274-3.87.69-5.811%201.238l4.537%2011.121h-5.418l-3.596-9.585c-5.144%202.084-10.085%205.216-14.217%209.585h-4.786L101.8%2048.312h4.56l5.68%2013.883a44.112%2044.112%200%200%201%207.323-1.774V48.312h9.084c1.703%200%203.156.143%204.061.393%203.453.929%205.727%203.667%205.727%207.323%200%201.917-.738%204.179-2.81%205.691%203.06%201.56%204.501%204.025%204.501%206.93Zm-15.634-8.667a62.664%2062.664%200%200%201%202.06-.036c1.703.012%203.239.131%204.608.37%201.441-.549%202.357-1.727%202.357-3.537%200-1.941-.881-3.144-2.488-3.667-.548-.18-1.358-.286-2.322-.286h-4.215v7.156Zm-16.55%203.905-3.715-9.894-6.394%2016.502c2.833-2.595%206.263-4.858%2010.109-6.608Zm27.254%204.74c0-2.775-3.131-4.347-8.513-4.418-.715%200-1.441.011-2.191.047v8.252h5.918c2.548%200%204.786-1.37%204.786-3.882Z'%20clip-rule='evenodd'/%3e%3c/g%3e%3cdefs%3e%3clinearGradient%20id='b'%20x1='51.47'%20x2='85.916'%20y1='62.946'%20y2='62.946'%20gradientUnits='userSpaceOnUse'%3e%3cstop%20stop-color='%23CD9F28'/%3e%3cstop%20offset='1'%20stop-color='%23ECD80B'/%3e%3c/linearGradient%3e%3cclipPath%20id='a'%3e%3cpath%20fill='%23fff'%20d='M51.47%2045.728h186.104V80.14H51.47z'/%3e%3c/clipPath%3e%3c/defs%3e%3c/svg%3e)


More from Graco


Explore Other Assets


© 2026 MaintainX. All rights reserved.