


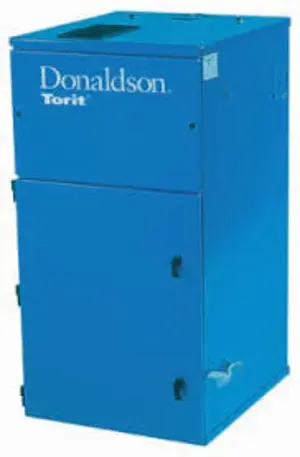
Donaldson Cabinet Collector 60 CAB
Need answers fast?
Explore the manual using AI.
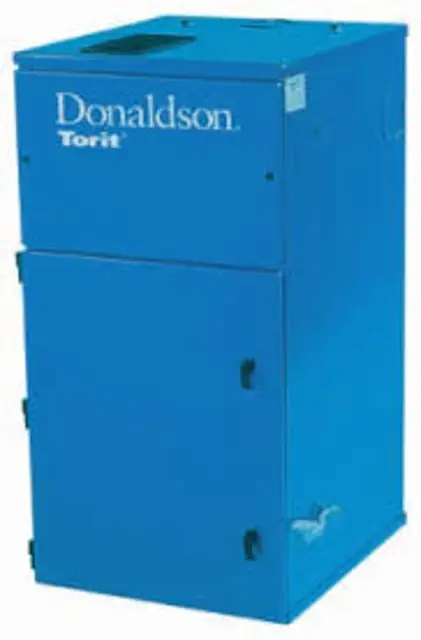
The Donaldson Cabinet Collector 60 CAB is an industrial dust collection system designed for efficient air filtration and dust management. This robust equipment ensures optimal performance in various applications, maintaining a clean and safe working environment. Regular maintenance is essential for longevity and efficiency.
Turn manuals into instant answers
with your AI-powered assistantTurn manuals into instant answers
with your AI-powered assistant
Manual for Donaldson Cabinet Collector 60 CAB
Complete asset maintenance, one click away
Get instant access to all the maintenance information you need. Empower technicians to perform preventive maintenance with asset packages, ready to use right out of the box.

Documents & Manuals
Find all the essential guides in one place.
 Tensioning Guide
- Belt-diagram
- C-120 pulleys
+ 13 more

Work Order Templates
Pre-built workflows to keep your asset running smoothly.
- Daily Electrical System Inspection
- Replace Roller and Pulley
- Install Engine B-120
+ 29 more

Procedures
Integrate maintenance plans directly into your work orders.
- Motion Industries
- Applied Industrial Technologies
- Electrical Brothers
+ 5 more

Parts
Access the parts list for your equipment in MaintainX.
- Drive Motor
- B2 Rollers
- Tensioning System
+ 40 more
Donaldson Cabinet Collector 60 CAB
Create an account to install this asset package.
Maintenance Plans for Donaldson Cabinet Collector Model 60 CAB
Integrate maintenance plans directly into your work orders in MaintainX.
Ductwork Maintenance
If the collector is operated with more than the maximum permissible inlet size, the fan motor can overload, or dust can settle in the duct due to low air velocity.
1. Inlet collars can be located on the side, top, or back of the cabinet by removing the desired inlet cover plate and installing the inlet collar using the same screws.
2. Use the shortest possible inlet duct. Avoid the use of tees or flexible, wire-molded duct except where machine motion or vibration needs to be isolated. Flexible duct has a high static pressure and reduces airflow.
3. Size duct for the recommended air velocity of the conveyed material, or material may collect inside the duct.
4. Connect joints with sheet metal screws, rivets, or sealer. Finish each joint with sealer or duct tape.
Note: Sheet metal screws may cause fibrous or stringing particulate to accumulate inside the duct. Use rivets or sealant in these conditions.;

Outdoor Exhaust Deflector
Top door assembly removed and set aside
Non-combustible cloth placed over the filters in the clean-air chamber
Eight holes drilled using a .218-inch diameter drill bit
Outdoor exhaust deflector positioned on the cabinet top, holes aligned, and fastened using eight #10-24 x 1/2-inch bolts, washers, and nuts. Bolts tightened securely.
Sealant applied around the outside edge of the exhaust deflector
Cloth protecting the filters carefully removed. Top door assembly replaced and tightened securely by hand.
HEPA Filter Maintenance
Position the HEPA filter pack on top of the collector as shown.
Remove the top door assembly and set aside.
Place a piece of non-combustible cloth over the filters in the clean-air chamber to protect them from drilling chips.
Position an angle bracket on each side of the collector flush with the top and under the HEPA filter brackets as shown.
Using the holes in the angle brackets as a guide, drill two .213-inch diameter holes in the cabinet side and two in the HEPA filter pack.
Remove the HEPA filter pack and apply silicone sealant around the mounting surface.
Fasten the angle bracket to the cabinet using four 1/4-20 thread-cutting screws supplied.
Align holes in the HEPA filter pack angle brackets with the holes drilled in the bracket top surfaces and secure using four 1/4-20 thread-cutting screws.
Carefully remove the cloth protecting the filters. Replace the top door assembly and tighten securely by hand.
Magnehelic Gauge Maintenance
Warning: This maintenance check requires trained personnel with PPE!
Choose a location for mounting the gauge
Pressure ports on the back of the gauge plugged
High- and low-pressure ports adapters installed
Mounting bracket attached
Gauge and bracket assembly mounted to the supporting structure
Plastic tubing cut into two sections and connected to the gauge’s high-pressure port and the pressure fitting in the dirty-air plenum
Remaining tubing connected from the gauge’s low-pressure port to the fitting in the clean-air plenum
Gauge zeroed and maintained as per the manufacturer’s instructions
Indoor Exhaust Deflector Maintenance
Top door assembly removed and set aside
Non-combustible cloth placed over the filters in the clean-air chamber
Eight holes drilled using a .213-inch diameter drill bit
Indoor exhaust deflector positioned on the cabinet top
Indoor exhaust deflector fastened using eight 1/4-20 thread-cutting screws and tightened securely
Cloth protecting the filters carefully removed
Top door assembly replaced and tightened securely by hand
Sign off on the Indoor Exhaust Deflector Maintenance
Parts for Donaldson Cabinet Collector 60 CAB
Access the parts list for your equipment in MaintainX.
Poly Sateen
1893803
Polypropylene
1095202
EZ Filter Pack Cotton Sateen FR
5882401
EZ Filter Pack Polypropylene
5687002
EZ Filter Pack Polypropylene
5882402
Poly Sateen
1893803
Polypropylene
1095202
EZ Filter Pack Cotton Sateen FR
5882401
EZ Filter Pack Polypropylene
5687002
EZ Filter Pack Polypropylene
5882402
Poly Sateen
1893803
Polypropylene
1095202
EZ Filter Pack Cotton Sateen FR
5882401
EZ Filter Pack Polypropylene
5687002
EZ Filter Pack Polypropylene
5882402
Unlock efficiency
with MaintainX CoPilot
MaintainX CoPilot is your expert colleague, on call 24/7, helping your team find the answers they need to keep equipment running.
Reduce Unplanned Downtime
Ensure your team follows consistent procedures to minimize equipment failures and costly delays.
Maximize Asset Availability
Keep your assets running longer and more reliably, with standardized maintenance workflows from OEM manuals.
Lower Maintenance Costs
Turn any technician into an expert to streamline operations, maintain more assets, and reduce overall costs.
Thousands of companies manage their assets with MaintainX

'%3e%3cpath%20fill='url(%23b)'%20d='M66.008%2080.068c-5.084-.786-9.763-3.834-12.442-8.68a16.942%2016.942%200%200%201-1.87-5.18c1.096.19%202.203.476%203.298.87%206.525%202.333%2010.836%207.68%2011.014%2012.99ZM51.47%2061.576c.488-5.524%203.62-10.716%208.847-13.597a17.132%2017.132%200%200%201%2011.335-1.882c-.798%208.145-7.43%2014.848-16.038%2015.599-1.417.119-2.799.07-4.144-.12Zm28.564-11.478a17.513%2017.513%200%200%201%203.727%204.62c4.608%208.335%201.584%2018.813-6.75%2023.409a16.988%2016.988%200%200%201-4.359%201.679%2019.624%2019.624%200%200%201-3.977-12.776c.346-7.561%204.942-13.931%2011.36-16.932Z'/%3e%3cpath%20fill='%23110F0D'%20fill-rule='evenodd'%20d='M142.831%2048.324h4.977V77.03h-4.977V48.324Zm27.278%2013.002c.322%201.048.453%202.263.453%203.62v12.073h-4.787V66.208c0-.75-.047-1.572-.154-2.143-.453-2.382-1.822-3.572-4.215-3.572-2.31%200-3.882%201.274-4.43%203.476-.143.596-.226%201.405-.226%202.25v10.8h-4.787V56.623h4.477v2.989c1.536-2.5%203.906-3.43%206.371-3.43%203.488%200%206.263%201.68%207.298%205.144Zm24.636%207.323c0%203.882-2.358%206.525-5.763%207.727-1.298.453-2.632.643-4.62.643h-10.169V48.324h9.085c1.691%200%203.156.143%204.049.38%203.465.93%205.727%203.68%205.727%207.335%200%202.441-.81%204.156-2.762%205.644%202.905%201.417%204.453%203.727%204.453%206.966Zm-15.634-8.656h4.584c1.024%200%201.917-.143%202.536-.417%201.215-.548%201.905-1.608%201.905-3.167%200-1.548-.643-2.572-1.845-3.132-.691-.31-1.762-.452-2.763-.452h-4.417v7.168Zm10.716%208.465c0-1.536-.893-3.37-3.227-3.893-.428-.095-1.036-.143-1.571-.143h-5.918v8.085h5.501c.56%200%201.429-.048%201.953-.167%201.94-.453%203.262-1.846%203.262-3.882Zm47.747-11.847-8.097%2020.408h-4.429l-8.109-20.408h5.191l5.192%2014.574%205.108-14.574h5.144Zm-20.218%2010.002c0%20.69-.036%201.262-.155%201.94h-15.943c.631%202.87%202.714%204.728%205.882%204.728%202.131%200%203.607-.882%204.703-2.525h4.87c-1.762%204.144-5.204%206.692-9.657%206.692-6.084%200-10.537-4.858-10.537-10.49%200-6.108%204.524-10.776%2010.335-10.776%206.239%200%2010.442%204.954%2010.502%2010.43Zm-4.763-1.405c-.333-2.846-2.643-4.858-5.691-4.858-2.894%200-5.287%201.929-5.621%204.858h11.312Zm-72.667%203.44c0%204.787-3.287%208.371-9.419%208.371H119.363V64.66c-1.917.274-3.87.69-5.811%201.238l4.537%2011.121h-5.418l-3.596-9.585c-5.144%202.084-10.085%205.216-14.217%209.585h-4.786L101.8%2048.312h4.56l5.68%2013.883a44.112%2044.112%200%200%201%207.323-1.774V48.312h9.084c1.703%200%203.156.143%204.061.393%203.453.929%205.727%203.667%205.727%207.323%200%201.917-.738%204.179-2.81%205.691%203.06%201.56%204.501%204.025%204.501%206.93Zm-15.634-8.667a62.664%2062.664%200%200%201%202.06-.036c1.703.012%203.239.131%204.608.37%201.441-.549%202.357-1.727%202.357-3.537%200-1.941-.881-3.144-2.488-3.667-.548-.18-1.358-.286-2.322-.286h-4.215v7.156Zm-16.55%203.905-3.715-9.894-6.394%2016.502c2.833-2.595%206.263-4.858%2010.109-6.608Zm27.254%204.74c0-2.775-3.131-4.347-8.513-4.418-.715%200-1.441.011-2.191.047v8.252h5.918c2.548%200%204.786-1.37%204.786-3.882Z'%20clip-rule='evenodd'/%3e%3c/g%3e%3cdefs%3e%3clinearGradient%20id='b'%20x1='51.47'%20x2='85.916'%20y1='62.946'%20y2='62.946'%20gradientUnits='userSpaceOnUse'%3e%3cstop%20stop-color='%23CD9F28'/%3e%3cstop%20offset='1'%20stop-color='%23ECD80B'/%3e%3c/linearGradient%3e%3cclipPath%20id='a'%3e%3cpath%20fill='%23fff'%20d='M51.47%2045.728h186.104V80.14H51.47z'/%3e%3c/clipPath%3e%3c/defs%3e%3c/svg%3e)


More from Donaldson


Explore Other Assets


© 2026 MaintainX. All rights reserved.