


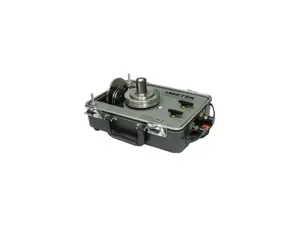
Ametek Digital Force Gauge DFE-050
Need answers fast?
Explore the manual using AI.
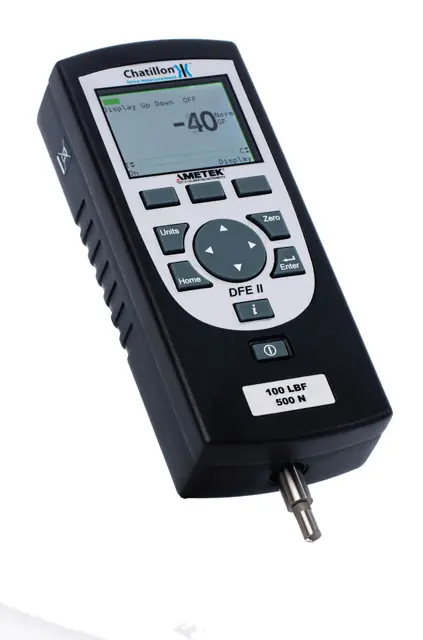
The Ametek Digital Force Gauge DFE-050 is a precision measurement tool designed for accurate force testing in various industrial applications. Known for its reliability and advanced features, this gauge ensures optimal performance and durability, making it essential for quality control and testing processes.
Turn manuals into instant answers
with your AI-powered assistantTurn manuals into instant answers
with your AI-powered assistant
Manual for Ametek Digital Force Gauge DFE-050
Complete asset maintenance, one click away
Get instant access to all the maintenance information you need. Empower technicians to perform preventive maintenance with asset packages, ready to use right out of the box.

Documents & Manuals
Find all the essential guides in one place.
 Tensioning Guide
- Belt-diagram
- C-120 pulleys
+ 13 more

Work Order Templates
Pre-built workflows to keep your asset running smoothly.
- Daily Electrical System Inspection
- Replace Roller and Pulley
- Install Engine B-120
+ 29 more

Procedures
Integrate maintenance plans directly into your work orders.
- Motion Industries
- Applied Industrial Technologies
- Electrical Brothers
+ 5 more

Parts
Access the parts list for your equipment in MaintainX.
- Drive Motor
- B2 Rollers
- Tensioning System
+ 40 more
Ametek Digital Force Gauge DFE-050
Create an account to install this asset package.
Maintenance Plans for Ametek Digital Force Gauge Model DFE-050
Integrate maintenance plans directly into your work orders in MaintainX.
Gauge Stand Test
Warning: Ensure the gauge is secured to the tester with the proper adapter
Is the gauge secured properly?
Enter the reading from the gauge
Select the adapter used for low capacity
Select the adapter used for high capacity
Did the gauge give a faulty reading?
Describe any damage to the loadcell
Sign off on the gauge stand test

Sharp Break Test
Setup your Break Detect and set the DFS II display to 'Norm'
Is the DFS II display set to 'Norm'?
Perform a pull to break test
Is the sample affixed to the grip or fixture and the gauge zeroed?
Did the sample break or the load drop by 95% from a maximum value?
Enter the Peak Tensile value for the test
Enter the Break Load value for the test
Enter the Maximum Load value for the test
Perform a compress to rupture test
Percentage Break Test
Percentage Break Setup is complete
Home display shows 'Norm' when F1 (Mode) key is pressed
Pull to Break Test
Sample affixed to the grip or fixture and gauge zeroed
Sample pulled and load sensor displays load during the test
Sample breaks or load drops by specified % Drop from maximum value
Peak Load viewable when F1 (Mode) key pressed until mode indicator displays 'T-PK'
%Break Load viewable when F1 (Mode) key pressed until mode indicator displays '%TBk'
Compress to Rupture (Break) Test
Annuciators Test
Warning: This test requires trained personnel!
Did a single beep sound to signal the START of a test?
Did the measured load achieve the Preload Value at the start of the test?
Did a double beep sound to signal the END of a test?
Did the time period for the test achieve when a double beep annunciated?
Did a rapid, triple beep sound to signal a FAILED test?
Did the measured load drop below the Preload Value before the Time Period was completed?
Sign off on the annunciators test
Gauge Force-Based Test
From the Home display, depress the F1 (Mode) key until the gauge displays “LAVf” for mode. The “LAVf” label indicates that the gauge is setup to perform a Load Average test based on a force only (No time)
Load applied to the measurement sensor in one direction only (tension or compression)
Measured load equals the preload value
Once the measured load equals the preload value, the gauge will begin to average the applied loads. When the applied load falls below the preload value specified, the display will 'freeze'. The gauge will display the LAV result when in the LAV mode
Display shows 'T-PK' or 'C-PK' when F1 key is pressed
At the completion of a test you may record the following: Minimum Load (equals Preload Value), Peak Load (equals T-PK or C-PK), Average Load (equals LAVi)
Enter the Minimum Load (equals Preload Value)
Enter the Peak Load (equals T-PK or C-PK)
Enter the Average Load (equals LAVi)
Parts for Ametek Digital Force Gauge DFE-050
Access the parts list for your equipment in MaintainX.
Extension Rod
SPK-FMG-013B
Notch Adapter
SPK-FMG-010A
Notch Adapter
SPK-FMG-010B
Tester Adapter
NC000300
Operation Instructions
SPK-DF-123
Extension Rod
SPK-FMG-013B
Notch Adapter
SPK-FMG-010A
Notch Adapter
SPK-FMG-010B
Tester Adapter
NC000300
Operation Instructions
SPK-DF-123
Extension Rod
SPK-FMG-013B
Notch Adapter
SPK-FMG-010A
Notch Adapter
SPK-FMG-010B
Tester Adapter
NC000300
Operation Instructions
SPK-DF-123
Unlock efficiency
with MaintainX CoPilot
MaintainX CoPilot is your expert colleague, on call 24/7, helping your team find the answers they need to keep equipment running.
Reduce Unplanned Downtime
Ensure your team follows consistent procedures to minimize equipment failures and costly delays.
Maximize Asset Availability
Keep your assets running longer and more reliably, with standardized maintenance workflows from OEM manuals.
Lower Maintenance Costs
Turn any technician into an expert to streamline operations, maintain more assets, and reduce overall costs.
Thousands of companies manage their assets with MaintainX

'%3e%3cpath%20fill='url(%23b)'%20d='M66.008%2080.068c-5.084-.786-9.763-3.834-12.442-8.68a16.942%2016.942%200%200%201-1.87-5.18c1.096.19%202.203.476%203.298.87%206.525%202.333%2010.836%207.68%2011.014%2012.99ZM51.47%2061.576c.488-5.524%203.62-10.716%208.847-13.597a17.132%2017.132%200%200%201%2011.335-1.882c-.798%208.145-7.43%2014.848-16.038%2015.599-1.417.119-2.799.07-4.144-.12Zm28.564-11.478a17.513%2017.513%200%200%201%203.727%204.62c4.608%208.335%201.584%2018.813-6.75%2023.409a16.988%2016.988%200%200%201-4.359%201.679%2019.624%2019.624%200%200%201-3.977-12.776c.346-7.561%204.942-13.931%2011.36-16.932Z'/%3e%3cpath%20fill='%23110F0D'%20fill-rule='evenodd'%20d='M142.831%2048.324h4.977V77.03h-4.977V48.324Zm27.278%2013.002c.322%201.048.453%202.263.453%203.62v12.073h-4.787V66.208c0-.75-.047-1.572-.154-2.143-.453-2.382-1.822-3.572-4.215-3.572-2.31%200-3.882%201.274-4.43%203.476-.143.596-.226%201.405-.226%202.25v10.8h-4.787V56.623h4.477v2.989c1.536-2.5%203.906-3.43%206.371-3.43%203.488%200%206.263%201.68%207.298%205.144Zm24.636%207.323c0%203.882-2.358%206.525-5.763%207.727-1.298.453-2.632.643-4.62.643h-10.169V48.324h9.085c1.691%200%203.156.143%204.049.38%203.465.93%205.727%203.68%205.727%207.335%200%202.441-.81%204.156-2.762%205.644%202.905%201.417%204.453%203.727%204.453%206.966Zm-15.634-8.656h4.584c1.024%200%201.917-.143%202.536-.417%201.215-.548%201.905-1.608%201.905-3.167%200-1.548-.643-2.572-1.845-3.132-.691-.31-1.762-.452-2.763-.452h-4.417v7.168Zm10.716%208.465c0-1.536-.893-3.37-3.227-3.893-.428-.095-1.036-.143-1.571-.143h-5.918v8.085h5.501c.56%200%201.429-.048%201.953-.167%201.94-.453%203.262-1.846%203.262-3.882Zm47.747-11.847-8.097%2020.408h-4.429l-8.109-20.408h5.191l5.192%2014.574%205.108-14.574h5.144Zm-20.218%2010.002c0%20.69-.036%201.262-.155%201.94h-15.943c.631%202.87%202.714%204.728%205.882%204.728%202.131%200%203.607-.882%204.703-2.525h4.87c-1.762%204.144-5.204%206.692-9.657%206.692-6.084%200-10.537-4.858-10.537-10.49%200-6.108%204.524-10.776%2010.335-10.776%206.239%200%2010.442%204.954%2010.502%2010.43Zm-4.763-1.405c-.333-2.846-2.643-4.858-5.691-4.858-2.894%200-5.287%201.929-5.621%204.858h11.312Zm-72.667%203.44c0%204.787-3.287%208.371-9.419%208.371H119.363V64.66c-1.917.274-3.87.69-5.811%201.238l4.537%2011.121h-5.418l-3.596-9.585c-5.144%202.084-10.085%205.216-14.217%209.585h-4.786L101.8%2048.312h4.56l5.68%2013.883a44.112%2044.112%200%200%201%207.323-1.774V48.312h9.084c1.703%200%203.156.143%204.061.393%203.453.929%205.727%203.667%205.727%207.323%200%201.917-.738%204.179-2.81%205.691%203.06%201.56%204.501%204.025%204.501%206.93Zm-15.634-8.667a62.664%2062.664%200%200%201%202.06-.036c1.703.012%203.239.131%204.608.37%201.441-.549%202.357-1.727%202.357-3.537%200-1.941-.881-3.144-2.488-3.667-.548-.18-1.358-.286-2.322-.286h-4.215v7.156Zm-16.55%203.905-3.715-9.894-6.394%2016.502c2.833-2.595%206.263-4.858%2010.109-6.608Zm27.254%204.74c0-2.775-3.131-4.347-8.513-4.418-.715%200-1.441.011-2.191.047v8.252h5.918c2.548%200%204.786-1.37%204.786-3.882Z'%20clip-rule='evenodd'/%3e%3c/g%3e%3cdefs%3e%3clinearGradient%20id='b'%20x1='51.47'%20x2='85.916'%20y1='62.946'%20y2='62.946'%20gradientUnits='userSpaceOnUse'%3e%3cstop%20stop-color='%23CD9F28'/%3e%3cstop%20offset='1'%20stop-color='%23ECD80B'/%3e%3c/linearGradient%3e%3cclipPath%20id='a'%3e%3cpath%20fill='%23fff'%20d='M51.47%2045.728h186.104V80.14H51.47z'/%3e%3c/clipPath%3e%3c/defs%3e%3c/svg%3e)


More from Ametek


Explore Other Assets


© 2026 MaintainX. All rights reserved.