


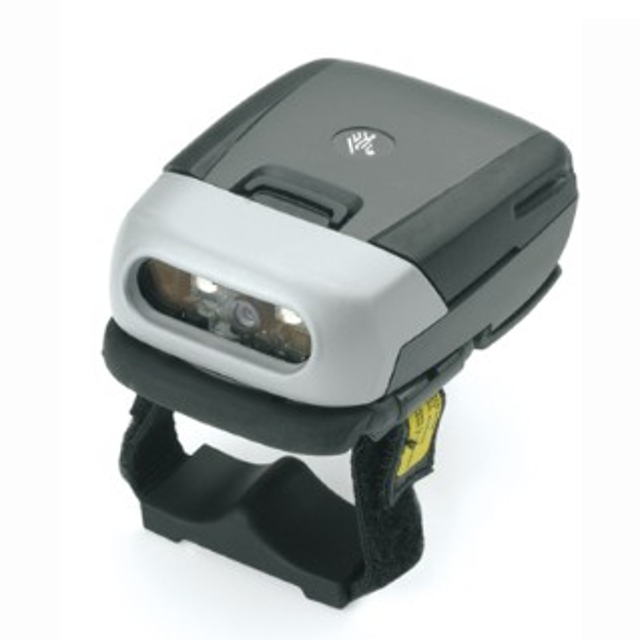
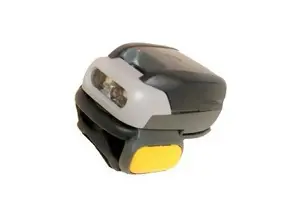
Zebra Imager RS507
Need answers fast?
Explore the manual using AI.
Turn manuals into instant answers
with your AI-powered assistantTurn manuals into instant answers
with your AI-powered assistant
Manual for Zebra Imager RS507
Complete asset maintenance, one click away
Get instant access to all the maintenance information you need. Empower technicians to perform preventive maintenance with asset packages, ready to use right out of the box.

Documents & Manuals
Find all the essential guides in one place.
 Tensioning Guide
- Belt-diagram
- C-120 pulleys
+ 13 more

Work Order Templates
Pre-built workflows to keep your asset running smoothly.
- Daily Electrical System Inspection
- Replace Roller and Pulley
- Install Engine B-120
+ 29 more

Procedures
Integrate maintenance plans directly into your work orders.
- Motion Industries
- Applied Industrial Technologies
- Electrical Brothers
+ 5 more

Parts
Access the parts list for your equipment in MaintainX.
- Drive Motor
- B2 Rollers
- Tensioning System
+ 40 more
Zebra Imager RS507
Create an account to install this asset package.
Maintenance Plans for Zebra Imager Model RS507
Integrate maintenance plans directly into your work orders in MaintainX.
Triggerless Strap Holder Replacement
Removal
Turn the Imager upside-down
Remove the Comfort Pad
Press the Release Latch using a paper clip or similar object
Rotate the Triggerless Strap Holder to align with the back of the Imager
Lift the Triggerless Strap Holder off the Imager
Installation
Turn the Imager upside-down
Position the Triggerless Strap Holder to align with the back of the Imager

Comfort Pad Replacement
Removal
Imager flipped over with bottom facing upwards
M2 screw removed from Triggerless Swivel Assembly
Comfort Pad lifted upwards and removed from Imager
CAUTION: Removing the Comfort Pad other than the described above may result in damage to the Trigger Swivel Assembly of the Imager.
NOTE: It is not necessary to remove the Finger Strap from the Trigger Swivel Assembly.
Installation
Comfort Pad positioned onto the Imager as shown
Comfort Pad pressed onto the Imager and locked into place
Trigger Swivel Assembly Replacement
Removal
To remove the Trigger Swivel Assembly:
1. Turn the Imager upside-down.
2. Remove the Comfort Pad.
3. Use a paper clip or similar object to press the Release Latch.
4. Rotate the Trigger Swivel Assembly to align with the back of the Imager.
5. Lift the Trigger Swivel Assembly off the scan assembly.
Installation
To install the Trigger Swivel Assembly:
Imager Cleaning
CAUTION: Do not pour, spray, or spill any liquid on the Imager.
Wipe the exit window with a lens tissue or other material suitable for cleaning eyeglasses.
The gold plated battery contacts do not tarnish or oxidize. No maintenance should be needed.
If the contacts need to be cleaned, wet the tip of a cotton swab with isopropyl alcohol and squeeze the excess alcohol from the swab.
Wipe the metal contacts with the damp swab.
Sign off on the imager cleaning
Strap Buckle Replacement
Removal
1. Remove the Trigger Swivel Assembly.
2. Press the Strap Buckle off the Trigger Swivel Assembly Pin.
Installation
1. Align the pin slot of Strap Buckle with the pin of the Trigger Swivel Assembly.
2. Gently press the pin slot of Strap Buckle to engage with the pin of the Trigger Swivel Assembly. The pin slot snaps onto the pin.
3. Install the Trigger Swivel Assembly.
Parts for Zebra Imager RS507
Access the parts list for your equipment in MaintainX.
Trigger Swivel Assembly
KT-CLMPT-RS507-01R
Set Of 10 Buckles For Hook And Loop Strap
KT-BKL-RS507-10R
Set Of 10 Buckles For Triggerless Elastic Finger Strap
KT-BKLN-RS507-10R
Set Of 10 Buckles For Trigger Elastic Finger Strap
KT-BKLT-RS507-10R
Triggerless Strap Holder
KT-CLMPN-RS507-01R
Trigger Swivel Assembly
KT-CLMPT-RS507-01R
Set Of 10 Buckles For Hook And Loop Strap
KT-BKL-RS507-10R
Set Of 10 Buckles For Triggerless Elastic Finger Strap
KT-BKLN-RS507-10R
Set Of 10 Buckles For Trigger Elastic Finger Strap
KT-BKLT-RS507-10R
Triggerless Strap Holder
KT-CLMPN-RS507-01R
Trigger Swivel Assembly
KT-CLMPT-RS507-01R
Set Of 10 Buckles For Hook And Loop Strap
KT-BKL-RS507-10R
Set Of 10 Buckles For Triggerless Elastic Finger Strap
KT-BKLN-RS507-10R
Set Of 10 Buckles For Trigger Elastic Finger Strap
KT-BKLT-RS507-10R
Triggerless Strap Holder
KT-CLMPN-RS507-01R
Unlock efficiency
with MaintainX CoPilot
MaintainX CoPilot is your expert colleague, on call 24/7, helping your team find the answers they need to keep equipment running.
Reduce Unplanned Downtime
Ensure your team follows consistent procedures to minimize equipment failures and costly delays.
Maximize Asset Availability
Keep your assets running longer and more reliably, with standardized maintenance workflows from OEM manuals.
Lower Maintenance Costs
Turn any technician into an expert to streamline operations, maintain more assets, and reduce overall costs.
Thousands of companies manage their assets with MaintainX

'%3e%3cpath%20fill='url(%23b)'%20d='M66.008%2080.068c-5.084-.786-9.763-3.834-12.442-8.68a16.942%2016.942%200%200%201-1.87-5.18c1.096.19%202.203.476%203.298.87%206.525%202.333%2010.836%207.68%2011.014%2012.99ZM51.47%2061.576c.488-5.524%203.62-10.716%208.847-13.597a17.132%2017.132%200%200%201%2011.335-1.882c-.798%208.145-7.43%2014.848-16.038%2015.599-1.417.119-2.799.07-4.144-.12Zm28.564-11.478a17.513%2017.513%200%200%201%203.727%204.62c4.608%208.335%201.584%2018.813-6.75%2023.409a16.988%2016.988%200%200%201-4.359%201.679%2019.624%2019.624%200%200%201-3.977-12.776c.346-7.561%204.942-13.931%2011.36-16.932Z'/%3e%3cpath%20fill='%23110F0D'%20fill-rule='evenodd'%20d='M142.831%2048.324h4.977V77.03h-4.977V48.324Zm27.278%2013.002c.322%201.048.453%202.263.453%203.62v12.073h-4.787V66.208c0-.75-.047-1.572-.154-2.143-.453-2.382-1.822-3.572-4.215-3.572-2.31%200-3.882%201.274-4.43%203.476-.143.596-.226%201.405-.226%202.25v10.8h-4.787V56.623h4.477v2.989c1.536-2.5%203.906-3.43%206.371-3.43%203.488%200%206.263%201.68%207.298%205.144Zm24.636%207.323c0%203.882-2.358%206.525-5.763%207.727-1.298.453-2.632.643-4.62.643h-10.169V48.324h9.085c1.691%200%203.156.143%204.049.38%203.465.93%205.727%203.68%205.727%207.335%200%202.441-.81%204.156-2.762%205.644%202.905%201.417%204.453%203.727%204.453%206.966Zm-15.634-8.656h4.584c1.024%200%201.917-.143%202.536-.417%201.215-.548%201.905-1.608%201.905-3.167%200-1.548-.643-2.572-1.845-3.132-.691-.31-1.762-.452-2.763-.452h-4.417v7.168Zm10.716%208.465c0-1.536-.893-3.37-3.227-3.893-.428-.095-1.036-.143-1.571-.143h-5.918v8.085h5.501c.56%200%201.429-.048%201.953-.167%201.94-.453%203.262-1.846%203.262-3.882Zm47.747-11.847-8.097%2020.408h-4.429l-8.109-20.408h5.191l5.192%2014.574%205.108-14.574h5.144Zm-20.218%2010.002c0%20.69-.036%201.262-.155%201.94h-15.943c.631%202.87%202.714%204.728%205.882%204.728%202.131%200%203.607-.882%204.703-2.525h4.87c-1.762%204.144-5.204%206.692-9.657%206.692-6.084%200-10.537-4.858-10.537-10.49%200-6.108%204.524-10.776%2010.335-10.776%206.239%200%2010.442%204.954%2010.502%2010.43Zm-4.763-1.405c-.333-2.846-2.643-4.858-5.691-4.858-2.894%200-5.287%201.929-5.621%204.858h11.312Zm-72.667%203.44c0%204.787-3.287%208.371-9.419%208.371H119.363V64.66c-1.917.274-3.87.69-5.811%201.238l4.537%2011.121h-5.418l-3.596-9.585c-5.144%202.084-10.085%205.216-14.217%209.585h-4.786L101.8%2048.312h4.56l5.68%2013.883a44.112%2044.112%200%200%201%207.323-1.774V48.312h9.084c1.703%200%203.156.143%204.061.393%203.453.929%205.727%203.667%205.727%207.323%200%201.917-.738%204.179-2.81%205.691%203.06%201.56%204.501%204.025%204.501%206.93Zm-15.634-8.667a62.664%2062.664%200%200%201%202.06-.036c1.703.012%203.239.131%204.608.37%201.441-.549%202.357-1.727%202.357-3.537%200-1.941-.881-3.144-2.488-3.667-.548-.18-1.358-.286-2.322-.286h-4.215v7.156Zm-16.55%203.905-3.715-9.894-6.394%2016.502c2.833-2.595%206.263-4.858%2010.109-6.608Zm27.254%204.74c0-2.775-3.131-4.347-8.513-4.418-.715%200-1.441.011-2.191.047v8.252h5.918c2.548%200%204.786-1.37%204.786-3.882Z'%20clip-rule='evenodd'/%3e%3c/g%3e%3cdefs%3e%3clinearGradient%20id='b'%20x1='51.47'%20x2='85.916'%20y1='62.946'%20y2='62.946'%20gradientUnits='userSpaceOnUse'%3e%3cstop%20stop-color='%23CD9F28'/%3e%3cstop%20offset='1'%20stop-color='%23ECD80B'/%3e%3c/linearGradient%3e%3cclipPath%20id='a'%3e%3cpath%20fill='%23fff'%20d='M51.47%2045.728h186.104V80.14H51.47z'/%3e%3c/clipPath%3e%3c/defs%3e%3c/svg%3e)


More from Zebra


Explore Other Assets


© 2026 MaintainX. All rights reserved.