


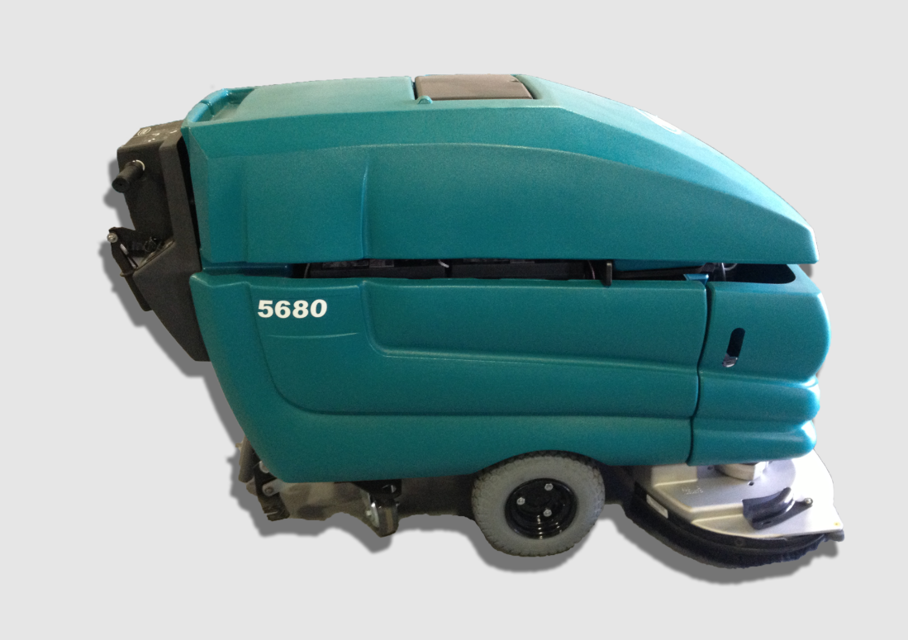
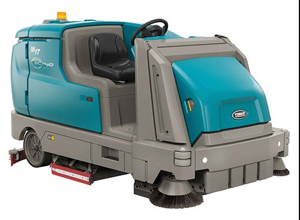
Tennant Walk-Behind Scrubber 5680
Need answers fast?
Explore the manual using AI.
Turn manuals into instant answers
with your AI-powered assistantTurn manuals into instant answers
with your AI-powered assistant
Manual for Tennant Walk-Behind Scrubber 5680
Complete asset maintenance, one click away
Get instant access to all the maintenance information you need. Empower technicians to perform preventive maintenance with asset packages, ready to use right out of the box.

Documents & Manuals
Find all the essential guides in one place.
 Tensioning Guide
- Belt-diagram
- C-120 pulleys
+ 13 more

Work Order Templates
Pre-built workflows to keep your asset running smoothly.
- Daily Electrical System Inspection
- Replace Roller and Pulley
- Install Engine B-120
+ 29 more

Procedures
Integrate maintenance plans directly into your work orders.
- Motion Industries
- Applied Industrial Technologies
- Electrical Brothers
+ 5 more

Parts
Access the parts list for your equipment in MaintainX.
- Drive Motor
- B2 Rollers
- Tensioning System
+ 40 more
Tennant Walk-Behind Scrubber 5680
Create an account to install this asset package.
Maintenance Plans for Tennant Walk-Behind Scrubber Model 5680
Integrate maintenance plans directly into your work orders in MaintainX.
Ec-H2O Nanoclean Water Conditioning Cartridge Replacement
FOR SAFETY: Before leaving or servicing machine, stop on level surface, set parking brake (if so equipped), and turn off machine.
The water conditioning cartridge is required to be replaced when it reaches its maximum water usage or expiration time of when the cartridge was activated, which ever comes first. The ec-H2O system indicator light will blink green/red when it’s time to replace cartridge.
Depending on machine usage, on average, a new cartridge can last anywhere from 12 months for heavy machine usage to 24 months for light machine usage.
ATTENTION: During first time use and after replacing the water conditioning cartridge, the ec-H2O system will automatically override the selected solution flow rate for up to 75 minutes.
Lift the solution tank and remove the front cover from machine to access the cartridge. Drain solution tank before lifting.
Disconnect the two hose connectors from cartridge by pressing the gray collars inward and pulling the connectors outward. Lift cartridge to remove.
Fill in the installation date on the new cartridge label.
Install the new cartridge and reconnect the two hoses. Make sure the hose connectors are fully inserted into new cartridge.
Reset timer for new cartridge.

50 Hourly Walk-Behind Scrubber Maintenance
FaST Filter screen (option): Clean
FOR SAFETY: Before leaving or servicing machine, stop on level surface, set parking brake (if so equipped), turn off machine, and remove key.
The FaST system filter screen is located under the solution tank and filters the water from the solution tank as it flows into the FaST system.
Remove the filter screen bowl and clean the filter screen after every 50 hours of machine operation. Empty the solution tank before removing the filter.
Cylindrical brushes: Check taper and rotate front to rear
Check the brush taper and rotate the brushes from front-to-rear every 50 hours of operation, for maximum brush life and best scrubbing performance.
Replace the brushes or pads when they no longer clean effectively.
NOTE: Be sure to replace brushes in sets. Otherwise one brush will be more aggressive than the other.;
Front Squeegee Blade Replacement
Is the squeegee raised off the floor?
Is the machine power off?
FOR SAFETY: Before leaving or servicing machine, stop on level surface, set parking brake (if so equipped), turn off machine, and remove key.
Was the squeegee removed from the machine?
Was the rear squeegee blade and retainer removed?
Were the two remaining knobs on top of the squeegee assembly loosened?
Was the retainer plate pulled back and the front squeegee blade pulled out of the squeegee frame?
Was the rotated or new squeegee blade inserted in the squeegee frame, lining up the slots in the blade with the tabs on the retainer plate?
Was the retainer plate pushed forward and the two outside knobs on top of the squeegee assembly tightened?
Squeegee Blade Replacement
Warning: Before leaving or servicing machine, stop on level surface, set parking brake (if so equipped), turn off machine, and remove key.
Squeegee is raised off the floor
Machine power is off
Two retention knobs are loosened
Rear retaining band is removed
Rear squeegee blade is removed
Rotated or new squeegee blade is inserted
Retainer band is inserted
Two retention knobs are tightened until the ends of the front and rear squeegee blades touch
Squeegee Blade Deflection Adjustment
Machine power turned on
Squeegee lowered
Deflection of the squeegee blade while moving forward
Machine power turned off
FOR SAFETY: Before leaving or servicing machine, stop on level surface, set parking brake (if so equipped), turn off machine, and remove key.
Adjustment of squeegee deflection cams
Machine driven forward again to check the squeegee blade deflection
Need to readjust the squeegee blade deflection?
Sign off on the squeegee blade deflection adjustment
Parts for Tennant Walk-Behind Scrubber 5680
Access the parts list for your equipment in MaintainX.
Lubriplate EMB Grease
01433- 1
Filter Kit
9003009
Lubriplate EMB Grease
01433- 1
Filter Kit
9003009
Lubriplate EMB Grease
01433- 1
Filter Kit
9003009
Unlock efficiency
with MaintainX CoPilot
MaintainX CoPilot is your expert colleague, on call 24/7, helping your team find the answers they need to keep equipment running.
Reduce Unplanned Downtime
Ensure your team follows consistent procedures to minimize equipment failures and costly delays.
Maximize Asset Availability
Keep your assets running longer and more reliably, with standardized maintenance workflows from OEM manuals.
Lower Maintenance Costs
Turn any technician into an expert to streamline operations, maintain more assets, and reduce overall costs.
Thousands of companies manage their assets with MaintainX

'%3e%3cpath%20fill='url(%23b)'%20d='M66.008%2080.068c-5.084-.786-9.763-3.834-12.442-8.68a16.942%2016.942%200%200%201-1.87-5.18c1.096.19%202.203.476%203.298.87%206.525%202.333%2010.836%207.68%2011.014%2012.99ZM51.47%2061.576c.488-5.524%203.62-10.716%208.847-13.597a17.132%2017.132%200%200%201%2011.335-1.882c-.798%208.145-7.43%2014.848-16.038%2015.599-1.417.119-2.799.07-4.144-.12Zm28.564-11.478a17.513%2017.513%200%200%201%203.727%204.62c4.608%208.335%201.584%2018.813-6.75%2023.409a16.988%2016.988%200%200%201-4.359%201.679%2019.624%2019.624%200%200%201-3.977-12.776c.346-7.561%204.942-13.931%2011.36-16.932Z'/%3e%3cpath%20fill='%23110F0D'%20fill-rule='evenodd'%20d='M142.831%2048.324h4.977V77.03h-4.977V48.324Zm27.278%2013.002c.322%201.048.453%202.263.453%203.62v12.073h-4.787V66.208c0-.75-.047-1.572-.154-2.143-.453-2.382-1.822-3.572-4.215-3.572-2.31%200-3.882%201.274-4.43%203.476-.143.596-.226%201.405-.226%202.25v10.8h-4.787V56.623h4.477v2.989c1.536-2.5%203.906-3.43%206.371-3.43%203.488%200%206.263%201.68%207.298%205.144Zm24.636%207.323c0%203.882-2.358%206.525-5.763%207.727-1.298.453-2.632.643-4.62.643h-10.169V48.324h9.085c1.691%200%203.156.143%204.049.38%203.465.93%205.727%203.68%205.727%207.335%200%202.441-.81%204.156-2.762%205.644%202.905%201.417%204.453%203.727%204.453%206.966Zm-15.634-8.656h4.584c1.024%200%201.917-.143%202.536-.417%201.215-.548%201.905-1.608%201.905-3.167%200-1.548-.643-2.572-1.845-3.132-.691-.31-1.762-.452-2.763-.452h-4.417v7.168Zm10.716%208.465c0-1.536-.893-3.37-3.227-3.893-.428-.095-1.036-.143-1.571-.143h-5.918v8.085h5.501c.56%200%201.429-.048%201.953-.167%201.94-.453%203.262-1.846%203.262-3.882Zm47.747-11.847-8.097%2020.408h-4.429l-8.109-20.408h5.191l5.192%2014.574%205.108-14.574h5.144Zm-20.218%2010.002c0%20.69-.036%201.262-.155%201.94h-15.943c.631%202.87%202.714%204.728%205.882%204.728%202.131%200%203.607-.882%204.703-2.525h4.87c-1.762%204.144-5.204%206.692-9.657%206.692-6.084%200-10.537-4.858-10.537-10.49%200-6.108%204.524-10.776%2010.335-10.776%206.239%200%2010.442%204.954%2010.502%2010.43Zm-4.763-1.405c-.333-2.846-2.643-4.858-5.691-4.858-2.894%200-5.287%201.929-5.621%204.858h11.312Zm-72.667%203.44c0%204.787-3.287%208.371-9.419%208.371H119.363V64.66c-1.917.274-3.87.69-5.811%201.238l4.537%2011.121h-5.418l-3.596-9.585c-5.144%202.084-10.085%205.216-14.217%209.585h-4.786L101.8%2048.312h4.56l5.68%2013.883a44.112%2044.112%200%200%201%207.323-1.774V48.312h9.084c1.703%200%203.156.143%204.061.393%203.453.929%205.727%203.667%205.727%207.323%200%201.917-.738%204.179-2.81%205.691%203.06%201.56%204.501%204.025%204.501%206.93Zm-15.634-8.667a62.664%2062.664%200%200%201%202.06-.036c1.703.012%203.239.131%204.608.37%201.441-.549%202.357-1.727%202.357-3.537%200-1.941-.881-3.144-2.488-3.667-.548-.18-1.358-.286-2.322-.286h-4.215v7.156Zm-16.55%203.905-3.715-9.894-6.394%2016.502c2.833-2.595%206.263-4.858%2010.109-6.608Zm27.254%204.74c0-2.775-3.131-4.347-8.513-4.418-.715%200-1.441.011-2.191.047v8.252h5.918c2.548%200%204.786-1.37%204.786-3.882Z'%20clip-rule='evenodd'/%3e%3c/g%3e%3cdefs%3e%3clinearGradient%20id='b'%20x1='51.47'%20x2='85.916'%20y1='62.946'%20y2='62.946'%20gradientUnits='userSpaceOnUse'%3e%3cstop%20stop-color='%23CD9F28'/%3e%3cstop%20offset='1'%20stop-color='%23ECD80B'/%3e%3c/linearGradient%3e%3cclipPath%20id='a'%3e%3cpath%20fill='%23fff'%20d='M51.47%2045.728h186.104V80.14H51.47z'/%3e%3c/clipPath%3e%3c/defs%3e%3c/svg%3e)


More from Tennant

Explore Other Assets


© 2026 MaintainX. All rights reserved.