


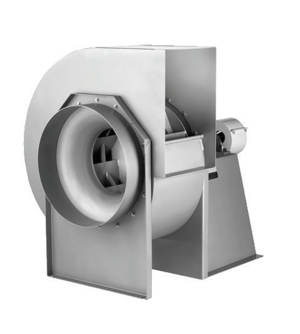
SPX Corporation Rotary Pump R4RI
Need answers fast?
Explore the manual using AI.

Turn manuals into instant answers
with your AI-powered assistantTurn manuals into instant answers
with your AI-powered assistant
Manual for SPX Corporation Rotary Pump R4RI
Complete asset maintenance, one click away
Get instant access to all the maintenance information you need. Empower technicians to perform preventive maintenance with asset packages, ready to use right out of the box.

Documents & Manuals
Find all the essential guides in one place.
 Tensioning Guide
- Belt-diagram
- C-120 pulleys
+ 13 more

Work Order Templates
Pre-built workflows to keep your asset running smoothly.
- Daily Electrical System Inspection
- Replace Roller and Pulley
- Install Engine B-120
+ 29 more

Procedures
Integrate maintenance plans directly into your work orders.
- Motion Industries
- Applied Industrial Technologies
- Electrical Brothers
+ 5 more

Parts
Access the parts list for your equipment in MaintainX.
- Drive Motor
- B2 Rollers
- Tensioning System
+ 40 more
SPX Corporation Rotary Pump R4RI
Create an account to install this asset package.
Maintenance Plans for SPX Corporation Rotary Pump Model R4RI
Integrate maintenance plans directly into your work orders in MaintainX.
Vented Cover Adjustment
- Manual:
Pump discharge pressure tends to push the rubber cover gasket and plunger towards the front of the pump. This pressure compresses spring allowing pressure to be relieved by escaping via the rear side of the gasket and the recess of the outer cover. The venting pressure can be set by adjusting spring tension with the adjusting nut.
1. Place a pressure gauge in the downstream line close to the pump; between the pump and other downstream equipment.
2. Place a shut-o valve in the discharge line immediately downstream from the pressure gauge. Leave the valve wide open.
3. Loosen the lock nut and turn the adjusting nut clockwise as far as it will go. This is to prevent any venting during Step 4 below.
4. Pump product through system at the desired temperature and adjust the pump speed until the desired capacity is attained.
5. Check the pressure gauge for the desired pumping pressure. Example: 40 psig (2.8 kg/cm2).
6. Determine the venting pressure needed to protect the system. Example: 45 psig (3.15 kg/cm2). Venting pressure must always be higher than the pumping pressure.
7. Now turn the adjusting nut counterclockwise until only two or three threads are engaged.

Rotary Pump Lubrication
Warning: Always lubricate parts after disassembly for cleaning or maintenance.
When processing food products, use a sanitary grade lubricant (approved for incidental contact with edible products) on all product contact surfaces during assembly.
Use high quality non-emulsifying gear oil.
Select the type of gear oil used
When processing food products, use a sanitary grade lubricant approved for incidental contact with edible products (USDA Classication H1) on all product contact surfaces after disassembly for cleaning or maintenance.
Was the pump properly lubricated?
Sign off on the pump lubrication
Rotary Pump Inspection
1. APV equipment is inspected prior to shipment. When leaving the factory, it is well crated for normal transportation procedures. APV cannot, however, guarantee safe arrival. Therefore, upon receipt of this equipment, check the received items against the packing list for damage or missing parts. Check the packing material thoroughly for small parts.
2. Visually inspect for damage or loss. Damage or loss should be reported immediately to the delivery carrier while present. Following the immediate notication of the lost or damaged parts, a detailed description including quantity, description of the loss or damage, and a cash value should be claimed against the carrier with respect to the guidelines set forth by the responsible carrier’s policies.
APV’s responsibility terminates F.O.B point of manufacture unless otherwise specied per the General Terms and Conditions of Sale as published by APV and amended from time to time. Contact APV Order Services if shipping information is required for handling claims.
3. In the case of damage or loss to the equipment, APV may perform three major functions:
a. Manufacturer Function – APV manufactures quality equipment and stands behind the APV Standard Warranty. Refer to the Standard Warranty.
b. Assessor Function – APV oers assessment services for ling claims. The APV assessor will accurately determine the extent of the damage (or loss) and cost of repairs to the equipment. Reimbursement for this service will be agreed upon prior to the assessment.
c. Repair House Function – APV oers services for repairing the damage(s) or replacement of loss(es) to the equipment. APV has the option to alter the Standard Warranty on refurbished or replacement parts. The cost of this service will be dependent upon the assessment that is made.;
Rotary Pump Oil Change
Warning: Ensure the pump is not running and is cool before starting the procedure
Drain pan placed under drain plug
Drain plug removed
Oil completely drained
Drain plug reinstalled
Filler plug removed
Amount of high grade gear lube filled
Pump filled to center of sight glass window
Vent plug installed
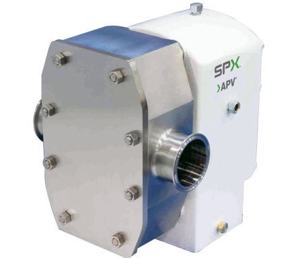
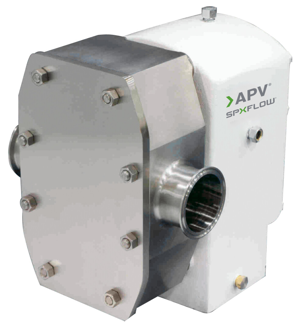
Rotary Pump Check
Warning: Disassemble pump before checking rotation.
Discharge on the right when the top rotor turns clockwise
Discharge on the left when the top rotor turns counterclockwise
Two seal pressure relief grooves on the discharge side of the pump
Pump body clearly stamped “IN”
Oversized stud hole and special large hex stud for correct mounting
Hex shaped stud in the upper left hand position for discharge on the right
Interchange hex stud with the lower right hand stud for discharge on the left
Sign off on the rotary pump check
Parts for SPX Corporation Rotary Pump R4RI
Access the parts list for your equipment in MaintainX.
Nut - Hex, Stainless Steel
M523V006529
Nut - Wing
M727P39782E
Cover - Rectangular Inlet - Std Flat Cover
M03HP133615
Gasket - Cover (Paper) Standard, Sold In Pks Of 100pcs
M541P133610
Bearing - Seal, SS, Standard
M03HP137734
Nut - Hex, Stainless Steel
M523V006529
Nut - Wing
M727P39782E
Cover - Rectangular Inlet - Std Flat Cover
M03HP133615
Gasket - Cover (Paper) Standard, Sold In Pks Of 100pcs
M541P133610
Bearing - Seal, SS, Standard
M03HP137734
Nut - Hex, Stainless Steel
M523V006529
Nut - Wing
M727P39782E
Cover - Rectangular Inlet - Std Flat Cover
M03HP133615
Gasket - Cover (Paper) Standard, Sold In Pks Of 100pcs
M541P133610
Bearing - Seal, SS, Standard
M03HP137734
Unlock efficiency
with MaintainX CoPilot
MaintainX CoPilot is your expert colleague, on call 24/7, helping your team find the answers they need to keep equipment running.
Reduce Unplanned Downtime
Ensure your team follows consistent procedures to minimize equipment failures and costly delays.
Maximize Asset Availability
Keep your assets running longer and more reliably, with standardized maintenance workflows from OEM manuals.
Lower Maintenance Costs
Turn any technician into an expert to streamline operations, maintain more assets, and reduce overall costs.
Thousands of companies manage their assets with MaintainX

'%3e%3cpath%20fill='url(%23b)'%20d='M66.008%2080.068c-5.084-.786-9.763-3.834-12.442-8.68a16.942%2016.942%200%200%201-1.87-5.18c1.096.19%202.203.476%203.298.87%206.525%202.333%2010.836%207.68%2011.014%2012.99ZM51.47%2061.576c.488-5.524%203.62-10.716%208.847-13.597a17.132%2017.132%200%200%201%2011.335-1.882c-.798%208.145-7.43%2014.848-16.038%2015.599-1.417.119-2.799.07-4.144-.12Zm28.564-11.478a17.513%2017.513%200%200%201%203.727%204.62c4.608%208.335%201.584%2018.813-6.75%2023.409a16.988%2016.988%200%200%201-4.359%201.679%2019.624%2019.624%200%200%201-3.977-12.776c.346-7.561%204.942-13.931%2011.36-16.932Z'/%3e%3cpath%20fill='%23110F0D'%20fill-rule='evenodd'%20d='M142.831%2048.324h4.977V77.03h-4.977V48.324Zm27.278%2013.002c.322%201.048.453%202.263.453%203.62v12.073h-4.787V66.208c0-.75-.047-1.572-.154-2.143-.453-2.382-1.822-3.572-4.215-3.572-2.31%200-3.882%201.274-4.43%203.476-.143.596-.226%201.405-.226%202.25v10.8h-4.787V56.623h4.477v2.989c1.536-2.5%203.906-3.43%206.371-3.43%203.488%200%206.263%201.68%207.298%205.144Zm24.636%207.323c0%203.882-2.358%206.525-5.763%207.727-1.298.453-2.632.643-4.62.643h-10.169V48.324h9.085c1.691%200%203.156.143%204.049.38%203.465.93%205.727%203.68%205.727%207.335%200%202.441-.81%204.156-2.762%205.644%202.905%201.417%204.453%203.727%204.453%206.966Zm-15.634-8.656h4.584c1.024%200%201.917-.143%202.536-.417%201.215-.548%201.905-1.608%201.905-3.167%200-1.548-.643-2.572-1.845-3.132-.691-.31-1.762-.452-2.763-.452h-4.417v7.168Zm10.716%208.465c0-1.536-.893-3.37-3.227-3.893-.428-.095-1.036-.143-1.571-.143h-5.918v8.085h5.501c.56%200%201.429-.048%201.953-.167%201.94-.453%203.262-1.846%203.262-3.882Zm47.747-11.847-8.097%2020.408h-4.429l-8.109-20.408h5.191l5.192%2014.574%205.108-14.574h5.144Zm-20.218%2010.002c0%20.69-.036%201.262-.155%201.94h-15.943c.631%202.87%202.714%204.728%205.882%204.728%202.131%200%203.607-.882%204.703-2.525h4.87c-1.762%204.144-5.204%206.692-9.657%206.692-6.084%200-10.537-4.858-10.537-10.49%200-6.108%204.524-10.776%2010.335-10.776%206.239%200%2010.442%204.954%2010.502%2010.43Zm-4.763-1.405c-.333-2.846-2.643-4.858-5.691-4.858-2.894%200-5.287%201.929-5.621%204.858h11.312Zm-72.667%203.44c0%204.787-3.287%208.371-9.419%208.371H119.363V64.66c-1.917.274-3.87.69-5.811%201.238l4.537%2011.121h-5.418l-3.596-9.585c-5.144%202.084-10.085%205.216-14.217%209.585h-4.786L101.8%2048.312h4.56l5.68%2013.883a44.112%2044.112%200%200%201%207.323-1.774V48.312h9.084c1.703%200%203.156.143%204.061.393%203.453.929%205.727%203.667%205.727%207.323%200%201.917-.738%204.179-2.81%205.691%203.06%201.56%204.501%204.025%204.501%206.93Zm-15.634-8.667a62.664%2062.664%200%200%201%202.06-.036c1.703.012%203.239.131%204.608.37%201.441-.549%202.357-1.727%202.357-3.537%200-1.941-.881-3.144-2.488-3.667-.548-.18-1.358-.286-2.322-.286h-4.215v7.156Zm-16.55%203.905-3.715-9.894-6.394%2016.502c2.833-2.595%206.263-4.858%2010.109-6.608Zm27.254%204.74c0-2.775-3.131-4.347-8.513-4.418-.715%200-1.441.011-2.191.047v8.252h5.918c2.548%200%204.786-1.37%204.786-3.882Z'%20clip-rule='evenodd'/%3e%3c/g%3e%3cdefs%3e%3clinearGradient%20id='b'%20x1='51.47'%20x2='85.916'%20y1='62.946'%20y2='62.946'%20gradientUnits='userSpaceOnUse'%3e%3cstop%20stop-color='%23CD9F28'/%3e%3cstop%20offset='1'%20stop-color='%23ECD80B'/%3e%3c/linearGradient%3e%3cclipPath%20id='a'%3e%3cpath%20fill='%23fff'%20d='M51.47%2045.728h186.104V80.14H51.47z'/%3e%3c/clipPath%3e%3c/defs%3e%3c/svg%3e)


More from SPX Corporation


Explore Other Assets


© 2026 MaintainX. All rights reserved.