


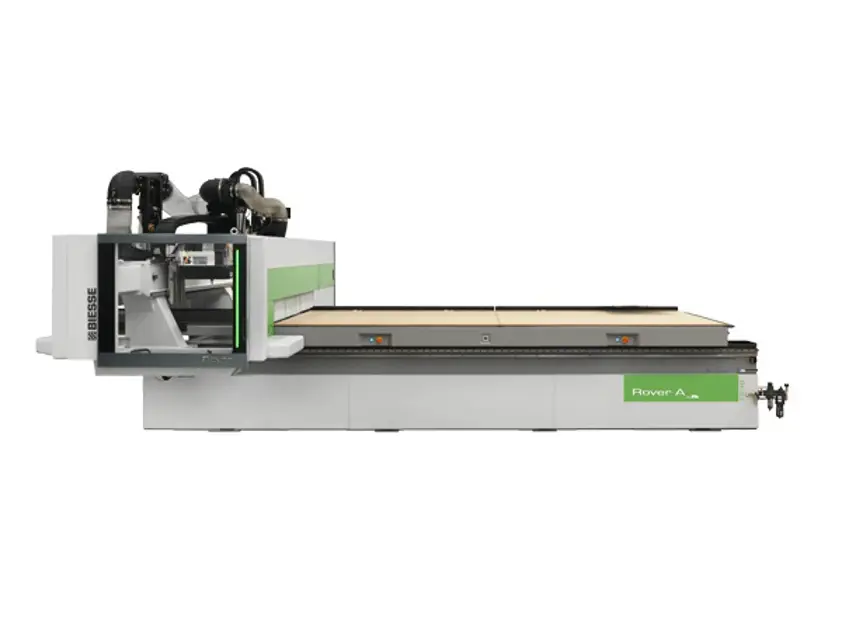
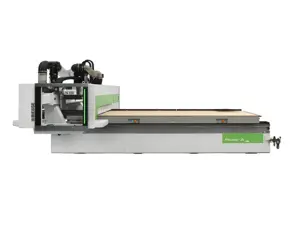
Biesse Machine Rover A 1564 G FT
Need answers fast?
Explore the manual using AI.
Turn manuals into instant answers
with your AI-powered assistantTurn manuals into instant answers
with your AI-powered assistant
Complete asset maintenance, one click away
Get instant access to all the maintenance information you need. Empower technicians to perform preventive maintenance with asset packages, ready to use right out of the box.

Documents & Manuals
Find all the essential guides in one place.
 Tensioning Guide
- Belt-diagram
- C-120 pulleys
+ 13 more

Work Order Templates
Pre-built workflows to keep your asset running smoothly.
- Daily Electrical System Inspection
- Replace Roller and Pulley
- Install Engine B-120
+ 29 more

Procedures
Integrate maintenance plans directly into your work orders.
- Motion Industries
- Applied Industrial Technologies
- Electrical Brothers
+ 5 more

Parts
Access the parts list for your equipment in MaintainX.
- Drive Motor
- B2 Rollers
- Tensioning System
+ 40 more
Biesse Machine Rover A 1564 G FT
Create an account to install this asset package.
Maintenance Plans for Biesse Machine Model Rover A 1564 G FT
Integrate maintenance plans directly into your work orders in MaintainX.
1 Monthly Machine Maintenance
Operating section
Lubricating the HSK F63 electrospindle unlocking device
Did you apply METAFLUX Fett-Paste 70-8508 grease on the electrospindle unlocking device?
Did you spread the grease evenly using a collet spindle?
Did you remove any excess grease with a clean cloth?
Checking the connections of the electrospindles
Are the electrical cables undamaged?
Are the connectors firmly fixed?
Are the seals of the pipes of the pneumatic system and the cooling circuit connections intact?

Machine Maintenance
14.4 Updating the antivirus system
Enter the URL of the antivirus update site
Upload the downloaded antivirus update file
Did the antivirus update start automatically?
14.14 Cleaning the Revolver tool magazine photocell
Is the photocell clean and free of dust?
FR unit - Replacing the oil separator filter cartridge
Is the supply pressure gauge indicating 0 bar?
Did you replace the cartridge?
1 Daily Machine Maintenance
General machine
General cleaning of the machine
Proper cleaning of the machine and the surrounding area
Use a vacuum cleaner to remove any wood chips
Never use compressed air to clean the electrical cabinet
Clean the various operating section covers using soap and water only
Safety devices
Inspection of the condition of the cams and their safety switches
Work table
6 Monthly / 2000 Hourly Machine Maintenance
Busch Mink vacuum pump
Cleaning the fans and the cooling tubes
1. Remove the soundproof casing A.
2. Clean the fans, the cooling tubes, the grilles and the cooling louvres (see the instructions supplied with the vacuum pump).
3. Replace the soundproof casing .
Refrigerator
Replacement of the coolant
1. Make sure that the refrigerator is turned off and disconnect the relevant cable from the power supply.
2. Using the indicator A, check the level of the coolant in the tank is above the minimum notch.
1 Yearly / 3000 Hourly Machine Maintenance
Becker VTLF2.250 vacuum pump
Lubricating the bearings
The vacuum pump bearings must be lubricated through the greasing nipples A with the pump operating, using the syringe provided filled with KLÜBER AMBLYGON TA 15/2 type grease (pump in 10 grammes of grease).
Blade wear check
Make sure everything is kept as clean as possible during this operation.
1. Remove the cover A.
2. Remove the cover B. To carry out this operation, after unscrewing the bolts that fasten the cover, screw two bolts evenly into the holes C, making sure the cover is not tilted to the side.
3. Remove the blades D and check they do not exceed the minimum limit of 41 mm. If necessary, replace them. Make sure you assemble the blades the right way round.
4. When performing this operation, also check the gaskets and bearing for wear.
Unlock efficiency
with MaintainX CoPilot
MaintainX CoPilot is your expert colleague, on call 24/7, helping your team find the answers they need to keep equipment running.
Reduce Unplanned Downtime
Ensure your team follows consistent procedures to minimize equipment failures and costly delays.
Maximize Asset Availability
Keep your assets running longer and more reliably, with standardized maintenance workflows from OEM manuals.
Lower Maintenance Costs
Turn any technician into an expert to streamline operations, maintain more assets, and reduce overall costs.
Thousands of companies manage their assets with MaintainX

'%3e%3cpath%20fill='url(%23b)'%20d='M66.008%2080.068c-5.084-.786-9.763-3.834-12.442-8.68a16.942%2016.942%200%200%201-1.87-5.18c1.096.19%202.203.476%203.298.87%206.525%202.333%2010.836%207.68%2011.014%2012.99ZM51.47%2061.576c.488-5.524%203.62-10.716%208.847-13.597a17.132%2017.132%200%200%201%2011.335-1.882c-.798%208.145-7.43%2014.848-16.038%2015.599-1.417.119-2.799.07-4.144-.12Zm28.564-11.478a17.513%2017.513%200%200%201%203.727%204.62c4.608%208.335%201.584%2018.813-6.75%2023.409a16.988%2016.988%200%200%201-4.359%201.679%2019.624%2019.624%200%200%201-3.977-12.776c.346-7.561%204.942-13.931%2011.36-16.932Z'/%3e%3cpath%20fill='%23110F0D'%20fill-rule='evenodd'%20d='M142.831%2048.324h4.977V77.03h-4.977V48.324Zm27.278%2013.002c.322%201.048.453%202.263.453%203.62v12.073h-4.787V66.208c0-.75-.047-1.572-.154-2.143-.453-2.382-1.822-3.572-4.215-3.572-2.31%200-3.882%201.274-4.43%203.476-.143.596-.226%201.405-.226%202.25v10.8h-4.787V56.623h4.477v2.989c1.536-2.5%203.906-3.43%206.371-3.43%203.488%200%206.263%201.68%207.298%205.144Zm24.636%207.323c0%203.882-2.358%206.525-5.763%207.727-1.298.453-2.632.643-4.62.643h-10.169V48.324h9.085c1.691%200%203.156.143%204.049.38%203.465.93%205.727%203.68%205.727%207.335%200%202.441-.81%204.156-2.762%205.644%202.905%201.417%204.453%203.727%204.453%206.966Zm-15.634-8.656h4.584c1.024%200%201.917-.143%202.536-.417%201.215-.548%201.905-1.608%201.905-3.167%200-1.548-.643-2.572-1.845-3.132-.691-.31-1.762-.452-2.763-.452h-4.417v7.168Zm10.716%208.465c0-1.536-.893-3.37-3.227-3.893-.428-.095-1.036-.143-1.571-.143h-5.918v8.085h5.501c.56%200%201.429-.048%201.953-.167%201.94-.453%203.262-1.846%203.262-3.882Zm47.747-11.847-8.097%2020.408h-4.429l-8.109-20.408h5.191l5.192%2014.574%205.108-14.574h5.144Zm-20.218%2010.002c0%20.69-.036%201.262-.155%201.94h-15.943c.631%202.87%202.714%204.728%205.882%204.728%202.131%200%203.607-.882%204.703-2.525h4.87c-1.762%204.144-5.204%206.692-9.657%206.692-6.084%200-10.537-4.858-10.537-10.49%200-6.108%204.524-10.776%2010.335-10.776%206.239%200%2010.442%204.954%2010.502%2010.43Zm-4.763-1.405c-.333-2.846-2.643-4.858-5.691-4.858-2.894%200-5.287%201.929-5.621%204.858h11.312Zm-72.667%203.44c0%204.787-3.287%208.371-9.419%208.371H119.363V64.66c-1.917.274-3.87.69-5.811%201.238l4.537%2011.121h-5.418l-3.596-9.585c-5.144%202.084-10.085%205.216-14.217%209.585h-4.786L101.8%2048.312h4.56l5.68%2013.883a44.112%2044.112%200%200%201%207.323-1.774V48.312h9.084c1.703%200%203.156.143%204.061.393%203.453.929%205.727%203.667%205.727%207.323%200%201.917-.738%204.179-2.81%205.691%203.06%201.56%204.501%204.025%204.501%206.93Zm-15.634-8.667a62.664%2062.664%200%200%201%202.06-.036c1.703.012%203.239.131%204.608.37%201.441-.549%202.357-1.727%202.357-3.537%200-1.941-.881-3.144-2.488-3.667-.548-.18-1.358-.286-2.322-.286h-4.215v7.156Zm-16.55%203.905-3.715-9.894-6.394%2016.502c2.833-2.595%206.263-4.858%2010.109-6.608Zm27.254%204.74c0-2.775-3.131-4.347-8.513-4.418-.715%200-1.441.011-2.191.047v8.252h5.918c2.548%200%204.786-1.37%204.786-3.882Z'%20clip-rule='evenodd'/%3e%3c/g%3e%3cdefs%3e%3clinearGradient%20id='b'%20x1='51.47'%20x2='85.916'%20y1='62.946'%20y2='62.946'%20gradientUnits='userSpaceOnUse'%3e%3cstop%20stop-color='%23CD9F28'/%3e%3cstop%20offset='1'%20stop-color='%23ECD80B'/%3e%3c/linearGradient%3e%3cclipPath%20id='a'%3e%3cpath%20fill='%23fff'%20d='M51.47%2045.728h186.104V80.14H51.47z'/%3e%3c/clipPath%3e%3c/defs%3e%3c/svg%3e)


More from Biesse


Explore Other Assets


© 2026 MaintainX. All rights reserved.