


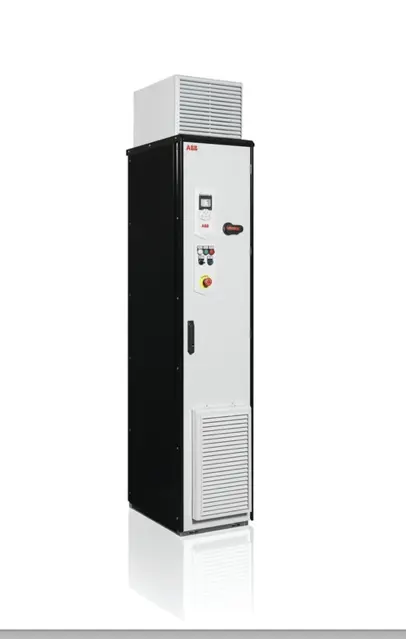
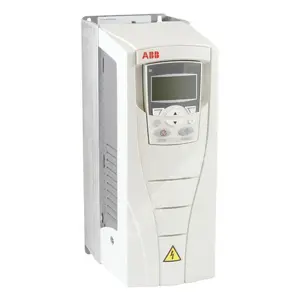
ABB Enclosed Variable Speed/Frequency Drive ACS880-07-0260A-5
Need answers fast?
Explore the manual using AI.
The ABB Enclosed Variable Speed/Frequency Drive ACS880-07-0260A-5 is designed for efficient motor control and energy savings in industrial applications. This advanced drive offers flexible installation options and robust performance, making it ideal for a wide range of automation tasks. Optimize your operations with ABB's reliable technology.
Turn manuals into instant answers
with your AI-powered assistantTurn manuals into instant answers
with your AI-powered assistant
Manual for ABB Enclosed Variable Speed/Frequency Drive ACS880-07-0260A-5
Complete asset maintenance, one click away
Get instant access to all the maintenance information you need. Empower technicians to perform preventive maintenance with asset packages, ready to use right out of the box.

Documents & Manuals
Find all the essential guides in one place.
 Tensioning Guide
- Belt-diagram
- C-120 pulleys
+ 13 more

Work Order Templates
Pre-built workflows to keep your asset running smoothly.
- Daily Electrical System Inspection
- Replace Roller and Pulley
- Install Engine B-120
+ 29 more

Procedures
Integrate maintenance plans directly into your work orders.
- Motion Industries
- Applied Industrial Technologies
- Electrical Brothers
+ 5 more

Parts
Access the parts list for your equipment in MaintainX.
- Drive Motor
- B2 Rollers
- Tensioning System
+ 40 more
ABB Enclosed Variable Speed/Frequency Drive ACS880-07-0260A-5
Create an account to install this asset package.
Maintenance Plans for ABB Enclosed Variable Speed/Frequency Drive Model ACS880-07-0260A-5
Integrate maintenance plans directly into your work orders in MaintainX.
1 Yearly Heatsink Cleaning
WARNING! Use the required personal protective equipment. Wear protective gloves and long sleeves. Some parts have sharp edges.
WARNING! Use a vacuum cleaner with antistatic hose and nozzle, and wear a grounding wristband. Using a normal vacuum cleaner creates static discharges which can damage circuit boards.
Drive stopped and electrical safety precautions followed
Drive module removed from the cabinet
Module cooling fan(s) removed
Cleaned heatsink with dry, clean and oil-free compressed air from bottom to top and used a vacuum cleaner at the air outlet to trap the dust
Reinstalled the cooling fan
Sign off on the heatsink cleaning

Cleaning the Interior of the Cabinet
WARNING! Obey the safety instructions of the drive. If you ignore them, injury or death, or damage to the equipment can occur. If you are not a qualified electrical professional, do not do installation, commissioning or maintenance work.
WARNING! Use a vacuum cleaner with antistatic hose and nozzle, and wear a grounding wristband. Using a normal vacuum cleaner creates static discharges which can damage circuit boards.
Drive stopped and electrical safety precautions followed
Cabinet door opened
Interior of the cabinet cleaned using a vacuum cleaner and a soft brush
Air inlets of the fans and air outlets of the modules (top) cleaned
Air inlet gratings (if any) on the door cleaned
Door closed
Sign off on the cleaning of the cabinet interior
ZCU-14 Memory Unit Replacement
WARNING! Do not remove or insert the memory unit when the control unit is powered.
WARNING! Obey the safety instructions of the drive. If you ignore them, injury or death, or damage to the equipment can occur. If you are not a qualified electrical professional, do not do installation, commissioning or maintenance work.
Drive stopped and electrical safety precautions followed
Clip of the memory unit pulled forward
Memory unit taken off
Memory unit replaced in reverse order
Sign off on the memory unit replacement
Drive Module Replacement
WARNING! Obey the safety instructions of the drive. If you ignore them, injury or death, or damage to the equipment can occur. If you are not a qualified electrical professional, do not do installation, commissioning or maintenance work.
WARNING! Make sure that the cabinet is secured to the floor. If not, the cabinet can topple over when the heavy drive module is slid forward in front of the cabinet. This can cause injury or death, and damage to the equipment.
Stop the drive and do the steps in section Electrical safety precautions before you start the work.
For drives with options +L505 and +L506: Remove the shroud.
For drives with options +L505 and +L506: Remove the Pt100 and thermistor relay mounting plate by loosening the two mounting screws and lifting the mounting plate up.
Remove the drive module main fan.
Undo the screws on the right-hand side of the swing-out frame.
Undo the hinge screw at the top and bottom of the swing-out frame to enable the frame to open aside far enough.
Unplug the control wire terminals at the right-hand side of the cabinet.
6 Yearly IP54 (UL type 12) Roof Fan 60 Hz Replacement
WARNING! Obey the safety instructions of the drive. If you ignore them, injury or death, or damage to the equipment can occur. If you are not a qualified electrical professional, do not do installation, commissioning or maintenance work.
Drive stopped and electrical safety precautions followed
Front grating lifted upwards and removed
Fastening screws of the front plate loosened and plate removed
Fan supply wires disconnected
Mounting screws of the fan loosened
Fan pulled out
New fan installed in reverse order
Sign off on the fan replacement
Parts for ABB Enclosed Variable Speed/Frequency Drive ACS880-07-0260A-5
Access the parts list for your equipment in MaintainX.
Sine Filter
B84143V0230S229
Fuse IEC
170M5810D
Fuse UL
DFJ-400
Sine Filter
B84143V0230S229
Fuse IEC
170M5810D
Fuse UL
DFJ-400
Sine Filter
B84143V0230S229
Fuse IEC
170M5810D
Fuse UL
DFJ-400
Unlock efficiency
with MaintainX CoPilot
MaintainX CoPilot is your expert colleague, on call 24/7, helping your team find the answers they need to keep equipment running.
Reduce Unplanned Downtime
Ensure your team follows consistent procedures to minimize equipment failures and costly delays.
Maximize Asset Availability
Keep your assets running longer and more reliably, with standardized maintenance workflows from OEM manuals.
Lower Maintenance Costs
Turn any technician into an expert to streamline operations, maintain more assets, and reduce overall costs.
Thousands of companies manage their assets with MaintainX

'%3e%3cpath%20fill='url(%23b)'%20d='M66.008%2080.068c-5.084-.786-9.763-3.834-12.442-8.68a16.942%2016.942%200%200%201-1.87-5.18c1.096.19%202.203.476%203.298.87%206.525%202.333%2010.836%207.68%2011.014%2012.99ZM51.47%2061.576c.488-5.524%203.62-10.716%208.847-13.597a17.132%2017.132%200%200%201%2011.335-1.882c-.798%208.145-7.43%2014.848-16.038%2015.599-1.417.119-2.799.07-4.144-.12Zm28.564-11.478a17.513%2017.513%200%200%201%203.727%204.62c4.608%208.335%201.584%2018.813-6.75%2023.409a16.988%2016.988%200%200%201-4.359%201.679%2019.624%2019.624%200%200%201-3.977-12.776c.346-7.561%204.942-13.931%2011.36-16.932Z'/%3e%3cpath%20fill='%23110F0D'%20fill-rule='evenodd'%20d='M142.831%2048.324h4.977V77.03h-4.977V48.324Zm27.278%2013.002c.322%201.048.453%202.263.453%203.62v12.073h-4.787V66.208c0-.75-.047-1.572-.154-2.143-.453-2.382-1.822-3.572-4.215-3.572-2.31%200-3.882%201.274-4.43%203.476-.143.596-.226%201.405-.226%202.25v10.8h-4.787V56.623h4.477v2.989c1.536-2.5%203.906-3.43%206.371-3.43%203.488%200%206.263%201.68%207.298%205.144Zm24.636%207.323c0%203.882-2.358%206.525-5.763%207.727-1.298.453-2.632.643-4.62.643h-10.169V48.324h9.085c1.691%200%203.156.143%204.049.38%203.465.93%205.727%203.68%205.727%207.335%200%202.441-.81%204.156-2.762%205.644%202.905%201.417%204.453%203.727%204.453%206.966Zm-15.634-8.656h4.584c1.024%200%201.917-.143%202.536-.417%201.215-.548%201.905-1.608%201.905-3.167%200-1.548-.643-2.572-1.845-3.132-.691-.31-1.762-.452-2.763-.452h-4.417v7.168Zm10.716%208.465c0-1.536-.893-3.37-3.227-3.893-.428-.095-1.036-.143-1.571-.143h-5.918v8.085h5.501c.56%200%201.429-.048%201.953-.167%201.94-.453%203.262-1.846%203.262-3.882Zm47.747-11.847-8.097%2020.408h-4.429l-8.109-20.408h5.191l5.192%2014.574%205.108-14.574h5.144Zm-20.218%2010.002c0%20.69-.036%201.262-.155%201.94h-15.943c.631%202.87%202.714%204.728%205.882%204.728%202.131%200%203.607-.882%204.703-2.525h4.87c-1.762%204.144-5.204%206.692-9.657%206.692-6.084%200-10.537-4.858-10.537-10.49%200-6.108%204.524-10.776%2010.335-10.776%206.239%200%2010.442%204.954%2010.502%2010.43Zm-4.763-1.405c-.333-2.846-2.643-4.858-5.691-4.858-2.894%200-5.287%201.929-5.621%204.858h11.312Zm-72.667%203.44c0%204.787-3.287%208.371-9.419%208.371H119.363V64.66c-1.917.274-3.87.69-5.811%201.238l4.537%2011.121h-5.418l-3.596-9.585c-5.144%202.084-10.085%205.216-14.217%209.585h-4.786L101.8%2048.312h4.56l5.68%2013.883a44.112%2044.112%200%200%201%207.323-1.774V48.312h9.084c1.703%200%203.156.143%204.061.393%203.453.929%205.727%203.667%205.727%207.323%200%201.917-.738%204.179-2.81%205.691%203.06%201.56%204.501%204.025%204.501%206.93Zm-15.634-8.667a62.664%2062.664%200%200%201%202.06-.036c1.703.012%203.239.131%204.608.37%201.441-.549%202.357-1.727%202.357-3.537%200-1.941-.881-3.144-2.488-3.667-.548-.18-1.358-.286-2.322-.286h-4.215v7.156Zm-16.55%203.905-3.715-9.894-6.394%2016.502c2.833-2.595%206.263-4.858%2010.109-6.608Zm27.254%204.74c0-2.775-3.131-4.347-8.513-4.418-.715%200-1.441.011-2.191.047v8.252h5.918c2.548%200%204.786-1.37%204.786-3.882Z'%20clip-rule='evenodd'/%3e%3c/g%3e%3cdefs%3e%3clinearGradient%20id='b'%20x1='51.47'%20x2='85.916'%20y1='62.946'%20y2='62.946'%20gradientUnits='userSpaceOnUse'%3e%3cstop%20stop-color='%23CD9F28'/%3e%3cstop%20offset='1'%20stop-color='%23ECD80B'/%3e%3c/linearGradient%3e%3cclipPath%20id='a'%3e%3cpath%20fill='%23fff'%20d='M51.47%2045.728h186.104V80.14H51.47z'/%3e%3c/clipPath%3e%3c/defs%3e%3c/svg%3e)


More from ABB


Explore Other Assets


© 2026 MaintainX. All rights reserved.