


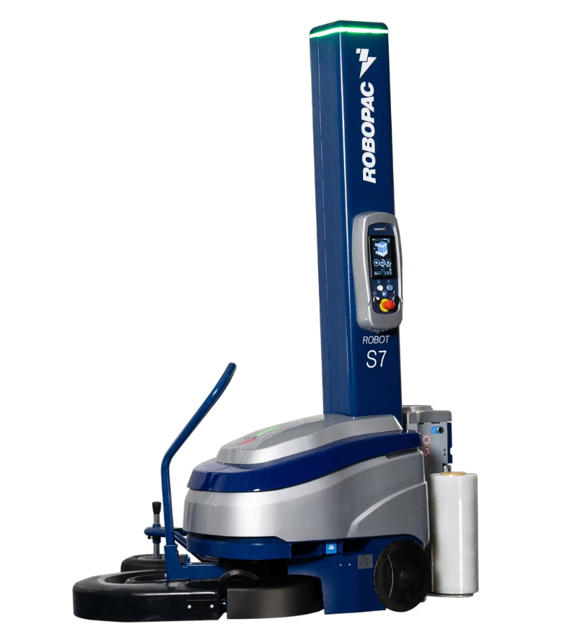
Robopac Self-Propelled Stretch Wrapper Machine Robot S7
Need answers fast?
Explore the manual using AI.
Turn manuals into instant answers
with your AI-powered assistantTurn manuals into instant answers
with your AI-powered assistant
Complete asset maintenance, one click away
Get instant access to all the maintenance information you need. Empower technicians to perform preventive maintenance with asset packages, ready to use right out of the box.

Documents & Manuals
Find all the essential guides in one place.
 Tensioning Guide
- Belt-diagram
- C-120 pulleys
+ 13 more

Work Order Templates
Pre-built workflows to keep your asset running smoothly.
- Daily Electrical System Inspection
- Replace Roller and Pulley
- Install Engine B-120
+ 29 more

Procedures
Integrate maintenance plans directly into your work orders.
- Motion Industries
- Applied Industrial Technologies
- Electrical Brothers
+ 5 more

Parts
Access the parts list for your equipment in MaintainX.
- Drive Motor
- B2 Rollers
- Tensioning System
+ 40 more
Robopac Self-Propelled Stretch Wrapper Machine Robot S7
Create an account to install this asset package.
Maintenance Plans for Robopac Self-Propelled Stretch Wrapper Machine Model Robot S7
Integrate maintenance plans directly into your work orders in MaintainX.
Spool Carriage Lifting Chain Adjustment
Lift the reel carriage until it reaches the upper limit switch
Turn the machine off
Use any means to prevent possible falls from the carriage
Remove the guard (A)
Loosen the nuts (B)
Tighten M8x50 UNI 5739 screw (C) on the chain tensioner (D) to a tightening torque of 3 Nm
Screw the nuts (B) again until reaching the chain tensioner (D) level
Remove screw (C)
Refit the guard (A)

Battery Replacement
Caution - warning: The main fuse of the machine is built into the battery cables, use only original cables.
Lift the battery casing (A)
Remove the connector (B) from the plug
Caution - warning: First disconnect the negative terminal (−)
Disconnect the terminals (C-D-E-F)
Extract the batteries (G) and replace them
Caution - warning: Respect the polarities when connecting the terminals. Grease the positive terminal (✚) and connect it first.
Reconnect the terminals (C-D-E-F)
Engage the connector (B) to the plug
40 Hourly Machine Working Area Cleaning
Warning: This cleaning procedure requires trained personnel with PPE!
Cycle timings have been defined on the basis of the standard cycle.
The standard cycle is the following: 500 mm high film reel, 1500 mm high pallet, pallet weight equal to 1500 kg, total wrapping cycle consisting of two turns at the base, two turns at the top with rotation speed of 12 r.p.m. or 80 m/1’ and carriage upstroke and downstroke speed equal to 4 m/1’.
Machine Working Areas cleaned?
Upload a photo of the cleaned machine working area
Sign off on the machine working area cleaning
Height Of The Feeler Wheel Adjustment
Perform “machine safe stop”
Pull the knob (A), adjust the height of the wheel (C) using the knob (B) and release the knob (A) so that the pin is correctly inserted into one of the holes
To obtain greater heights, remove the knob (B), loosen the nut from the wheel (C) and refit them inverting their positions
Sign off on the feeler wheel adjustment
Film Stretch Adjustment
5.2.1. "FRD for mesh" TYPE REEL CARRIAGES
Proceed as follows.
1. Work on the handwheel (A) until reaching the value displayed on the index (B).
The brake shaft for mesh is an accessory that can be mounted on the carriage at a later stage. This optional fitting allows the system to use a mesh reel with a std “FRD” carriage.
Important: For a correct tensioning of the mesh, adjust the braking effect so that the outfeed roller (C) is more braked than the infeed roller (D); moreover, it is necessary to avoid braking the stretching rollers too much to prevent the mesh from slipping.
5.2.2. "P3GS” REEL CARRIAGES FOR CHANGING PRE-STRETCH RATIOS
Proceed as follows.
1. Open the door (A).
2. Lift switch (B) until reaching the requested value (250/0/150 – 300/0/230).
Unlock efficiency
with MaintainX CoPilot
MaintainX CoPilot is your expert colleague, on call 24/7, helping your team find the answers they need to keep equipment running.
Reduce Unplanned Downtime
Ensure your team follows consistent procedures to minimize equipment failures and costly delays.
Maximize Asset Availability
Keep your assets running longer and more reliably, with standardized maintenance workflows from OEM manuals.
Lower Maintenance Costs
Turn any technician into an expert to streamline operations, maintain more assets, and reduce overall costs.
Thousands of companies manage their assets with MaintainX

'%3e%3cpath%20fill='url(%23b)'%20d='M66.008%2080.068c-5.084-.786-9.763-3.834-12.442-8.68a16.942%2016.942%200%200%201-1.87-5.18c1.096.19%202.203.476%203.298.87%206.525%202.333%2010.836%207.68%2011.014%2012.99ZM51.47%2061.576c.488-5.524%203.62-10.716%208.847-13.597a17.132%2017.132%200%200%201%2011.335-1.882c-.798%208.145-7.43%2014.848-16.038%2015.599-1.417.119-2.799.07-4.144-.12Zm28.564-11.478a17.513%2017.513%200%200%201%203.727%204.62c4.608%208.335%201.584%2018.813-6.75%2023.409a16.988%2016.988%200%200%201-4.359%201.679%2019.624%2019.624%200%200%201-3.977-12.776c.346-7.561%204.942-13.931%2011.36-16.932Z'/%3e%3cpath%20fill='%23110F0D'%20fill-rule='evenodd'%20d='M142.831%2048.324h4.977V77.03h-4.977V48.324Zm27.278%2013.002c.322%201.048.453%202.263.453%203.62v12.073h-4.787V66.208c0-.75-.047-1.572-.154-2.143-.453-2.382-1.822-3.572-4.215-3.572-2.31%200-3.882%201.274-4.43%203.476-.143.596-.226%201.405-.226%202.25v10.8h-4.787V56.623h4.477v2.989c1.536-2.5%203.906-3.43%206.371-3.43%203.488%200%206.263%201.68%207.298%205.144Zm24.636%207.323c0%203.882-2.358%206.525-5.763%207.727-1.298.453-2.632.643-4.62.643h-10.169V48.324h9.085c1.691%200%203.156.143%204.049.38%203.465.93%205.727%203.68%205.727%207.335%200%202.441-.81%204.156-2.762%205.644%202.905%201.417%204.453%203.727%204.453%206.966Zm-15.634-8.656h4.584c1.024%200%201.917-.143%202.536-.417%201.215-.548%201.905-1.608%201.905-3.167%200-1.548-.643-2.572-1.845-3.132-.691-.31-1.762-.452-2.763-.452h-4.417v7.168Zm10.716%208.465c0-1.536-.893-3.37-3.227-3.893-.428-.095-1.036-.143-1.571-.143h-5.918v8.085h5.501c.56%200%201.429-.048%201.953-.167%201.94-.453%203.262-1.846%203.262-3.882Zm47.747-11.847-8.097%2020.408h-4.429l-8.109-20.408h5.191l5.192%2014.574%205.108-14.574h5.144Zm-20.218%2010.002c0%20.69-.036%201.262-.155%201.94h-15.943c.631%202.87%202.714%204.728%205.882%204.728%202.131%200%203.607-.882%204.703-2.525h4.87c-1.762%204.144-5.204%206.692-9.657%206.692-6.084%200-10.537-4.858-10.537-10.49%200-6.108%204.524-10.776%2010.335-10.776%206.239%200%2010.442%204.954%2010.502%2010.43Zm-4.763-1.405c-.333-2.846-2.643-4.858-5.691-4.858-2.894%200-5.287%201.929-5.621%204.858h11.312Zm-72.667%203.44c0%204.787-3.287%208.371-9.419%208.371H119.363V64.66c-1.917.274-3.87.69-5.811%201.238l4.537%2011.121h-5.418l-3.596-9.585c-5.144%202.084-10.085%205.216-14.217%209.585h-4.786L101.8%2048.312h4.56l5.68%2013.883a44.112%2044.112%200%200%201%207.323-1.774V48.312h9.084c1.703%200%203.156.143%204.061.393%203.453.929%205.727%203.667%205.727%207.323%200%201.917-.738%204.179-2.81%205.691%203.06%201.56%204.501%204.025%204.501%206.93Zm-15.634-8.667a62.664%2062.664%200%200%201%202.06-.036c1.703.012%203.239.131%204.608.37%201.441-.549%202.357-1.727%202.357-3.537%200-1.941-.881-3.144-2.488-3.667-.548-.18-1.358-.286-2.322-.286h-4.215v7.156Zm-16.55%203.905-3.715-9.894-6.394%2016.502c2.833-2.595%206.263-4.858%2010.109-6.608Zm27.254%204.74c0-2.775-3.131-4.347-8.513-4.418-.715%200-1.441.011-2.191.047v8.252h5.918c2.548%200%204.786-1.37%204.786-3.882Z'%20clip-rule='evenodd'/%3e%3c/g%3e%3cdefs%3e%3clinearGradient%20id='b'%20x1='51.47'%20x2='85.916'%20y1='62.946'%20y2='62.946'%20gradientUnits='userSpaceOnUse'%3e%3cstop%20stop-color='%23CD9F28'/%3e%3cstop%20offset='1'%20stop-color='%23ECD80B'/%3e%3c/linearGradient%3e%3cclipPath%20id='a'%3e%3cpath%20fill='%23fff'%20d='M51.47%2045.728h186.104V80.14H51.47z'/%3e%3c/clipPath%3e%3c/defs%3e%3c/svg%3e)


Explore Other Assets


© 2026 MaintainX. All rights reserved.