


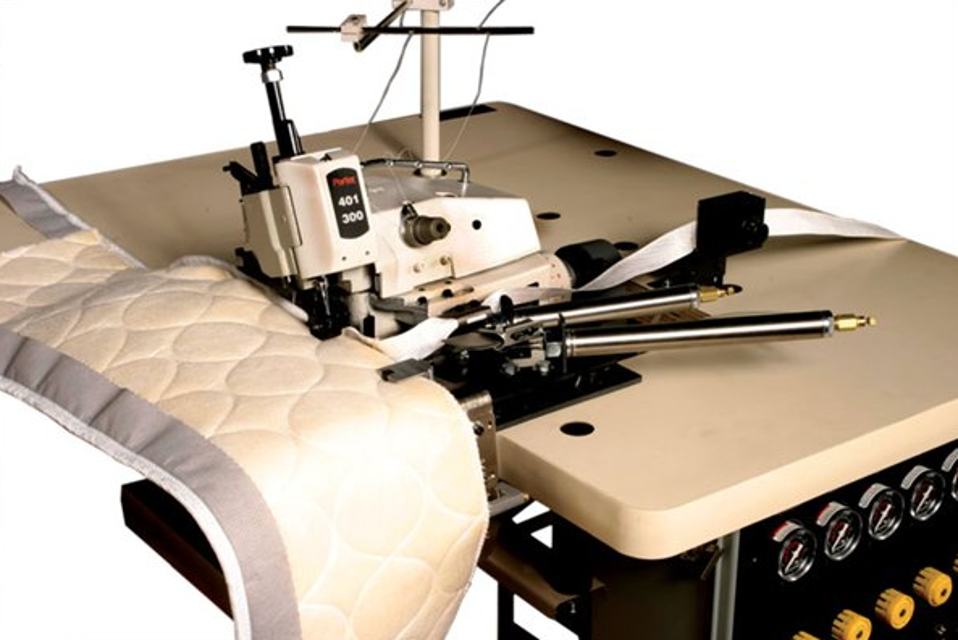
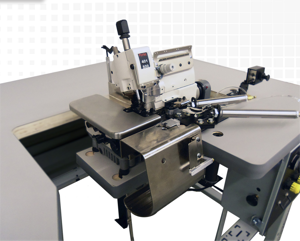
Porter International Box Spring Machine BS401-300
Need answers fast?
Explore the manual using AI.
Turn manuals into instant answers
with your AI-powered assistantTurn manuals into instant answers
with your AI-powered assistant
Manual for Porter International Box Spring Machine BS401-300
Complete asset maintenance, one click away
Get instant access to all the maintenance information you need. Empower technicians to perform preventive maintenance with asset packages, ready to use right out of the box.

Documents & Manuals
Find all the essential guides in one place.
 Tensioning Guide
- Belt-diagram
- C-120 pulleys
+ 13 more

Work Order Templates
Pre-built workflows to keep your asset running smoothly.
- Daily Electrical System Inspection
- Replace Roller and Pulley
- Install Engine B-120
+ 29 more

Procedures
Integrate maintenance plans directly into your work orders.
- Motion Industries
- Applied Industrial Technologies
- Electrical Brothers
+ 5 more

Parts
Access the parts list for your equipment in MaintainX.
- Drive Motor
- B2 Rollers
- Tensioning System
+ 40 more
Porter International Box Spring Machine BS401-300
Create an account to install this asset package.
Maintenance Plans for Porter International Box Spring Machine Model BS401-300
Integrate maintenance plans directly into your work orders in MaintainX.
Oil Filter Maintenance
Warning: Always ensure the machine is turned off and cooled down before performing any maintenance.
Is the oil jet in oil sight window 1 restricted or weak?
Does the oil contain foam or debris?
If either of the above checks fail, proceed with the following steps.
Drain oil from machine.
Remove bolts 5 and oil pan from machine.
Remove screws 6 and take out filter 4.
Clean filter 4 with new petrol and blow with low pressure air.
Replace filter 4 and tighten screws 6.

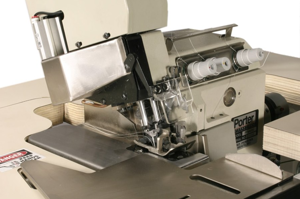
Looper Adjustment
Warning: This procedure requires trained personnel with PPE!
Looper slid into lever 5 and reached regulator 2
Enter the distance from the center line of the needle to the point of looper
Clearance of 0 - 0.1 mm obtained when looper point is in the scarf of the needle
Handwheel turned until needle bar ascends 3.0 mm from the lowest position
Lever 5 moved so that looper point comes to the scarf of needle and just touches needle
Handwheel turned until looper is at its extreme left position
Enter the distance from the centerline of needle to point of looper
Screw 4 tightened securely
Walking Foot Adjustments
A). This eccentric pin adjusts the position of the Walking Foot front to rear. This enables you to align the Walking Foot teeth with the lower feed dog teeth.
B). This screw adjusts the Walking Foot movement in relation to the presser foot. The higher the bracket, the faster the presser foot will meet the needle plate, causing the Walking Foot to raise off the work faster. Lowering the bracket will cause the Walking Foot to raise off the work more slowly.
C). This eccentric pin primarily adjusts the position of the presser foot front to rear.
D). This shaft adjusts the position of the presser foot front to rear. It is used to adjust the clearance between the presser foot and the Walking Foot.
E). This screw holds shaft 'D'. Loosen it to free the shaft.
Any one of the above adjust- ments will slightly change one or more of the other adjustments. Take this into consideration when making any one adjustment. Before running the machine, turn it over by hand to check all clearances.;
Needle Bar Height Adjustment
Is the needle at its highest position?
Is the clearance between the point of needle 1 and the top of needle plate correct?
If the setting is incorrect, follow the steps below
Slightly loosen screw 2
Reset needle bar to correct clearance at its highest position
Turn handwheel and observe that needle descends in the center of the needle hole in needle plate
Tighten screw 2 securely
Sign off on the needle bar height adjustment
Air Pressure Settings Adjustment
A. Main air gauge.
1. Flip up "hemmer" toggle switch.
2. Adjust main air knob to obtain 80-100 PSI of air pressure.
3. Tighten center screw on knob to lock the knob at this position.
B. Binder hemmer gauge
1. Flip up "binder" toggle switch.
2. Adjust knob and tighten screw to obtain 30 PSI of air pressure as described below.
C."A, B, C" gauges (These gauges control the air pressure on the drag foot. The three switches toggle three different types of material.)
1. Flip up respective toggle switches.
Parts for Porter International Box Spring Machine BS401-300
Access the parts list for your equipment in MaintainX.
Thumbscrew
650000
Nut
650001
Spring Guide Sleeve
650003
Pressure Spring
650002
Flange.
650004
Thumbscrew
650000
Nut
650001
Spring Guide Sleeve
650003
Pressure Spring
650002
Flange.
650004
Thumbscrew
650000
Nut
650001
Spring Guide Sleeve
650003
Pressure Spring
650002
Flange.
650004
Unlock efficiency
with MaintainX CoPilot
MaintainX CoPilot is your expert colleague, on call 24/7, helping your team find the answers they need to keep equipment running.
Reduce Unplanned Downtime
Ensure your team follows consistent procedures to minimize equipment failures and costly delays.
Maximize Asset Availability
Keep your assets running longer and more reliably, with standardized maintenance workflows from OEM manuals.
Lower Maintenance Costs
Turn any technician into an expert to streamline operations, maintain more assets, and reduce overall costs.
Thousands of companies manage their assets with MaintainX

'%3e%3cpath%20fill='url(%23b)'%20d='M66.008%2080.068c-5.084-.786-9.763-3.834-12.442-8.68a16.942%2016.942%200%200%201-1.87-5.18c1.096.19%202.203.476%203.298.87%206.525%202.333%2010.836%207.68%2011.014%2012.99ZM51.47%2061.576c.488-5.524%203.62-10.716%208.847-13.597a17.132%2017.132%200%200%201%2011.335-1.882c-.798%208.145-7.43%2014.848-16.038%2015.599-1.417.119-2.799.07-4.144-.12Zm28.564-11.478a17.513%2017.513%200%200%201%203.727%204.62c4.608%208.335%201.584%2018.813-6.75%2023.409a16.988%2016.988%200%200%201-4.359%201.679%2019.624%2019.624%200%200%201-3.977-12.776c.346-7.561%204.942-13.931%2011.36-16.932Z'/%3e%3cpath%20fill='%23110F0D'%20fill-rule='evenodd'%20d='M142.831%2048.324h4.977V77.03h-4.977V48.324Zm27.278%2013.002c.322%201.048.453%202.263.453%203.62v12.073h-4.787V66.208c0-.75-.047-1.572-.154-2.143-.453-2.382-1.822-3.572-4.215-3.572-2.31%200-3.882%201.274-4.43%203.476-.143.596-.226%201.405-.226%202.25v10.8h-4.787V56.623h4.477v2.989c1.536-2.5%203.906-3.43%206.371-3.43%203.488%200%206.263%201.68%207.298%205.144Zm24.636%207.323c0%203.882-2.358%206.525-5.763%207.727-1.298.453-2.632.643-4.62.643h-10.169V48.324h9.085c1.691%200%203.156.143%204.049.38%203.465.93%205.727%203.68%205.727%207.335%200%202.441-.81%204.156-2.762%205.644%202.905%201.417%204.453%203.727%204.453%206.966Zm-15.634-8.656h4.584c1.024%200%201.917-.143%202.536-.417%201.215-.548%201.905-1.608%201.905-3.167%200-1.548-.643-2.572-1.845-3.132-.691-.31-1.762-.452-2.763-.452h-4.417v7.168Zm10.716%208.465c0-1.536-.893-3.37-3.227-3.893-.428-.095-1.036-.143-1.571-.143h-5.918v8.085h5.501c.56%200%201.429-.048%201.953-.167%201.94-.453%203.262-1.846%203.262-3.882Zm47.747-11.847-8.097%2020.408h-4.429l-8.109-20.408h5.191l5.192%2014.574%205.108-14.574h5.144Zm-20.218%2010.002c0%20.69-.036%201.262-.155%201.94h-15.943c.631%202.87%202.714%204.728%205.882%204.728%202.131%200%203.607-.882%204.703-2.525h4.87c-1.762%204.144-5.204%206.692-9.657%206.692-6.084%200-10.537-4.858-10.537-10.49%200-6.108%204.524-10.776%2010.335-10.776%206.239%200%2010.442%204.954%2010.502%2010.43Zm-4.763-1.405c-.333-2.846-2.643-4.858-5.691-4.858-2.894%200-5.287%201.929-5.621%204.858h11.312Zm-72.667%203.44c0%204.787-3.287%208.371-9.419%208.371H119.363V64.66c-1.917.274-3.87.69-5.811%201.238l4.537%2011.121h-5.418l-3.596-9.585c-5.144%202.084-10.085%205.216-14.217%209.585h-4.786L101.8%2048.312h4.56l5.68%2013.883a44.112%2044.112%200%200%201%207.323-1.774V48.312h9.084c1.703%200%203.156.143%204.061.393%203.453.929%205.727%203.667%205.727%207.323%200%201.917-.738%204.179-2.81%205.691%203.06%201.56%204.501%204.025%204.501%206.93Zm-15.634-8.667a62.664%2062.664%200%200%201%202.06-.036c1.703.012%203.239.131%204.608.37%201.441-.549%202.357-1.727%202.357-3.537%200-1.941-.881-3.144-2.488-3.667-.548-.18-1.358-.286-2.322-.286h-4.215v7.156Zm-16.55%203.905-3.715-9.894-6.394%2016.502c2.833-2.595%206.263-4.858%2010.109-6.608Zm27.254%204.74c0-2.775-3.131-4.347-8.513-4.418-.715%200-1.441.011-2.191.047v8.252h5.918c2.548%200%204.786-1.37%204.786-3.882Z'%20clip-rule='evenodd'/%3e%3c/g%3e%3cdefs%3e%3clinearGradient%20id='b'%20x1='51.47'%20x2='85.916'%20y1='62.946'%20y2='62.946'%20gradientUnits='userSpaceOnUse'%3e%3cstop%20stop-color='%23CD9F28'/%3e%3cstop%20offset='1'%20stop-color='%23ECD80B'/%3e%3c/linearGradient%3e%3cclipPath%20id='a'%3e%3cpath%20fill='%23fff'%20d='M51.47%2045.728h186.104V80.14H51.47z'/%3e%3c/clipPath%3e%3c/defs%3e%3c/svg%3e)


More from Porter International


Explore Other Assets


© 2026 MaintainX. All rights reserved.