


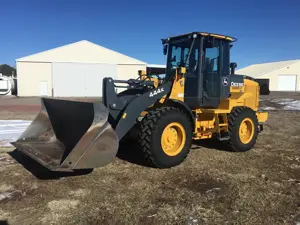
John Deere Compact Utility Tractor 3032E
Need answers fast?
Explore the manual using AI.

The John Deere Compact Utility Tractor 3032E is a versatile and powerful machine designed for various agricultural and landscaping tasks. With its robust features and reliable performance, this tractor is ideal for both professional and personal use, ensuring efficiency and productivity in every operation.
Turn manuals into instant answers
with your AI-powered assistantTurn manuals into instant answers
with your AI-powered assistant
Manual for John Deere Compact Utility Tractor 3032E
Complete asset maintenance, one click away
Get instant access to all the maintenance information you need. Empower technicians to perform preventive maintenance with asset packages, ready to use right out of the box.

Documents & Manuals
Find all the essential guides in one place.
 Tensioning Guide
- Belt-diagram
- C-120 pulleys
+ 13 more

Work Order Templates
Pre-built workflows to keep your asset running smoothly.
- Daily Electrical System Inspection
- Replace Roller and Pulley
- Install Engine B-120
+ 29 more

Procedures
Integrate maintenance plans directly into your work orders.
- Motion Industries
- Applied Industrial Technologies
- Electrical Brothers
+ 5 more

Parts
Access the parts list for your equipment in MaintainX.
- Drive Motor
- B2 Rollers
- Tensioning System
+ 40 more
John Deere Compact Utility Tractor 3032E
Create an account to install this asset package.
Maintenance Plans for John Deere Compact Utility Tractor Model 3032E
Integrate maintenance plans directly into your work orders in MaintainX.
50 Hourly Maintenance
Park machine safely on a level surface. Allow machine to cool down for at least one hour.
Loosen and remove the dipstick (A) on the right side of the front axle.
Wipe dipstick clean with a rag. Install dipstick but do not tighten. Allow dipstick to rest on top of threads.
Oil level on dipstick
Add recommended oil through dipstick fill opening until oil level is correct.
Install and tighten the dipstick.
Check front axle oil level again after the first several hours of operation.
Lubricate lift link grease fitting (A) with recommended grease or equivalent.
Lubricate ball joints (B) and drawbar hitch (C) with the SUPER LUBE® lubricant.

Fuel Filter Sediment Bowl and Filter Maintenance
Park machine safely and allow engine to cool
Check fuel sediment bowl for water and deposits
Remove bowl and replace fuel filter if necessary
Move the fuel shutoff valve to closed position
Position drain pan under fuel filter sediment bowl
Turn sediment bowl counterclockwise to remove
Remove and discard the fuel filter
Clean bowl
Install new filter to filter head
Selective Control Valve Check
Check the dust plugs (A) for damage
Upload a photo of the dust plugs (A)
Clean dirt and debris from the selective control valve couplers (B)
Upload a photo of the cleaned selective control valve couplers (B)
Check selective control valve couplers (B) for oil leakage
Report any oil leakage found
Sign off on the selective control valve check
Safety Interlock System Testing
Warning: Ensure you have read the machine operator manual and are familiar with the operation of the machine before performing these safety system checks.
Perform these tests in a clear open area. Keep bystanders away.
Test the Neutral Start Switch: Sit on the operator seat, disengage PTO, move the transmission range lever to the H (high) or L (low) position, turn key switch to START position. Engine must not start.
Test the Seat Switch: Sit on the operator seat, do not depress the hydrostatic travel pedals, lock park brake, start engine, press PTO switch, raise up slightly from the operator seat. Do not dismount machine. Engine must shut down within 1 second.
Test the Rear PTO Switch: Sit on the operator seat, lock park brake, move transmission range lever to the N (neutral) position, press PTO switch to the engaged/on position, turn key to START position. Engine must not start.
Sign off on the safety interlock system testing
6000 Hourly / 6 Yearly Maintenance
Drain, Flush and Refill Engine Cooling System
Park machine safely
Allow engine to cool
Raise hood
Slowly open radiator cap to the first stop to release all pressure
Close radiator cap tightly
Position a pan under the radiator drain plug
Open the drain plug and allow the coolant to drain from the system
When coolant drains from the recovery tank, remove the radiator cap
Parts for John Deere Compact Utility Tractor 3032E
Access the parts list for your equipment in MaintainX.
Wheel Retaining Bolts/Nuts
L124516
Wheel Retaining Bolts/Nuts
L124516
Wheel Retaining Bolts/Nuts
L124516
Unlock efficiency
with MaintainX CoPilot
MaintainX CoPilot is your expert colleague, on call 24/7, helping your team find the answers they need to keep equipment running.
Reduce Unplanned Downtime
Ensure your team follows consistent procedures to minimize equipment failures and costly delays.
Maximize Asset Availability
Keep your assets running longer and more reliably, with standardized maintenance workflows from OEM manuals.
Lower Maintenance Costs
Turn any technician into an expert to streamline operations, maintain more assets, and reduce overall costs.
Thousands of companies manage their assets with MaintainX

'%3e%3cpath%20fill='url(%23b)'%20d='M66.008%2080.068c-5.084-.786-9.763-3.834-12.442-8.68a16.942%2016.942%200%200%201-1.87-5.18c1.096.19%202.203.476%203.298.87%206.525%202.333%2010.836%207.68%2011.014%2012.99ZM51.47%2061.576c.488-5.524%203.62-10.716%208.847-13.597a17.132%2017.132%200%200%201%2011.335-1.882c-.798%208.145-7.43%2014.848-16.038%2015.599-1.417.119-2.799.07-4.144-.12Zm28.564-11.478a17.513%2017.513%200%200%201%203.727%204.62c4.608%208.335%201.584%2018.813-6.75%2023.409a16.988%2016.988%200%200%201-4.359%201.679%2019.624%2019.624%200%200%201-3.977-12.776c.346-7.561%204.942-13.931%2011.36-16.932Z'/%3e%3cpath%20fill='%23110F0D'%20fill-rule='evenodd'%20d='M142.831%2048.324h4.977V77.03h-4.977V48.324Zm27.278%2013.002c.322%201.048.453%202.263.453%203.62v12.073h-4.787V66.208c0-.75-.047-1.572-.154-2.143-.453-2.382-1.822-3.572-4.215-3.572-2.31%200-3.882%201.274-4.43%203.476-.143.596-.226%201.405-.226%202.25v10.8h-4.787V56.623h4.477v2.989c1.536-2.5%203.906-3.43%206.371-3.43%203.488%200%206.263%201.68%207.298%205.144Zm24.636%207.323c0%203.882-2.358%206.525-5.763%207.727-1.298.453-2.632.643-4.62.643h-10.169V48.324h9.085c1.691%200%203.156.143%204.049.38%203.465.93%205.727%203.68%205.727%207.335%200%202.441-.81%204.156-2.762%205.644%202.905%201.417%204.453%203.727%204.453%206.966Zm-15.634-8.656h4.584c1.024%200%201.917-.143%202.536-.417%201.215-.548%201.905-1.608%201.905-3.167%200-1.548-.643-2.572-1.845-3.132-.691-.31-1.762-.452-2.763-.452h-4.417v7.168Zm10.716%208.465c0-1.536-.893-3.37-3.227-3.893-.428-.095-1.036-.143-1.571-.143h-5.918v8.085h5.501c.56%200%201.429-.048%201.953-.167%201.94-.453%203.262-1.846%203.262-3.882Zm47.747-11.847-8.097%2020.408h-4.429l-8.109-20.408h5.191l5.192%2014.574%205.108-14.574h5.144Zm-20.218%2010.002c0%20.69-.036%201.262-.155%201.94h-15.943c.631%202.87%202.714%204.728%205.882%204.728%202.131%200%203.607-.882%204.703-2.525h4.87c-1.762%204.144-5.204%206.692-9.657%206.692-6.084%200-10.537-4.858-10.537-10.49%200-6.108%204.524-10.776%2010.335-10.776%206.239%200%2010.442%204.954%2010.502%2010.43Zm-4.763-1.405c-.333-2.846-2.643-4.858-5.691-4.858-2.894%200-5.287%201.929-5.621%204.858h11.312Zm-72.667%203.44c0%204.787-3.287%208.371-9.419%208.371H119.363V64.66c-1.917.274-3.87.69-5.811%201.238l4.537%2011.121h-5.418l-3.596-9.585c-5.144%202.084-10.085%205.216-14.217%209.585h-4.786L101.8%2048.312h4.56l5.68%2013.883a44.112%2044.112%200%200%201%207.323-1.774V48.312h9.084c1.703%200%203.156.143%204.061.393%203.453.929%205.727%203.667%205.727%207.323%200%201.917-.738%204.179-2.81%205.691%203.06%201.56%204.501%204.025%204.501%206.93Zm-15.634-8.667a62.664%2062.664%200%200%201%202.06-.036c1.703.012%203.239.131%204.608.37%201.441-.549%202.357-1.727%202.357-3.537%200-1.941-.881-3.144-2.488-3.667-.548-.18-1.358-.286-2.322-.286h-4.215v7.156Zm-16.55%203.905-3.715-9.894-6.394%2016.502c2.833-2.595%206.263-4.858%2010.109-6.608Zm27.254%204.74c0-2.775-3.131-4.347-8.513-4.418-.715%200-1.441.011-2.191.047v8.252h5.918c2.548%200%204.786-1.37%204.786-3.882Z'%20clip-rule='evenodd'/%3e%3c/g%3e%3cdefs%3e%3clinearGradient%20id='b'%20x1='51.47'%20x2='85.916'%20y1='62.946'%20y2='62.946'%20gradientUnits='userSpaceOnUse'%3e%3cstop%20stop-color='%23CD9F28'/%3e%3cstop%20offset='1'%20stop-color='%23ECD80B'/%3e%3c/linearGradient%3e%3cclipPath%20id='a'%3e%3cpath%20fill='%23fff'%20d='M51.47%2045.728h186.104V80.14H51.47z'/%3e%3c/clipPath%3e%3c/defs%3e%3c/svg%3e)


More from John Deere


Explore Other Assets


© 2026 MaintainX. All rights reserved.