


Hussmann Q-Series Medium Temperature Self Contained Merchandiser Q1SSM6S
Need answers fast?
Explore the manual using AI.
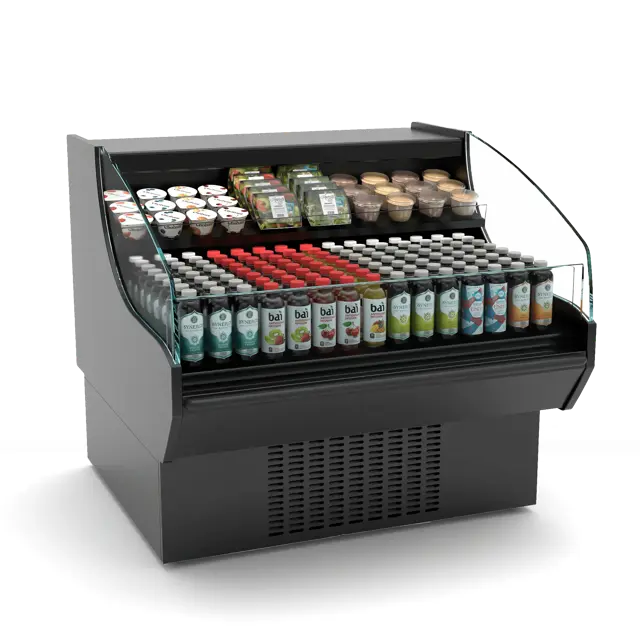
The Hussmann Q-Series Medium Temperature Self Contained Merchandiser Q1SSM6S is designed for efficient food display and preservation. This reliable unit offers optimal temperature control and energy efficiency, making it ideal for retail environments. Enhance your merchandising with this high-performance solution from Hussmann.
Turn manuals into instant answers
with your AI-powered assistantTurn manuals into instant answers
with your AI-powered assistant
Manual for Hussmann Q-Series Medium Temperature Self Contained Merchandiser Q1SSM6S
Complete asset maintenance, one click away
Get instant access to all the maintenance information you need. Empower technicians to perform preventive maintenance with asset packages, ready to use right out of the box.

Documents & Manuals
Find all the essential guides in one place.
 Tensioning Guide
- Belt-diagram
- C-120 pulleys
+ 13 more

Work Order Templates
Pre-built workflows to keep your asset running smoothly.
- Daily Electrical System Inspection
- Replace Roller and Pulley
- Install Engine B-120
+ 29 more

Procedures
Integrate maintenance plans directly into your work orders.
- Motion Industries
- Applied Industrial Technologies
- Electrical Brothers
+ 5 more

Parts
Access the parts list for your equipment in MaintainX.
- Drive Motor
- B2 Rollers
- Tensioning System
+ 40 more
Hussmann Q-Series Medium Temperature Self Contained Merchandiser Q1SSM6S
Create an account to install this asset package.
Maintenance Plans for Hussmann Q-Series Medium Temperature Self Contained Merchandiser Model Q1SSM6S
Integrate maintenance plans directly into your work orders in MaintainX.
1 Weekly Merchandiser Cleaning
CARE AND CLEANING
• Long life and satisfactory performance of any equipment is dependent upon the care it receives. To ensure long life, proper sanitation and minimum maintenance costs, these merchandisers should be thoroughly cleaned, all debris removed and the interiors washed down, weekly.
Exterior Surfaces • The exterior surfaces must be cleaned with a mild detergent and warm water to protect and maintain their attractive finish. Never use abrasive cleansers or scouring pads.
Interior Surfaces
• The interior surfaces may be cleaned with most domestic detergents, ammonia based cleaners and sanitizing solutions with no harm to the surface. Self contained models empty into a limited capacity evaporation pan, which will overflow if excess water is used in cleaning.
Do NOT Use:
•Abrasive cleansers and scouring pads, as these will mar the finish.
•Coarse paper towels on coated glass.
•Ammonia-based cleaners on acrylic parts.

3 Monthly Merchandiser Maintenance
Record any complaints or issues from the store manager
Check unit for any damage, vibrations or abnormal noise
Verify unit is level side to side and front to rear
Confirm refrigerant lines are properly secured and not touching or rubbing other lines, wires or framework
Verify fan motors and motor mounts are tight
Confirm fan blades are tight and not rubbing or hitting
Make sure all electrical connections, factory and field, are tight
Verify electrical connections at lamps are secure and dry
Check for and replace any frayed or chaffed wiring
Removing Scratches from Bumper
Use steel wool to smooth out the surface area of the bumper
Clean area
Apply vinyl or car wax and polish surface for a smooth glossy finish
Cleaning Under Fan Plenum
After cleaning be sure the plenum is properly lowered into position or product loss will result due to improper refrigeration
Sign off on the scratch removal and cleaning process
Evaporation Pan Cleaning
CAUTION! Evaporation Pan is Hot! and poses risk of bodily injury – Always Wear gloves and protective eye wear when servicing.
Turn off evaporation pan heater, and allow pan to cool.
The condensate water outlet for self contained models empties into a limited capacity evaporation pan.
Debris or dirt accumulation inside the condensate evaporation pan or on the heater coil will reduce the pan’s evaporation capacity and cause premature heater failure.
The evaporation pan waste water will overflow and spill onto the floor if the heater is not properly operating.
Remove accumulated debris from the evaporation pan.
Wipe down heater coil with a cloth and warm water.
Be sure to remove any dirt, debris or liquids from the heater coil.
Water introduced during cleaning will cause the evaporation pan to overflow.
6 Monthly Discharge Air Louvers Cleaning
Warning: Be careful not to damage the louvers during cleaning
Are the louvers dirty?
Select the cleaning method used
Is all water removed from the louvers cells before replacing?
Are the louvers damaged during cleaning?
Sign off on the louver cleaning
Parts for Hussmann Q-Series Medium Temperature Self Contained Merchandiser Q1SSM6S
Access the parts list for your equipment in MaintainX.
Binding Screw #8-32 1/4
300030604
Cover Drain
0301266
Expansion Valve (Danfoss 068U2138)
225013403
Fuse 15 Amp
125018604
Drain Trap
18S279
Binding Screw #8-32 1/4
300030604
Cover Drain
0301266
Expansion Valve (Danfoss 068U2138)
225013403
Fuse 15 Amp
125018604
Drain Trap
18S279
Binding Screw #8-32 1/4
300030604
Cover Drain
0301266
Expansion Valve (Danfoss 068U2138)
225013403
Fuse 15 Amp
125018604
Drain Trap
18S279
Unlock efficiency
with MaintainX CoPilot
MaintainX CoPilot is your expert colleague, on call 24/7, helping your team find the answers they need to keep equipment running.
Reduce Unplanned Downtime
Ensure your team follows consistent procedures to minimize equipment failures and costly delays.
Maximize Asset Availability
Keep your assets running longer and more reliably, with standardized maintenance workflows from OEM manuals.
Lower Maintenance Costs
Turn any technician into an expert to streamline operations, maintain more assets, and reduce overall costs.
Thousands of companies manage their assets with MaintainX

'%3e%3cpath%20fill='url(%23b)'%20d='M66.008%2080.068c-5.084-.786-9.763-3.834-12.442-8.68a16.942%2016.942%200%200%201-1.87-5.18c1.096.19%202.203.476%203.298.87%206.525%202.333%2010.836%207.68%2011.014%2012.99ZM51.47%2061.576c.488-5.524%203.62-10.716%208.847-13.597a17.132%2017.132%200%200%201%2011.335-1.882c-.798%208.145-7.43%2014.848-16.038%2015.599-1.417.119-2.799.07-4.144-.12Zm28.564-11.478a17.513%2017.513%200%200%201%203.727%204.62c4.608%208.335%201.584%2018.813-6.75%2023.409a16.988%2016.988%200%200%201-4.359%201.679%2019.624%2019.624%200%200%201-3.977-12.776c.346-7.561%204.942-13.931%2011.36-16.932Z'/%3e%3cpath%20fill='%23110F0D'%20fill-rule='evenodd'%20d='M142.831%2048.324h4.977V77.03h-4.977V48.324Zm27.278%2013.002c.322%201.048.453%202.263.453%203.62v12.073h-4.787V66.208c0-.75-.047-1.572-.154-2.143-.453-2.382-1.822-3.572-4.215-3.572-2.31%200-3.882%201.274-4.43%203.476-.143.596-.226%201.405-.226%202.25v10.8h-4.787V56.623h4.477v2.989c1.536-2.5%203.906-3.43%206.371-3.43%203.488%200%206.263%201.68%207.298%205.144Zm24.636%207.323c0%203.882-2.358%206.525-5.763%207.727-1.298.453-2.632.643-4.62.643h-10.169V48.324h9.085c1.691%200%203.156.143%204.049.38%203.465.93%205.727%203.68%205.727%207.335%200%202.441-.81%204.156-2.762%205.644%202.905%201.417%204.453%203.727%204.453%206.966Zm-15.634-8.656h4.584c1.024%200%201.917-.143%202.536-.417%201.215-.548%201.905-1.608%201.905-3.167%200-1.548-.643-2.572-1.845-3.132-.691-.31-1.762-.452-2.763-.452h-4.417v7.168Zm10.716%208.465c0-1.536-.893-3.37-3.227-3.893-.428-.095-1.036-.143-1.571-.143h-5.918v8.085h5.501c.56%200%201.429-.048%201.953-.167%201.94-.453%203.262-1.846%203.262-3.882Zm47.747-11.847-8.097%2020.408h-4.429l-8.109-20.408h5.191l5.192%2014.574%205.108-14.574h5.144Zm-20.218%2010.002c0%20.69-.036%201.262-.155%201.94h-15.943c.631%202.87%202.714%204.728%205.882%204.728%202.131%200%203.607-.882%204.703-2.525h4.87c-1.762%204.144-5.204%206.692-9.657%206.692-6.084%200-10.537-4.858-10.537-10.49%200-6.108%204.524-10.776%2010.335-10.776%206.239%200%2010.442%204.954%2010.502%2010.43Zm-4.763-1.405c-.333-2.846-2.643-4.858-5.691-4.858-2.894%200-5.287%201.929-5.621%204.858h11.312Zm-72.667%203.44c0%204.787-3.287%208.371-9.419%208.371H119.363V64.66c-1.917.274-3.87.69-5.811%201.238l4.537%2011.121h-5.418l-3.596-9.585c-5.144%202.084-10.085%205.216-14.217%209.585h-4.786L101.8%2048.312h4.56l5.68%2013.883a44.112%2044.112%200%200%201%207.323-1.774V48.312h9.084c1.703%200%203.156.143%204.061.393%203.453.929%205.727%203.667%205.727%207.323%200%201.917-.738%204.179-2.81%205.691%203.06%201.56%204.501%204.025%204.501%206.93Zm-15.634-8.667a62.664%2062.664%200%200%201%202.06-.036c1.703.012%203.239.131%204.608.37%201.441-.549%202.357-1.727%202.357-3.537%200-1.941-.881-3.144-2.488-3.667-.548-.18-1.358-.286-2.322-.286h-4.215v7.156Zm-16.55%203.905-3.715-9.894-6.394%2016.502c2.833-2.595%206.263-4.858%2010.109-6.608Zm27.254%204.74c0-2.775-3.131-4.347-8.513-4.418-.715%200-1.441.011-2.191.047v8.252h5.918c2.548%200%204.786-1.37%204.786-3.882Z'%20clip-rule='evenodd'/%3e%3c/g%3e%3cdefs%3e%3clinearGradient%20id='b'%20x1='51.47'%20x2='85.916'%20y1='62.946'%20y2='62.946'%20gradientUnits='userSpaceOnUse'%3e%3cstop%20stop-color='%23CD9F28'/%3e%3cstop%20offset='1'%20stop-color='%23ECD80B'/%3e%3c/linearGradient%3e%3cclipPath%20id='a'%3e%3cpath%20fill='%23fff'%20d='M51.47%2045.728h186.104V80.14H51.47z'/%3e%3c/clipPath%3e%3c/defs%3e%3c/svg%3e)


More from Hussmann


Explore Other Assets


© 2026 MaintainX. All rights reserved.