


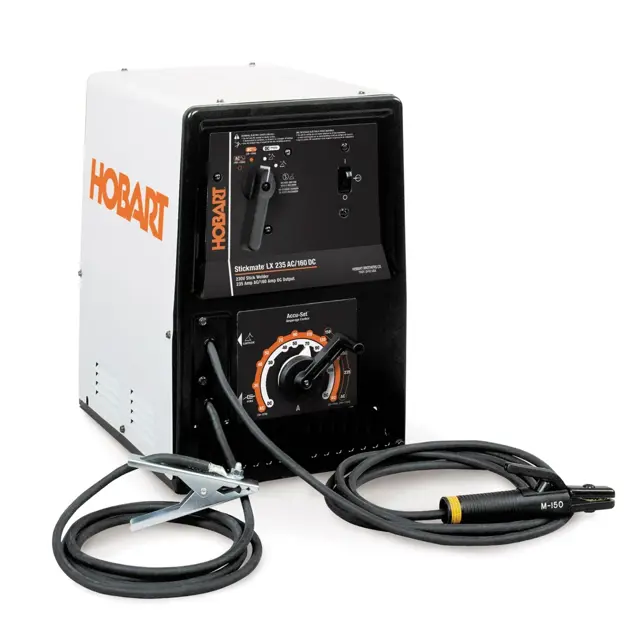
Hobart Arc Welding Machine LX 235 AC
Need answers fast?
Explore the manual using AI.
Turn manuals into instant answers
with your AI-powered assistantTurn manuals into instant answers
with your AI-powered assistant
Complete asset maintenance, one click away
Get instant access to all the maintenance information you need. Empower technicians to perform preventive maintenance with asset packages, ready to use right out of the box.

Documents & Manuals
Find all the essential guides in one place.
 Tensioning Guide
- Belt-diagram
- C-120 pulleys
+ 13 more

Work Order Templates
Pre-built workflows to keep your asset running smoothly.
- Daily Electrical System Inspection
- Replace Roller and Pulley
- Install Engine B-120
+ 29 more

Procedures
Integrate maintenance plans directly into your work orders.
- Motion Industries
- Applied Industrial Technologies
- Electrical Brothers
+ 5 more

Parts
Access the parts list for your equipment in MaintainX.
- Drive Motor
- B2 Rollers
- Tensioning System
+ 40 more
Hobart Arc Welding Machine LX 235 AC
Create an account to install this asset package.
Maintenance Plans for Hobart Arc Welding Machine Model LX 235 AC
Integrate maintenance plans directly into your work orders in MaintainX.
3 Monthly Arc Welding Machine Maintenance
- Replace unreadable labels
- Repair or replace cracked cables
Hazards
1. Electric shock
Touching live electrical parts can cause fatal shocks or severe burns.; The electrode and work circuit is electrically live whenever the output is on.; The input power circuit and machine internal circuits are also live when power is on.; In semiautomatic or automatic wire welding, the wire, wire reel, drive roll housing, and all metal parts touching the welding wire are electrically live.; Incorrectly installed or improperly grounded equipment is a hazard.
- Do not touch live electrical parts.
- Wear dry, hole-free insulating gloves and body protection.
- Insulate yourself from work and ground using dry insulating mats or covers big enough to prevent any physical contact with the work or ground.
- Do not use AC output in damp areas, if movement is confined, or if there is a danger of falling.

Amperage Adjustment Indicator Reinstalling
Turn Off welding power source and disconnect input power.
1. Wrapper
- Remove wrapper from unit.
2. Crank Handle
3. Shunt Shaft
4. Transformer And Shunt (Located Inside Unit)
- Insert crank handle onto shunt shaft protruding through front panel and turn crank handle to adjust shunt to the proper vale of "X", depending on model (see detail of transformer and shunt.
- Remove crank handle.
5. Pinion Gear
12 Monthly Arc Welding Machine Maintenance
Turn Off welding power source and disconnect input power.
1. Wrapper. - Remove wrapper.
2. Shunt Block
Note: Do not grease screw threads on shunt block.
- Apply light coating of high-temperature grease to shaded areas of both shunt blocks. Turn amperage control handle to spread grease evenly.
3. Anti-Noise Adjustment
- If shunt block vibrates and becomes noisy, tighten adjustment screws 1/4 turn.; - Install wrapper, turn On unit, and check for shunt noise. Repeat procedure until noise stops. Do not overtighten. Call your nearest Factory Authorized Service Agent if noise continues.
Note: Install wrapper before turning On power.
Hazards
6 Monthly Arc Welding Machine Maintenance
- Blow out or vacuum inside, during heavy service clean mounthly
Hazards
1. Electric shock
Touching live electrical parts can cause fatal shocks or severe burns.; The electrode and work circuit is electrically live whenever the output is on.; The input power circuit and machine internal circuits are also live when power is on.; In semiautomatic or automatic wire welding, the wire, wire reel, drive roll housing, and all metal parts touching the welding wire are electrically live.; Incorrectly installed or improperly grounded equipment is a hazard.
- Do not touch live electrical parts.
- Wear dry, hole-free insulating gloves and body protection.
- Insulate yourself from work and ground using dry insulating mats or covers big enough to prevent any physical contact with the work or ground.
- Do not use AC output in damp areas, if movement is confined, or if there is a danger of falling.
- Use AC output ONLY if required for the welding process.
Parts for Hobart Arc Welding Machine LX 235 AC
Access the parts list for your equipment in MaintainX.
Label, Gen Precautionary
134 464
Label, Warning General Precautionary (En/Fr) Vert
217 732
Wrapper
210 309
Switch, Secondary 2-Position (AC Model)
190 079
Bracket, Base Reinforcing
191 122
Label, Gen Precautionary
134 464
Label, Warning General Precautionary (En/Fr) Vert
217 732
Wrapper
210 309
Switch, Secondary 2-Position (AC Model)
190 079
Bracket, Base Reinforcing
191 122
Label, Gen Precautionary
134 464
Label, Warning General Precautionary (En/Fr) Vert
217 732
Wrapper
210 309
Switch, Secondary 2-Position (AC Model)
190 079
Bracket, Base Reinforcing
191 122
Unlock efficiency
with MaintainX CoPilot
MaintainX CoPilot is your expert colleague, on call 24/7, helping your team find the answers they need to keep equipment running.
Reduce Unplanned Downtime
Ensure your team follows consistent procedures to minimize equipment failures and costly delays.
Maximize Asset Availability
Keep your assets running longer and more reliably, with standardized maintenance workflows from OEM manuals.
Lower Maintenance Costs
Turn any technician into an expert to streamline operations, maintain more assets, and reduce overall costs.
Thousands of companies manage their assets with MaintainX

'%3e%3cpath%20fill='url(%23b)'%20d='M66.008%2080.068c-5.084-.786-9.763-3.834-12.442-8.68a16.942%2016.942%200%200%201-1.87-5.18c1.096.19%202.203.476%203.298.87%206.525%202.333%2010.836%207.68%2011.014%2012.99ZM51.47%2061.576c.488-5.524%203.62-10.716%208.847-13.597a17.132%2017.132%200%200%201%2011.335-1.882c-.798%208.145-7.43%2014.848-16.038%2015.599-1.417.119-2.799.07-4.144-.12Zm28.564-11.478a17.513%2017.513%200%200%201%203.727%204.62c4.608%208.335%201.584%2018.813-6.75%2023.409a16.988%2016.988%200%200%201-4.359%201.679%2019.624%2019.624%200%200%201-3.977-12.776c.346-7.561%204.942-13.931%2011.36-16.932Z'/%3e%3cpath%20fill='%23110F0D'%20fill-rule='evenodd'%20d='M142.831%2048.324h4.977V77.03h-4.977V48.324Zm27.278%2013.002c.322%201.048.453%202.263.453%203.62v12.073h-4.787V66.208c0-.75-.047-1.572-.154-2.143-.453-2.382-1.822-3.572-4.215-3.572-2.31%200-3.882%201.274-4.43%203.476-.143.596-.226%201.405-.226%202.25v10.8h-4.787V56.623h4.477v2.989c1.536-2.5%203.906-3.43%206.371-3.43%203.488%200%206.263%201.68%207.298%205.144Zm24.636%207.323c0%203.882-2.358%206.525-5.763%207.727-1.298.453-2.632.643-4.62.643h-10.169V48.324h9.085c1.691%200%203.156.143%204.049.38%203.465.93%205.727%203.68%205.727%207.335%200%202.441-.81%204.156-2.762%205.644%202.905%201.417%204.453%203.727%204.453%206.966Zm-15.634-8.656h4.584c1.024%200%201.917-.143%202.536-.417%201.215-.548%201.905-1.608%201.905-3.167%200-1.548-.643-2.572-1.845-3.132-.691-.31-1.762-.452-2.763-.452h-4.417v7.168Zm10.716%208.465c0-1.536-.893-3.37-3.227-3.893-.428-.095-1.036-.143-1.571-.143h-5.918v8.085h5.501c.56%200%201.429-.048%201.953-.167%201.94-.453%203.262-1.846%203.262-3.882Zm47.747-11.847-8.097%2020.408h-4.429l-8.109-20.408h5.191l5.192%2014.574%205.108-14.574h5.144Zm-20.218%2010.002c0%20.69-.036%201.262-.155%201.94h-15.943c.631%202.87%202.714%204.728%205.882%204.728%202.131%200%203.607-.882%204.703-2.525h4.87c-1.762%204.144-5.204%206.692-9.657%206.692-6.084%200-10.537-4.858-10.537-10.49%200-6.108%204.524-10.776%2010.335-10.776%206.239%200%2010.442%204.954%2010.502%2010.43Zm-4.763-1.405c-.333-2.846-2.643-4.858-5.691-4.858-2.894%200-5.287%201.929-5.621%204.858h11.312Zm-72.667%203.44c0%204.787-3.287%208.371-9.419%208.371H119.363V64.66c-1.917.274-3.87.69-5.811%201.238l4.537%2011.121h-5.418l-3.596-9.585c-5.144%202.084-10.085%205.216-14.217%209.585h-4.786L101.8%2048.312h4.56l5.68%2013.883a44.112%2044.112%200%200%201%207.323-1.774V48.312h9.084c1.703%200%203.156.143%204.061.393%203.453.929%205.727%203.667%205.727%207.323%200%201.917-.738%204.179-2.81%205.691%203.06%201.56%204.501%204.025%204.501%206.93Zm-15.634-8.667a62.664%2062.664%200%200%201%202.06-.036c1.703.012%203.239.131%204.608.37%201.441-.549%202.357-1.727%202.357-3.537%200-1.941-.881-3.144-2.488-3.667-.548-.18-1.358-.286-2.322-.286h-4.215v7.156Zm-16.55%203.905-3.715-9.894-6.394%2016.502c2.833-2.595%206.263-4.858%2010.109-6.608Zm27.254%204.74c0-2.775-3.131-4.347-8.513-4.418-.715%200-1.441.011-2.191.047v8.252h5.918c2.548%200%204.786-1.37%204.786-3.882Z'%20clip-rule='evenodd'/%3e%3c/g%3e%3cdefs%3e%3clinearGradient%20id='b'%20x1='51.47'%20x2='85.916'%20y1='62.946'%20y2='62.946'%20gradientUnits='userSpaceOnUse'%3e%3cstop%20stop-color='%23CD9F28'/%3e%3cstop%20offset='1'%20stop-color='%23ECD80B'/%3e%3c/linearGradient%3e%3cclipPath%20id='a'%3e%3cpath%20fill='%23fff'%20d='M51.47%2045.728h186.104V80.14H51.47z'/%3e%3c/clipPath%3e%3c/defs%3e%3c/svg%3e)


More from Hobart


Explore Other Assets


© 2026 MaintainX. All rights reserved.