


Daikin Air Handler CAH019GVDM
Need answers fast?
Explore the manual using AI.
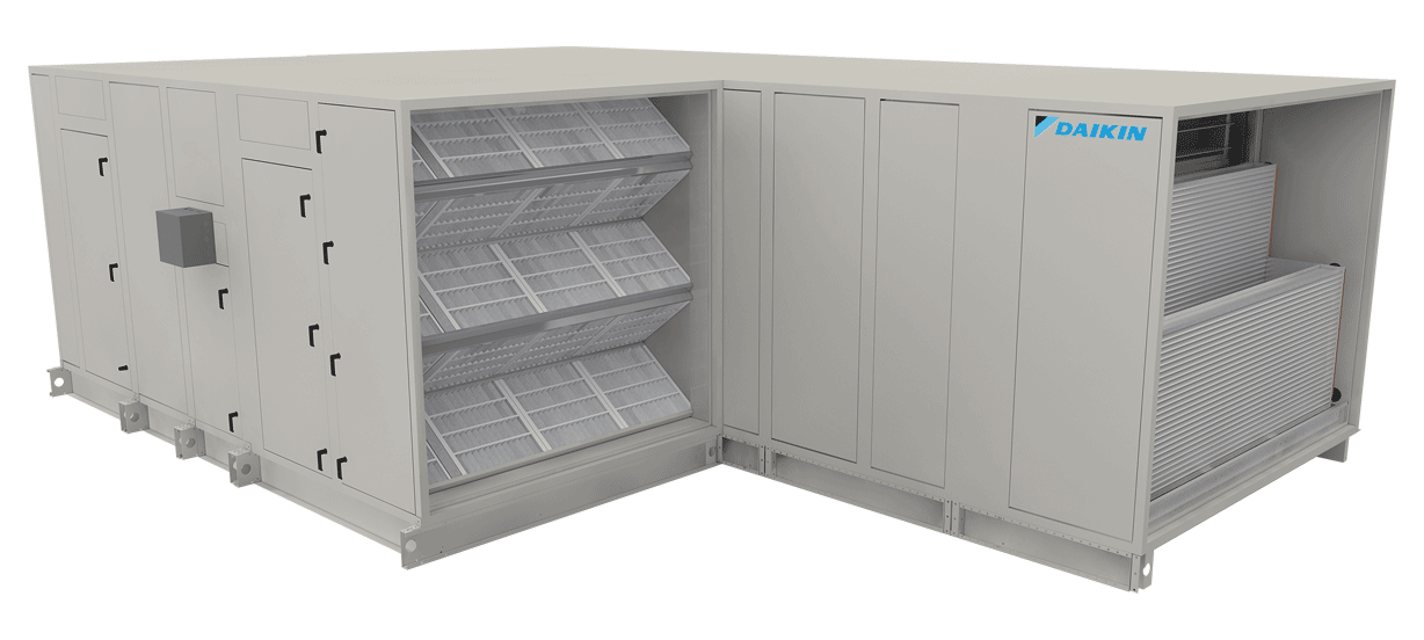
The Daikin Air Handler CAH019GVDM is a high-efficiency air handling unit designed for optimal indoor climate control. This model features advanced technology for improved air quality and energy savings, making it ideal for commercial and industrial applications. Experience reliable performance and enhanced comfort with Daikin's innovative solutions.
Turn manuals into instant answers
with your AI-powered assistantTurn manuals into instant answers
with your AI-powered assistant
Manual for Daikin Air Handler CAH019GVDM
Complete asset maintenance, one click away
Get instant access to all the maintenance information you need. Empower technicians to perform preventive maintenance with asset packages, ready to use right out of the box.

Documents & Manuals
Find all the essential guides in one place.
 Tensioning Guide
- Belt-diagram
- C-120 pulleys
+ 13 more

Work Order Templates
Pre-built workflows to keep your asset running smoothly.
- Daily Electrical System Inspection
- Replace Roller and Pulley
- Install Engine B-120
+ 29 more

Procedures
Integrate maintenance plans directly into your work orders.
- Motion Industries
- Applied Industrial Technologies
- Electrical Brothers
+ 5 more

Parts
Access the parts list for your equipment in MaintainX.
- Drive Motor
- B2 Rollers
- Tensioning System
+ 40 more
Daikin Air Handler CAH019GVDM
Create an account to install this asset package.
Maintenance Plans for Daikin Air Handler Model CAH019GVDM
Integrate maintenance plans directly into your work orders in MaintainX.
MVP Variable Speed Sheave Maintenance
Adjust motor base forward to release belt tension
Remove the belts for easier adjustment
Loosen, but do not remove both of the locking setscrews A in the outer locking ring by using a hex key or torque wrench with a hex bit
Adjust sheave to desired pitch diameter by turning the outer locking ring, using a spanner wrench or drift inserted into the three holes that are located 120° apart on the ring
Enter the pitch diameter
Select the type of sheave
Tighten BOTH locking screws A in the outer locking ring before operating the drive. Use a torque wrench and tighten to the value
Replace belts and adjust the motor base to tension the belts properly
Do not loosen any screws other than the two locking screws A in the outer locking ring when adjusting the sheave pitch. Do not operate the drive until the locking screws have been set to the torque specifications

Fan Drive Belt Maintenance
Warning: Moving belt and fan can cause severe personal injury or death. Always ensure safety measures are in place.
Is the belt tension at the lowest tension at which the belt does not slip under peak load conditions?
Enter the belt span measurement
Enter the force applied to the belt tension checker
Does the force applied match the required values?
Is the belt free from foreign material that can cause slippage?
Is the V-drive in good condition?
Are the belt and fan guards on plenum fan units always in place?
Is the fan locked and tagged out to prevent accidental start up?
1 Weekly Fan Shaft Bearings Lubrication
CAUTION: For safety, stop rotating equipment before lubrication
Equipment stopped for lubrication?
Enter the temperature of the bearing after lubrication
CAUTION: For best results, monitor specific applications regularly and adjust lubrication intervals and amounts accordingly
Type of grease used for lubrication
Compatibility of grease checked?
Lubrication interval based on RPM and temperature
Recommended Lubricants for Fan Shaft Ball Bearings
Sign off on the fan shaft bearings lubrication
Coil Maintenance
Winterize Water Coils
WARNING: Mold can cause personal injury. Clean drain pan regularly so mold does not develop
Coils can freeze due to air stratification or failure of outdoor air dampers and/or preheat controls. Drain all coils as thoroughly as possible and then treat in the following manner
Fill each coil independently with an antifreeze solution using a small circulating pump and again thoroughly drain
Check freezing point of antifreeze before proceeding to next coil. Due to a small amount of water always remaining in each coil, there is a diluting effect. The small amount of antifreeze solution remaining in the coil must always be sufficient enough to prevent freeze-up
Remove and Replace Components of Coils
WARNING: Before removing any component, lock out and tag out all power to the unit. Fans and belts can cause severe personal injury or death
Remove the flat head fasteners located along the sides of the panel
Once all fasteners are removed, lift off the panel
Filter Maintenance
Front Load Filter Replacement
Filters removed from inside the unit
Wire clips rotated to release filters
Clean filters fully seated in the frame
Filter Gauge Cleaning
Pressure drop for installed filters
Typical filter pressure drop for clean filters at rated air flow
Final pressure drop for front loaded filters
Prefilters removed to check the pressure drop of the final filters
Parts for Daikin Air Handler CAH019GVDM
Access the parts list for your equipment in MaintainX.
Replacement Bulb
205484001
Replacement Bulb
205484201
Replacement Bulb
205484101
Replacement Bulb
205484001
Replacement Bulb
205484201
Replacement Bulb
205484101
Replacement Bulb
205484001
Replacement Bulb
205484201
Replacement Bulb
205484101
Unlock efficiency
with MaintainX CoPilot
MaintainX CoPilot is your expert colleague, on call 24/7, helping your team find the answers they need to keep equipment running.
Reduce Unplanned Downtime
Ensure your team follows consistent procedures to minimize equipment failures and costly delays.
Maximize Asset Availability
Keep your assets running longer and more reliably, with standardized maintenance workflows from OEM manuals.
Lower Maintenance Costs
Turn any technician into an expert to streamline operations, maintain more assets, and reduce overall costs.
Thousands of companies manage their assets with MaintainX

'%3e%3cpath%20fill='url(%23b)'%20d='M66.008%2080.068c-5.084-.786-9.763-3.834-12.442-8.68a16.942%2016.942%200%200%201-1.87-5.18c1.096.19%202.203.476%203.298.87%206.525%202.333%2010.836%207.68%2011.014%2012.99ZM51.47%2061.576c.488-5.524%203.62-10.716%208.847-13.597a17.132%2017.132%200%200%201%2011.335-1.882c-.798%208.145-7.43%2014.848-16.038%2015.599-1.417.119-2.799.07-4.144-.12Zm28.564-11.478a17.513%2017.513%200%200%201%203.727%204.62c4.608%208.335%201.584%2018.813-6.75%2023.409a16.988%2016.988%200%200%201-4.359%201.679%2019.624%2019.624%200%200%201-3.977-12.776c.346-7.561%204.942-13.931%2011.36-16.932Z'/%3e%3cpath%20fill='%23110F0D'%20fill-rule='evenodd'%20d='M142.831%2048.324h4.977V77.03h-4.977V48.324Zm27.278%2013.002c.322%201.048.453%202.263.453%203.62v12.073h-4.787V66.208c0-.75-.047-1.572-.154-2.143-.453-2.382-1.822-3.572-4.215-3.572-2.31%200-3.882%201.274-4.43%203.476-.143.596-.226%201.405-.226%202.25v10.8h-4.787V56.623h4.477v2.989c1.536-2.5%203.906-3.43%206.371-3.43%203.488%200%206.263%201.68%207.298%205.144Zm24.636%207.323c0%203.882-2.358%206.525-5.763%207.727-1.298.453-2.632.643-4.62.643h-10.169V48.324h9.085c1.691%200%203.156.143%204.049.38%203.465.93%205.727%203.68%205.727%207.335%200%202.441-.81%204.156-2.762%205.644%202.905%201.417%204.453%203.727%204.453%206.966Zm-15.634-8.656h4.584c1.024%200%201.917-.143%202.536-.417%201.215-.548%201.905-1.608%201.905-3.167%200-1.548-.643-2.572-1.845-3.132-.691-.31-1.762-.452-2.763-.452h-4.417v7.168Zm10.716%208.465c0-1.536-.893-3.37-3.227-3.893-.428-.095-1.036-.143-1.571-.143h-5.918v8.085h5.501c.56%200%201.429-.048%201.953-.167%201.94-.453%203.262-1.846%203.262-3.882Zm47.747-11.847-8.097%2020.408h-4.429l-8.109-20.408h5.191l5.192%2014.574%205.108-14.574h5.144Zm-20.218%2010.002c0%20.69-.036%201.262-.155%201.94h-15.943c.631%202.87%202.714%204.728%205.882%204.728%202.131%200%203.607-.882%204.703-2.525h4.87c-1.762%204.144-5.204%206.692-9.657%206.692-6.084%200-10.537-4.858-10.537-10.49%200-6.108%204.524-10.776%2010.335-10.776%206.239%200%2010.442%204.954%2010.502%2010.43Zm-4.763-1.405c-.333-2.846-2.643-4.858-5.691-4.858-2.894%200-5.287%201.929-5.621%204.858h11.312Zm-72.667%203.44c0%204.787-3.287%208.371-9.419%208.371H119.363V64.66c-1.917.274-3.87.69-5.811%201.238l4.537%2011.121h-5.418l-3.596-9.585c-5.144%202.084-10.085%205.216-14.217%209.585h-4.786L101.8%2048.312h4.56l5.68%2013.883a44.112%2044.112%200%200%201%207.323-1.774V48.312h9.084c1.703%200%203.156.143%204.061.393%203.453.929%205.727%203.667%205.727%207.323%200%201.917-.738%204.179-2.81%205.691%203.06%201.56%204.501%204.025%204.501%206.93Zm-15.634-8.667a62.664%2062.664%200%200%201%202.06-.036c1.703.012%203.239.131%204.608.37%201.441-.549%202.357-1.727%202.357-3.537%200-1.941-.881-3.144-2.488-3.667-.548-.18-1.358-.286-2.322-.286h-4.215v7.156Zm-16.55%203.905-3.715-9.894-6.394%2016.502c2.833-2.595%206.263-4.858%2010.109-6.608Zm27.254%204.74c0-2.775-3.131-4.347-8.513-4.418-.715%200-1.441.011-2.191.047v8.252h5.918c2.548%200%204.786-1.37%204.786-3.882Z'%20clip-rule='evenodd'/%3e%3c/g%3e%3cdefs%3e%3clinearGradient%20id='b'%20x1='51.47'%20x2='85.916'%20y1='62.946'%20y2='62.946'%20gradientUnits='userSpaceOnUse'%3e%3cstop%20stop-color='%23CD9F28'/%3e%3cstop%20offset='1'%20stop-color='%23ECD80B'/%3e%3c/linearGradient%3e%3cclipPath%20id='a'%3e%3cpath%20fill='%23fff'%20d='M51.47%2045.728h186.104V80.14H51.47z'/%3e%3c/clipPath%3e%3c/defs%3e%3c/svg%3e)


More from Daikin


Explore Other Assets


© 2026 MaintainX. All rights reserved.