


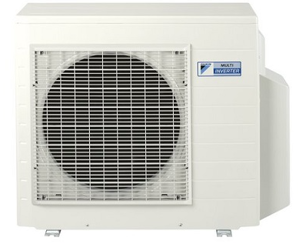
Daikin Air Handler CAH009GDAM
Need answers fast?
Explore the manual using AI.

The Daikin Air Handler CAH009GDAM is a high-efficiency air handling unit designed for optimal indoor climate control. With advanced features and reliable performance, this model ensures effective air distribution and comfort in various industrial applications. Ideal for commercial settings, it enhances energy efficiency and air quality.
Turn manuals into instant answers
with your AI-powered assistantTurn manuals into instant answers
with your AI-powered assistant
Manual for Daikin Air Handler CAH009GDAM
Complete asset maintenance, one click away
Get instant access to all the maintenance information you need. Empower technicians to perform preventive maintenance with asset packages, ready to use right out of the box.

Documents & Manuals
Find all the essential guides in one place.
 Tensioning Guide
- Belt-diagram
- C-120 pulleys
+ 13 more

Work Order Templates
Pre-built workflows to keep your asset running smoothly.
- Daily Electrical System Inspection
- Replace Roller and Pulley
- Install Engine B-120
+ 29 more

Procedures
Integrate maintenance plans directly into your work orders.
- Motion Industries
- Applied Industrial Technologies
- Electrical Brothers
+ 5 more

Parts
Access the parts list for your equipment in MaintainX.
- Drive Motor
- B2 Rollers
- Tensioning System
+ 40 more
Daikin Air Handler CAH009GDAM
Create an account to install this asset package.
Maintenance Plans for Daikin Air Handler Model CAH009GDAM
Integrate maintenance plans directly into your work orders in MaintainX.
LVP Variable Speed Sheave Maintenance
Belt tension slacked off if belts have been installed
Setscrews D loosened
Capscrews E loosened but not removed
Key F removed
Pitch diameter adjusted by opening or closing the movable flanges by half or full turns
Key F replaced
Setscrews D and capscrews E tightened
Belt tension readjusted if belts have been installed, or belts installed and tension adjusted if not previously installed
All keys in place and all setscrews and all capscrews are tight before starting the drive

Pitch Key Sheave Maintenance
Loosen setscrews B and C in moving parts of sheave and pull out external key E
Adjust sheave pitch diameter for desired speed, open moving parts by half or full turns from closed position
Replace external key E and securely tighten setscrews B over key and setscrews C into keyway in fixed half of the sheave
Put on belts and adjust tension
Make future adjustments by loosening the belt tension and increasing or decreasing the pitch diameter of the sheave by half or full turns as required
Adjust both halves of the two-groove sheaves by the same number of turns from closed position to provide the same pitch diameter
Verify that all keys are in place and that all se screws are tight before starting drive
Check setscrews and belt tension after 24 hours service
Sign off on the Pitch Key Sheave Maintenance
MVP Variable Speed Sheave Maintenance
Adjust motor base forward to release belt tension
Remove the belts for easier adjustment
Loosen, but do not remove both of the locking setscrews A in the outer locking ring by using a hex key or torque wrench with a hex bit
Adjust sheave to desired pitch diameter by turning the outer locking ring, using a spanner wrench or drift inserted into the three holes that are located 120° apart on the ring
Ensure pitch diameter is within the sheave range. One complete turn of the outer locking ring changes the pitch diameter 0.233\" 6"
Tighten BOTH locking screws A in the outer locking ring before operating the drive. Use a torque wrench and tighten to the value
Replace belts and adjust the motor base to tension the belts properly
Do not loosen any screws other than the two locking screws A in the outer locking ring when adjusting the sheave pitch. Do not operate the drive until the locking screws have been set to the torque specifications
Sign off on the MVP Variable Speed Sheave Maintenance
Fan Drive Belt Maintenance
Warning: Moving belt and fan can cause severe personal injury or death. Always ensure safety measures are in place.
Is the belt tension at the lowest tension at which the belt does not slip under peak load conditions?
Enter the belt tension measurement
Is the belt free from foreign material that can cause slippage?
Is the V-drive inspected and tension adjusted if the belt is slipping?
Warning: Do not apply belt dressing. This can damage the belt and cause early failure.
Enter the belt span measurement
Enter the force applied to the belt tension checker
Does the force applied match the required values?
1 Yearly Coil Maintenance
CAUTION: Sharp fin edges are a potential injury hazard. Avoid contact with them
Check coils for cleanliness
To obtain maximum performance, the coil must be clean
Check once a year under normal operating conditions and, if dirty, brush or vacuum clean.
Use a chemical coil cleaner on multiple row coils
Read and follow the chemical cleaner's instructions as some cleaners may contain harsh chemicals
Take care not to damage fins while cleaning.
CAUTION-Fin edges are sharp
Parts for Daikin Air Handler CAH009GDAM
Access the parts list for your equipment in MaintainX.
Replacement Bulb
205484101
Replacement Bulb
205484201
Replacement Bulb
205484001
Replacement Bulb
205484101
Replacement Bulb
205484201
Replacement Bulb
205484001
Replacement Bulb
205484101
Replacement Bulb
205484201
Replacement Bulb
205484001
Unlock efficiency
with MaintainX CoPilot
MaintainX CoPilot is your expert colleague, on call 24/7, helping your team find the answers they need to keep equipment running.
Reduce Unplanned Downtime
Ensure your team follows consistent procedures to minimize equipment failures and costly delays.
Maximize Asset Availability
Keep your assets running longer and more reliably, with standardized maintenance workflows from OEM manuals.
Lower Maintenance Costs
Turn any technician into an expert to streamline operations, maintain more assets, and reduce overall costs.
Thousands of companies manage their assets with MaintainX

'%3e%3cpath%20fill='url(%23b)'%20d='M66.008%2080.068c-5.084-.786-9.763-3.834-12.442-8.68a16.942%2016.942%200%200%201-1.87-5.18c1.096.19%202.203.476%203.298.87%206.525%202.333%2010.836%207.68%2011.014%2012.99ZM51.47%2061.576c.488-5.524%203.62-10.716%208.847-13.597a17.132%2017.132%200%200%201%2011.335-1.882c-.798%208.145-7.43%2014.848-16.038%2015.599-1.417.119-2.799.07-4.144-.12Zm28.564-11.478a17.513%2017.513%200%200%201%203.727%204.62c4.608%208.335%201.584%2018.813-6.75%2023.409a16.988%2016.988%200%200%201-4.359%201.679%2019.624%2019.624%200%200%201-3.977-12.776c.346-7.561%204.942-13.931%2011.36-16.932Z'/%3e%3cpath%20fill='%23110F0D'%20fill-rule='evenodd'%20d='M142.831%2048.324h4.977V77.03h-4.977V48.324Zm27.278%2013.002c.322%201.048.453%202.263.453%203.62v12.073h-4.787V66.208c0-.75-.047-1.572-.154-2.143-.453-2.382-1.822-3.572-4.215-3.572-2.31%200-3.882%201.274-4.43%203.476-.143.596-.226%201.405-.226%202.25v10.8h-4.787V56.623h4.477v2.989c1.536-2.5%203.906-3.43%206.371-3.43%203.488%200%206.263%201.68%207.298%205.144Zm24.636%207.323c0%203.882-2.358%206.525-5.763%207.727-1.298.453-2.632.643-4.62.643h-10.169V48.324h9.085c1.691%200%203.156.143%204.049.38%203.465.93%205.727%203.68%205.727%207.335%200%202.441-.81%204.156-2.762%205.644%202.905%201.417%204.453%203.727%204.453%206.966Zm-15.634-8.656h4.584c1.024%200%201.917-.143%202.536-.417%201.215-.548%201.905-1.608%201.905-3.167%200-1.548-.643-2.572-1.845-3.132-.691-.31-1.762-.452-2.763-.452h-4.417v7.168Zm10.716%208.465c0-1.536-.893-3.37-3.227-3.893-.428-.095-1.036-.143-1.571-.143h-5.918v8.085h5.501c.56%200%201.429-.048%201.953-.167%201.94-.453%203.262-1.846%203.262-3.882Zm47.747-11.847-8.097%2020.408h-4.429l-8.109-20.408h5.191l5.192%2014.574%205.108-14.574h5.144Zm-20.218%2010.002c0%20.69-.036%201.262-.155%201.94h-15.943c.631%202.87%202.714%204.728%205.882%204.728%202.131%200%203.607-.882%204.703-2.525h4.87c-1.762%204.144-5.204%206.692-9.657%206.692-6.084%200-10.537-4.858-10.537-10.49%200-6.108%204.524-10.776%2010.335-10.776%206.239%200%2010.442%204.954%2010.502%2010.43Zm-4.763-1.405c-.333-2.846-2.643-4.858-5.691-4.858-2.894%200-5.287%201.929-5.621%204.858h11.312Zm-72.667%203.44c0%204.787-3.287%208.371-9.419%208.371H119.363V64.66c-1.917.274-3.87.69-5.811%201.238l4.537%2011.121h-5.418l-3.596-9.585c-5.144%202.084-10.085%205.216-14.217%209.585h-4.786L101.8%2048.312h4.56l5.68%2013.883a44.112%2044.112%200%200%201%207.323-1.774V48.312h9.084c1.703%200%203.156.143%204.061.393%203.453.929%205.727%203.667%205.727%207.323%200%201.917-.738%204.179-2.81%205.691%203.06%201.56%204.501%204.025%204.501%206.93Zm-15.634-8.667a62.664%2062.664%200%200%201%202.06-.036c1.703.012%203.239.131%204.608.37%201.441-.549%202.357-1.727%202.357-3.537%200-1.941-.881-3.144-2.488-3.667-.548-.18-1.358-.286-2.322-.286h-4.215v7.156Zm-16.55%203.905-3.715-9.894-6.394%2016.502c2.833-2.595%206.263-4.858%2010.109-6.608Zm27.254%204.74c0-2.775-3.131-4.347-8.513-4.418-.715%200-1.441.011-2.191.047v8.252h5.918c2.548%200%204.786-1.37%204.786-3.882Z'%20clip-rule='evenodd'/%3e%3c/g%3e%3cdefs%3e%3clinearGradient%20id='b'%20x1='51.47'%20x2='85.916'%20y1='62.946'%20y2='62.946'%20gradientUnits='userSpaceOnUse'%3e%3cstop%20stop-color='%23CD9F28'/%3e%3cstop%20offset='1'%20stop-color='%23ECD80B'/%3e%3c/linearGradient%3e%3cclipPath%20id='a'%3e%3cpath%20fill='%23fff'%20d='M51.47%2045.728h186.104V80.14H51.47z'/%3e%3c/clipPath%3e%3c/defs%3e%3c/svg%3e)


More from Daikin


Explore Other Assets


© 2026 MaintainX. All rights reserved.