


Turn manuals into instant answers
with your AI-powered assistantTurn manuals into instant answers
with your AI-powered assistant
Complete asset maintenance, one click away
Get instant access to all the maintenance information you need. Empower technicians to perform preventive maintenance with asset packages, ready to use right out of the box.

Documents & Manuals
Find all the essential guides in one place.
 Tensioning Guide
- Belt-diagram
- C-120 pulleys
+ 13 more

Work Order Templates
Pre-built workflows to keep your asset running smoothly.
- Daily Electrical System Inspection
- Replace Roller and Pulley
- Install Engine B-120
+ 29 more

Procedures
Integrate maintenance plans directly into your work orders.
- Motion Industries
- Applied Industrial Technologies
- Electrical Brothers
+ 5 more

Parts
Access the parts list for your equipment in MaintainX.
- Drive Motor
- B2 Rollers
- Tensioning System
+ 40 more
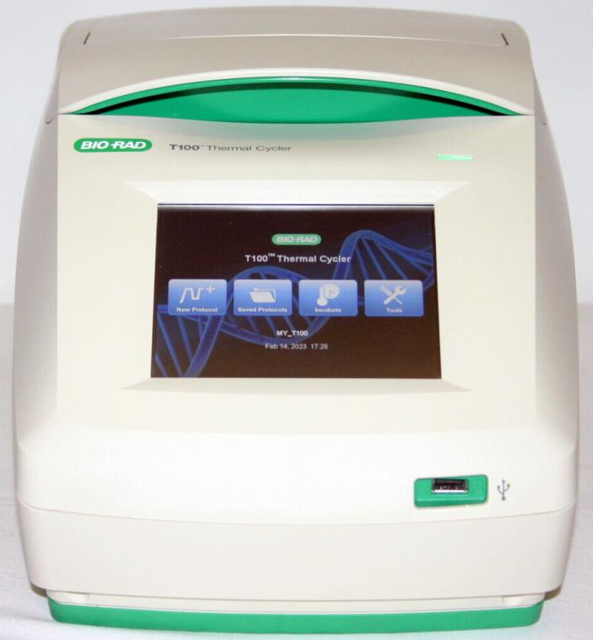
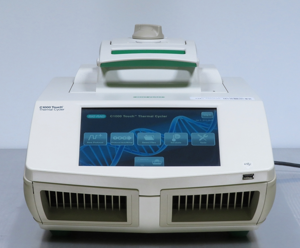
Bio-Rad Thermal Cycler T100
Create an account to install this asset package.
Maintenance Plans for Bio-Rad Thermal Cycler Model T100
Integrate maintenance plans directly into your work orders in MaintainX.
Fuse Replacement
Fuses on the T100 Thermal Cycler are designed to blow in case of severe power surges or other causes of electrical short. This process protects both the user and the instrument from excessive electrical charge.
Fuses on the T100 Thermal Cycler rarely need to be replaced. However, some institutions prefer to replace fuses on a regular basis to maintain uninterrupted operation.
If the thermal cycler does not turn on, first check that the power cord is plugged into a functioning power source. Also, check that the power cord and power source are within the specifications for this instrument.
To replace a power cord, contact Bio-Rad Technical Support.
Finally, check that the fuses are intact. The T100 Thermal Cycler runs with two fuses (Figure 29). To remove and check the fuses, follow these steps:
WARNING!: To prevent electrical shock, always turn off the instrument and unplug it from the electrical outlet before checking the fuses.
1. Use a small coin to unscrew the fuse drawer.
2. Pull out the fuse drawer and remove each fuse.
3. If a fuse is damaged, replace it with the correct fuse and close the drawer. A bad fuse shows a break or burned spot in the metal. A good fuse has intact metal.;

Exterior Thermal Cycler Cleaning
The T100 Thermal Cycler exterior should be cleaned on a regular schedule to remove any debris or dirt that might interfere with proper function.
To clean the exterior of the thermal cycler, follow these instructions and pay careful attention to the warnings:
Clean the air vents. Remove dust with a soft brush, damp cloth, or vacuum cleaner. Remove any heavy dust that is deep in the vents with a vacuum cleaner. Cleaning the vents allows sufficient airflow for precise thermal control during a run
Clean the touch screen. Remove debris on the control panel with a soft cloth and any commercial touch screen cleaning fluid or mild soap solution
WARNING!: Do not use abrasive detergents or rough material; they will scratch the display.
Clean the outside case and lid of the thermal cycler. Use a damp cloth or tissue to clean spills off the outside case. If needed, use a mild soap solution, and remove the residue completely. Cleaning the outside case prevents corrosion
Clean the inner heated lid. Use a soft cloth and water to remove debris and solutions from the inner lid surface. Never use abrasive detergents or rough material that can scratch the surface. Cleaning the inner lid improves precise sample heating and cooling;
Reaction Block Cleaning
Warning: Follow these instructions carefully to prevent damage to the T100 Thermal Cycler.
Are there spills inside the wells?
Select the cleaning solution used
Warning: Always rinse the wells with water several times to remove all traces of ethanol, bleach, or soap.
Is oil used in the wells?
Warning: If oil is used, the wells must be cleaned thoroughly and often.
Warning: Never clean the block with strong alkaline solutions (strong soap, ammonia, or high-concentration bleach).
Warning: Never heat the block after adding a cleaning solution.
Warning: Never pour water or other solutions in the sample block.
Battery Replacement
WARNING! If misused or abused, the battery may explode or leak, causing injury to personnel and/or damage to the unit. Do not attempt to revive or recharge a used T100 battery by any means. Do not expose the battery to flames, high temperatures, moisture, or direct sunlight. Do not open, dismantle, modify, or short-circuit the battery.
Power cord disconnected
Unit turned over and green access panel removed
Orientation of the old battery noted
Old battery removed and placed on a nonconductive surface
New battery installed with the correct orientation
Access panel replaced and unit turned right side up
Power cord reconnected
Old battery protected from shorts and disposed of in accordance with local rules and regulations
Insufficient Airflow Test
Warning: This test requires trained personnel with PPE!
Is the T100 Thermal Cycler set up in its intended location?
Is the local environment adjusted for typical conditions?
Is all nearby equipment turned on?
Are all window blinds open?
Are all thermal cyclers in the area running a protocol?
Did the PCR protocol run for 30 minutes?
Is an empty microplate or empty tubes included?
Enter the air temperature at the air intake vents of the thermal cycler
Unlock efficiency
with MaintainX CoPilot
MaintainX CoPilot is your expert colleague, on call 24/7, helping your team find the answers they need to keep equipment running.
Reduce Unplanned Downtime
Ensure your team follows consistent procedures to minimize equipment failures and costly delays.
Maximize Asset Availability
Keep your assets running longer and more reliably, with standardized maintenance workflows from OEM manuals.
Lower Maintenance Costs
Turn any technician into an expert to streamline operations, maintain more assets, and reduce overall costs.
Thousands of companies manage their assets with MaintainX

'%3e%3cpath%20fill='url(%23b)'%20d='M66.008%2080.068c-5.084-.786-9.763-3.834-12.442-8.68a16.942%2016.942%200%200%201-1.87-5.18c1.096.19%202.203.476%203.298.87%206.525%202.333%2010.836%207.68%2011.014%2012.99ZM51.47%2061.576c.488-5.524%203.62-10.716%208.847-13.597a17.132%2017.132%200%200%201%2011.335-1.882c-.798%208.145-7.43%2014.848-16.038%2015.599-1.417.119-2.799.07-4.144-.12Zm28.564-11.478a17.513%2017.513%200%200%201%203.727%204.62c4.608%208.335%201.584%2018.813-6.75%2023.409a16.988%2016.988%200%200%201-4.359%201.679%2019.624%2019.624%200%200%201-3.977-12.776c.346-7.561%204.942-13.931%2011.36-16.932Z'/%3e%3cpath%20fill='%23110F0D'%20fill-rule='evenodd'%20d='M142.831%2048.324h4.977V77.03h-4.977V48.324Zm27.278%2013.002c.322%201.048.453%202.263.453%203.62v12.073h-4.787V66.208c0-.75-.047-1.572-.154-2.143-.453-2.382-1.822-3.572-4.215-3.572-2.31%200-3.882%201.274-4.43%203.476-.143.596-.226%201.405-.226%202.25v10.8h-4.787V56.623h4.477v2.989c1.536-2.5%203.906-3.43%206.371-3.43%203.488%200%206.263%201.68%207.298%205.144Zm24.636%207.323c0%203.882-2.358%206.525-5.763%207.727-1.298.453-2.632.643-4.62.643h-10.169V48.324h9.085c1.691%200%203.156.143%204.049.38%203.465.93%205.727%203.68%205.727%207.335%200%202.441-.81%204.156-2.762%205.644%202.905%201.417%204.453%203.727%204.453%206.966Zm-15.634-8.656h4.584c1.024%200%201.917-.143%202.536-.417%201.215-.548%201.905-1.608%201.905-3.167%200-1.548-.643-2.572-1.845-3.132-.691-.31-1.762-.452-2.763-.452h-4.417v7.168Zm10.716%208.465c0-1.536-.893-3.37-3.227-3.893-.428-.095-1.036-.143-1.571-.143h-5.918v8.085h5.501c.56%200%201.429-.048%201.953-.167%201.94-.453%203.262-1.846%203.262-3.882Zm47.747-11.847-8.097%2020.408h-4.429l-8.109-20.408h5.191l5.192%2014.574%205.108-14.574h5.144Zm-20.218%2010.002c0%20.69-.036%201.262-.155%201.94h-15.943c.631%202.87%202.714%204.728%205.882%204.728%202.131%200%203.607-.882%204.703-2.525h4.87c-1.762%204.144-5.204%206.692-9.657%206.692-6.084%200-10.537-4.858-10.537-10.49%200-6.108%204.524-10.776%2010.335-10.776%206.239%200%2010.442%204.954%2010.502%2010.43Zm-4.763-1.405c-.333-2.846-2.643-4.858-5.691-4.858-2.894%200-5.287%201.929-5.621%204.858h11.312Zm-72.667%203.44c0%204.787-3.287%208.371-9.419%208.371H119.363V64.66c-1.917.274-3.87.69-5.811%201.238l4.537%2011.121h-5.418l-3.596-9.585c-5.144%202.084-10.085%205.216-14.217%209.585h-4.786L101.8%2048.312h4.56l5.68%2013.883a44.112%2044.112%200%200%201%207.323-1.774V48.312h9.084c1.703%200%203.156.143%204.061.393%203.453.929%205.727%203.667%205.727%207.323%200%201.917-.738%204.179-2.81%205.691%203.06%201.56%204.501%204.025%204.501%206.93Zm-15.634-8.667a62.664%2062.664%200%200%201%202.06-.036c1.703.012%203.239.131%204.608.37%201.441-.549%202.357-1.727%202.357-3.537%200-1.941-.881-3.144-2.488-3.667-.548-.18-1.358-.286-2.322-.286h-4.215v7.156Zm-16.55%203.905-3.715-9.894-6.394%2016.502c2.833-2.595%206.263-4.858%2010.109-6.608Zm27.254%204.74c0-2.775-3.131-4.347-8.513-4.418-.715%200-1.441.011-2.191.047v8.252h5.918c2.548%200%204.786-1.37%204.786-3.882Z'%20clip-rule='evenodd'/%3e%3c/g%3e%3cdefs%3e%3clinearGradient%20id='b'%20x1='51.47'%20x2='85.916'%20y1='62.946'%20y2='62.946'%20gradientUnits='userSpaceOnUse'%3e%3cstop%20stop-color='%23CD9F28'/%3e%3cstop%20offset='1'%20stop-color='%23ECD80B'/%3e%3c/linearGradient%3e%3cclipPath%20id='a'%3e%3cpath%20fill='%23fff'%20d='M51.47%2045.728h186.104V80.14H51.47z'/%3e%3c/clipPath%3e%3c/defs%3e%3c/svg%3e)


More from Bio-Rad
Explore Other Assets


© 2026 MaintainX. All rights reserved.