


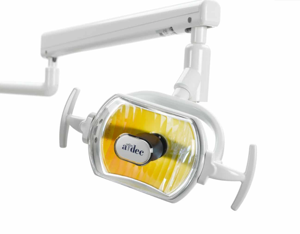
A-Dec Dental Light 572
Need answers fast?
Explore the manual using AI.

Turn manuals into instant answers
with your AI-powered assistantTurn manuals into instant answers
with your AI-powered assistant
Manual for A-Dec Dental Light 572
Complete asset maintenance, one click away
Get instant access to all the maintenance information you need. Empower technicians to perform preventive maintenance with asset packages, ready to use right out of the box.

Documents & Manuals
Find all the essential guides in one place.
 Tensioning Guide
- Belt-diagram
- C-120 pulleys
+ 13 more

Work Order Templates
Pre-built workflows to keep your asset running smoothly.
- Daily Electrical System Inspection
- Replace Roller and Pulley
- Install Engine B-120
+ 29 more

Procedures
Integrate maintenance plans directly into your work orders.
- Motion Industries
- Applied Industrial Technologies
- Electrical Brothers
+ 5 more

Parts
Access the parts list for your equipment in MaintainX.
- Drive Motor
- B2 Rollers
- Tensioning System
+ 40 more
A-Dec Dental Light 572
Create an account to install this asset package.
Maintenance Plans for A-Dec Dental Light Model 572
Integrate maintenance plans directly into your work orders in MaintainX.
Bulb Replacement
CAUTION: Finger oils can affect light performance and severely limit bulb life. If you should inadvertently touch the bulb, gently clean it with cotton that is dampened with isopropyl or ethyl alcohol.
WARNING: To avoid burning your fingers, allow the light shield to cool before removing. Never operate the dental light with the light shield removed. The light shield contains UV blocking additives. The light shield is also your protection in the unlikely event that the bulb shatters.
Turn off the light and allow it to cool.
Release the toggles on the light shield and set the shield aside.
Using a gauze pad or cloth to protect your fingers, carefully pull the old bulb from its socket. Discard the bulb.
Holding the new bulb in its outer wrapper with the pins away from you, carefully insert the bulb pins into the socket. The bulb base is fragile and can break under excess pressure.
Remove and discard the outer wrapper, then reinstall the light shield.
Verify the operation of the light by turning it on and operating it at each intensity setting.
Sign off on the bulb replacement

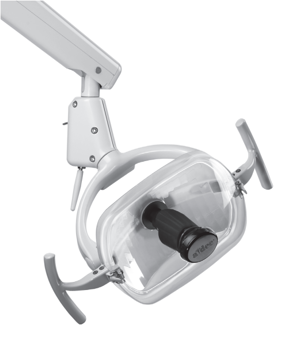
Light Head Adjustment
Adjust the light head tension if it is difficult to position, moves too easily, or tends to slip out of position (see Figure 6). Horizontal Rotation
1. Use a hex key to make left/right rotation adjustments, beginning with the top screw on both sides of the switch housing (see Figure 7).
2. If the light head moves too easily, or tends to drift out of position, increase the tension by turning the screws right.
3. If the light is difficult to move, loosen the tension by turning the screws left
Diagonal Axis Rotation
For diagonal axis rotation, adjust the screws at the bottom of the switch housing (see Figure 8).
1. If the light head moves too easily, or tends to drift out of position, increase the tension by turning the screw right.
2. If the light head is difficult to move, loosen the tension by turning the screw left.
3. To eliminate all movement in the diagonal axis, tighten the adjustment screw until it is tight.
Focus Adjustment
WARNING Always turn off the dental light and allow it to cool completely before maintenance or service.
The light is factory adjusted for proper illumination focus at 27 inches (700 mm) from the oral cavity. However, you can quickly and easily adjust the light focus (between 18 and 31 inches [460 mm and 790 mm]) to best suit your needs.
Place a white towel over the chair headrest to represent the oral cavity.
Position the light head at the distance you would normally use it when working in the oral cavity (select a distance representative of most of your work).
Turn the light on.
Use a large screwdriver or coin to turn the focus adjusting screw until the light within the borders of the light pattern is most uniform.
WARNING The focus adjustment screw becomes very hot during operation. To avoid burns, do not touch the screw with your fingers while making this adjustment.
Is the light within the borders of the light pattern most uniform?
Sign off on the focus adjustment
Barrier Maintenance
CAUTION: Always replace the barrier film after each patient.
A-dec recommends barrier protection for all applicable touch and transfer surfaces.
Touch surfaces are areas that come into contact with hands and become potential cross-contamination points during dental procedures.
Transfer surfaces are areas that come into contact with instruments and other inanimate objects.
In the USA, barriers must be produced under the Current Good Manufacturing Practice (CGMP) as specified by the U.S. Food and Drug Administration (US FDA).
For regions outside the USA, refer to the medical device regulations specific to your location.
IMPORTANT: For recommendations on cleaning and chemical disinfection of touch and transfer surfaces (where barrier protection is not applicable or when barriers are compromised), please see the A-dec Equipment Asepsis Guide (p/n 85.0696.00) included with your equipment.
Barrier film replaced after each patient?
Barrier protection applied to all applicable touch and transfer surfaces?
Parts for A-Dec Dental Light 572
Access the parts list for your equipment in MaintainX.
Bulb Only
041.709.00
Light Shield And Nosepiece
28.0503.02
Light Shield
28.0503.01
Bulb Only
041.709.00
Light Shield And Nosepiece
28.0503.02
Light Shield
28.0503.01
Bulb Only
041.709.00
Light Shield And Nosepiece
28.0503.02
Light Shield
28.0503.01
Unlock efficiency
with MaintainX CoPilot
MaintainX CoPilot is your expert colleague, on call 24/7, helping your team find the answers they need to keep equipment running.
Reduce Unplanned Downtime
Ensure your team follows consistent procedures to minimize equipment failures and costly delays.
Maximize Asset Availability
Keep your assets running longer and more reliably, with standardized maintenance workflows from OEM manuals.
Lower Maintenance Costs
Turn any technician into an expert to streamline operations, maintain more assets, and reduce overall costs.
Thousands of companies manage their assets with MaintainX

'%3e%3cpath%20fill='url(%23b)'%20d='M66.008%2080.068c-5.084-.786-9.763-3.834-12.442-8.68a16.942%2016.942%200%200%201-1.87-5.18c1.096.19%202.203.476%203.298.87%206.525%202.333%2010.836%207.68%2011.014%2012.99ZM51.47%2061.576c.488-5.524%203.62-10.716%208.847-13.597a17.132%2017.132%200%200%201%2011.335-1.882c-.798%208.145-7.43%2014.848-16.038%2015.599-1.417.119-2.799.07-4.144-.12Zm28.564-11.478a17.513%2017.513%200%200%201%203.727%204.62c4.608%208.335%201.584%2018.813-6.75%2023.409a16.988%2016.988%200%200%201-4.359%201.679%2019.624%2019.624%200%200%201-3.977-12.776c.346-7.561%204.942-13.931%2011.36-16.932Z'/%3e%3cpath%20fill='%23110F0D'%20fill-rule='evenodd'%20d='M142.831%2048.324h4.977V77.03h-4.977V48.324Zm27.278%2013.002c.322%201.048.453%202.263.453%203.62v12.073h-4.787V66.208c0-.75-.047-1.572-.154-2.143-.453-2.382-1.822-3.572-4.215-3.572-2.31%200-3.882%201.274-4.43%203.476-.143.596-.226%201.405-.226%202.25v10.8h-4.787V56.623h4.477v2.989c1.536-2.5%203.906-3.43%206.371-3.43%203.488%200%206.263%201.68%207.298%205.144Zm24.636%207.323c0%203.882-2.358%206.525-5.763%207.727-1.298.453-2.632.643-4.62.643h-10.169V48.324h9.085c1.691%200%203.156.143%204.049.38%203.465.93%205.727%203.68%205.727%207.335%200%202.441-.81%204.156-2.762%205.644%202.905%201.417%204.453%203.727%204.453%206.966Zm-15.634-8.656h4.584c1.024%200%201.917-.143%202.536-.417%201.215-.548%201.905-1.608%201.905-3.167%200-1.548-.643-2.572-1.845-3.132-.691-.31-1.762-.452-2.763-.452h-4.417v7.168Zm10.716%208.465c0-1.536-.893-3.37-3.227-3.893-.428-.095-1.036-.143-1.571-.143h-5.918v8.085h5.501c.56%200%201.429-.048%201.953-.167%201.94-.453%203.262-1.846%203.262-3.882Zm47.747-11.847-8.097%2020.408h-4.429l-8.109-20.408h5.191l5.192%2014.574%205.108-14.574h5.144Zm-20.218%2010.002c0%20.69-.036%201.262-.155%201.94h-15.943c.631%202.87%202.714%204.728%205.882%204.728%202.131%200%203.607-.882%204.703-2.525h4.87c-1.762%204.144-5.204%206.692-9.657%206.692-6.084%200-10.537-4.858-10.537-10.49%200-6.108%204.524-10.776%2010.335-10.776%206.239%200%2010.442%204.954%2010.502%2010.43Zm-4.763-1.405c-.333-2.846-2.643-4.858-5.691-4.858-2.894%200-5.287%201.929-5.621%204.858h11.312Zm-72.667%203.44c0%204.787-3.287%208.371-9.419%208.371H119.363V64.66c-1.917.274-3.87.69-5.811%201.238l4.537%2011.121h-5.418l-3.596-9.585c-5.144%202.084-10.085%205.216-14.217%209.585h-4.786L101.8%2048.312h4.56l5.68%2013.883a44.112%2044.112%200%200%201%207.323-1.774V48.312h9.084c1.703%200%203.156.143%204.061.393%203.453.929%205.727%203.667%205.727%207.323%200%201.917-.738%204.179-2.81%205.691%203.06%201.56%204.501%204.025%204.501%206.93Zm-15.634-8.667a62.664%2062.664%200%200%201%202.06-.036c1.703.012%203.239.131%204.608.37%201.441-.549%202.357-1.727%202.357-3.537%200-1.941-.881-3.144-2.488-3.667-.548-.18-1.358-.286-2.322-.286h-4.215v7.156Zm-16.55%203.905-3.715-9.894-6.394%2016.502c2.833-2.595%206.263-4.858%2010.109-6.608Zm27.254%204.74c0-2.775-3.131-4.347-8.513-4.418-.715%200-1.441.011-2.191.047v8.252h5.918c2.548%200%204.786-1.37%204.786-3.882Z'%20clip-rule='evenodd'/%3e%3c/g%3e%3cdefs%3e%3clinearGradient%20id='b'%20x1='51.47'%20x2='85.916'%20y1='62.946'%20y2='62.946'%20gradientUnits='userSpaceOnUse'%3e%3cstop%20stop-color='%23CD9F28'/%3e%3cstop%20offset='1'%20stop-color='%23ECD80B'/%3e%3c/linearGradient%3e%3cclipPath%20id='a'%3e%3cpath%20fill='%23fff'%20d='M51.47%2045.728h186.104V80.14H51.47z'/%3e%3c/clipPath%3e%3c/defs%3e%3c/svg%3e)


More from A-Dec
Explore Other Assets


© 2026 MaintainX. All rights reserved.