


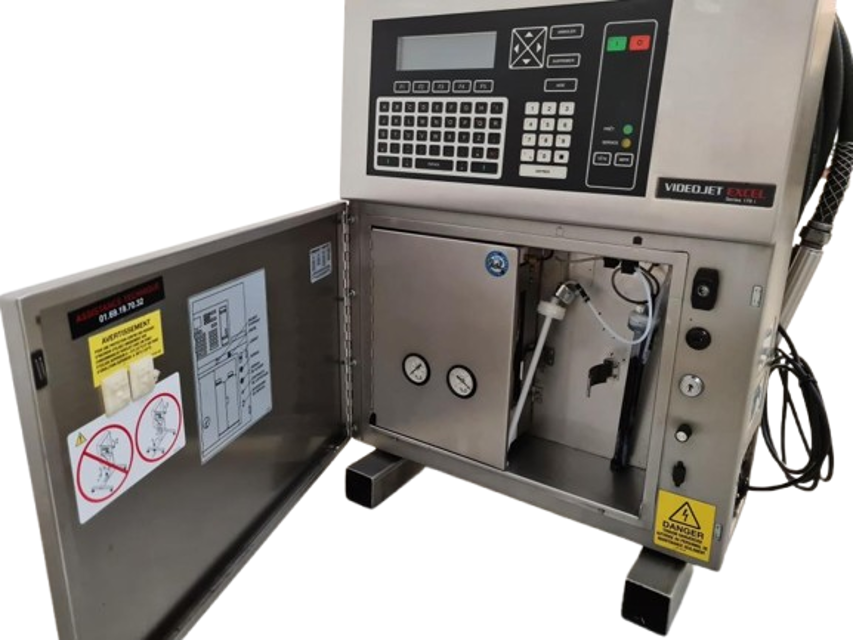
Videojet Printer EXCEL 170i
Need answers fast?
Explore the manual using AI.
Turn manuals into instant answers
with your AI-powered assistantTurn manuals into instant answers
with your AI-powered assistant
Manual for Videojet Printer EXCEL 170i
Complete asset maintenance, one click away
Get instant access to all the maintenance information you need. Empower technicians to perform preventive maintenance with asset packages, ready to use right out of the box.

Documents & Manuals
Find all the essential guides in one place.
 Tensioning Guide
- Belt-diagram
- C-120 pulleys
+ 13 more

Work Order Templates
Pre-built workflows to keep your asset running smoothly.
- Daily Electrical System Inspection
- Replace Roller and Pulley
- Install Engine B-120
+ 29 more

Procedures
Integrate maintenance plans directly into your work orders.
- Motion Industries
- Applied Industrial Technologies
- Electrical Brothers
+ 5 more

Parts
Access the parts list for your equipment in MaintainX.
- Drive Motor
- B2 Rollers
- Tensioning System
+ 40 more
Videojet Printer EXCEL 170i
Create an account to install this asset package.
Maintenance Plans for Videojet Printer Model EXCEL 170i
Integrate maintenance plans directly into your work orders in MaintainX.
Printer Nozzle Drive Set-Up
CAUTION: Ground the printhead to a metal service tray.
CAUTION: Wear safety glasses with side shields when working with fluids.
CAUTION: Ensure that the work area is well-ventilated.
CAUTION: Pour all unused fluids into a grounded, metal container.
CAUTION: Properly dispose of all unused fluids in approved containers and in an approved manner.
Enter a text message in the font you intend to print
Set <NOZZLE DRIVE> in Frame <04 SERVICE>. Set at 1% and increase until breakoff comes into view in charge tunnel window
Gradually increase nozzle drive level until the breakoff point reverses direction and begins to move toward the front end of the printhead (the point at which it reverses direction is foldback)
Lower nozzle drive below foldback and determine the print window (nozzle drive range that yields good print quality) using the following criteria: • satellites, if present, are forward-merging • number of satellites is three or fewer • breakoff point lies within charge tunnel • print quality is acceptable*

1 Daily Printer Maintenance
Cleaning the Printhead:This section describes how to clean the printhead.
When to Clean the Printhead:Clean the printhead at the start of every shift or work period.
Never clean the printhead at shutdown. By not cleaning the printhead at shutdown, a cap of ink is allowed to dry over the end of the nozzle. This ink cap keeps air from entering the nozzle and drying the ink. This helps prevent clogs in the nozzle.
Procedure
WARNING:
Before starting this procedure, make certain that mains power to the printer is Off, and the mains power and compressed air supply to the printer are disconnected (unplugged). Failure to follow this warning may result in personal injury.
1. If you have not done so, press the OFF key to turn the printer Off. Allow the printer to complete its programmed four-minute shutdown sequence.
2. Turn the mains power switch Off. (Refer to Figure 6-1 for the location of the Mains Power Switch.)
3. Locate the screw that holds the printhead cover in place. (Refer to Figure 6-2.)
Printer Calibration
CAUTION: Ground the printhead to a metal service tray.
CAUTION: Wear safety glasses with side shields when working with fluids.
CAUTION: Ensure that the work area is well-ventilated.
CAUTION: Pour all unused fluids into a grounded, metal container.
CAUTION: Properly dispose of all unused fluids in approved containers and in an approved manner.
Press HEAD key to turn air control solenoid On
Turn < INK> On in Frame <02 SERVICE>
Align ink stream into ink return block
Preset ink pressure to 40 psi (2.8 bar) for ketone/alcohol or 50 psi (3.4 bar) for water/poly
Printer Print Quality Adjustment
CAUTION: Ground the printhead to a metal service tray.
CAUTION: Wear safety glasses with side shields when working with fluids.
CAUTION: Ensure that the work area is well-ventilated.
CAUTION: Pour all unused fluids into a grounded, metal container.
CAUTION: Properly dispose of all unused fluids in approved containers and in an approved manner.
Note: The following procedure may have to be repeated if the ambient temperature changes substantially.
Perform the printer calibration procedure to set the ink pressure.
Enter a text message using the font you intend to print.
Find the foldback nozzle drive level.
Printer Ink Renewal
The following safety procedures are recommended for all procedures in this section.
CAUTION:
Ground the printhead to a metal service tray. Refer to Chapter 2, Safety, in this manual for the recommended printhead grounding methods.
CAUTION:
Wear safety glasses with side shields when working with fluids.
CAUTION:
Ensure that the work area is well-ventilated.
CAUTION:
Pour all unused fluids into a grounded, metal container.
Parts for Videojet Printer EXCEL 170i
Access the parts list for your equipment in MaintainX.
Screw, Mach, Pnhd, Phlp (Item 1, 8–32 3/8 LG)
001606
Screw, Mach, Pnhd, Phlp (Item 2, 8–32 5/16 "OB)
001661
Screw, Mach, Sems Ext (Item 3, 6–32 1/4 LG)
001681
Nut, Keps (Item 4, 8–32)
014181
Screw, Mach, Pnhd, Poz (Item 5, 8–32 1/4 LG)
100319
Screw, Mach, Pnhd, Phlp (Item 1, 8–32 3/8 LG)
001606
Screw, Mach, Pnhd, Phlp (Item 2, 8–32 5/16 "OB)
001661
Screw, Mach, Sems Ext (Item 3, 6–32 1/4 LG)
001681
Nut, Keps (Item 4, 8–32)
014181
Screw, Mach, Pnhd, Poz (Item 5, 8–32 1/4 LG)
100319
Screw, Mach, Pnhd, Phlp (Item 1, 8–32 3/8 LG)
001606
Screw, Mach, Pnhd, Phlp (Item 2, 8–32 5/16 "OB)
001661
Screw, Mach, Sems Ext (Item 3, 6–32 1/4 LG)
001681
Nut, Keps (Item 4, 8–32)
014181
Screw, Mach, Pnhd, Poz (Item 5, 8–32 1/4 LG)
100319
Unlock efficiency
with MaintainX CoPilot
MaintainX CoPilot is your expert colleague, on call 24/7, helping your team find the answers they need to keep equipment running.
Reduce Unplanned Downtime
Ensure your team follows consistent procedures to minimize equipment failures and costly delays.
Maximize Asset Availability
Keep your assets running longer and more reliably, with standardized maintenance workflows from OEM manuals.
Lower Maintenance Costs
Turn any technician into an expert to streamline operations, maintain more assets, and reduce overall costs.
Thousands of companies manage their assets with MaintainX

'%3e%3cpath%20fill='url(%23b)'%20d='M66.008%2080.068c-5.084-.786-9.763-3.834-12.442-8.68a16.942%2016.942%200%200%201-1.87-5.18c1.096.19%202.203.476%203.298.87%206.525%202.333%2010.836%207.68%2011.014%2012.99ZM51.47%2061.576c.488-5.524%203.62-10.716%208.847-13.597a17.132%2017.132%200%200%201%2011.335-1.882c-.798%208.145-7.43%2014.848-16.038%2015.599-1.417.119-2.799.07-4.144-.12Zm28.564-11.478a17.513%2017.513%200%200%201%203.727%204.62c4.608%208.335%201.584%2018.813-6.75%2023.409a16.988%2016.988%200%200%201-4.359%201.679%2019.624%2019.624%200%200%201-3.977-12.776c.346-7.561%204.942-13.931%2011.36-16.932Z'/%3e%3cpath%20fill='%23110F0D'%20fill-rule='evenodd'%20d='M142.831%2048.324h4.977V77.03h-4.977V48.324Zm27.278%2013.002c.322%201.048.453%202.263.453%203.62v12.073h-4.787V66.208c0-.75-.047-1.572-.154-2.143-.453-2.382-1.822-3.572-4.215-3.572-2.31%200-3.882%201.274-4.43%203.476-.143.596-.226%201.405-.226%202.25v10.8h-4.787V56.623h4.477v2.989c1.536-2.5%203.906-3.43%206.371-3.43%203.488%200%206.263%201.68%207.298%205.144Zm24.636%207.323c0%203.882-2.358%206.525-5.763%207.727-1.298.453-2.632.643-4.62.643h-10.169V48.324h9.085c1.691%200%203.156.143%204.049.38%203.465.93%205.727%203.68%205.727%207.335%200%202.441-.81%204.156-2.762%205.644%202.905%201.417%204.453%203.727%204.453%206.966Zm-15.634-8.656h4.584c1.024%200%201.917-.143%202.536-.417%201.215-.548%201.905-1.608%201.905-3.167%200-1.548-.643-2.572-1.845-3.132-.691-.31-1.762-.452-2.763-.452h-4.417v7.168Zm10.716%208.465c0-1.536-.893-3.37-3.227-3.893-.428-.095-1.036-.143-1.571-.143h-5.918v8.085h5.501c.56%200%201.429-.048%201.953-.167%201.94-.453%203.262-1.846%203.262-3.882Zm47.747-11.847-8.097%2020.408h-4.429l-8.109-20.408h5.191l5.192%2014.574%205.108-14.574h5.144Zm-20.218%2010.002c0%20.69-.036%201.262-.155%201.94h-15.943c.631%202.87%202.714%204.728%205.882%204.728%202.131%200%203.607-.882%204.703-2.525h4.87c-1.762%204.144-5.204%206.692-9.657%206.692-6.084%200-10.537-4.858-10.537-10.49%200-6.108%204.524-10.776%2010.335-10.776%206.239%200%2010.442%204.954%2010.502%2010.43Zm-4.763-1.405c-.333-2.846-2.643-4.858-5.691-4.858-2.894%200-5.287%201.929-5.621%204.858h11.312Zm-72.667%203.44c0%204.787-3.287%208.371-9.419%208.371H119.363V64.66c-1.917.274-3.87.69-5.811%201.238l4.537%2011.121h-5.418l-3.596-9.585c-5.144%202.084-10.085%205.216-14.217%209.585h-4.786L101.8%2048.312h4.56l5.68%2013.883a44.112%2044.112%200%200%201%207.323-1.774V48.312h9.084c1.703%200%203.156.143%204.061.393%203.453.929%205.727%203.667%205.727%207.323%200%201.917-.738%204.179-2.81%205.691%203.06%201.56%204.501%204.025%204.501%206.93Zm-15.634-8.667a62.664%2062.664%200%200%201%202.06-.036c1.703.012%203.239.131%204.608.37%201.441-.549%202.357-1.727%202.357-3.537%200-1.941-.881-3.144-2.488-3.667-.548-.18-1.358-.286-2.322-.286h-4.215v7.156Zm-16.55%203.905-3.715-9.894-6.394%2016.502c2.833-2.595%206.263-4.858%2010.109-6.608Zm27.254%204.74c0-2.775-3.131-4.347-8.513-4.418-.715%200-1.441.011-2.191.047v8.252h5.918c2.548%200%204.786-1.37%204.786-3.882Z'%20clip-rule='evenodd'/%3e%3c/g%3e%3cdefs%3e%3clinearGradient%20id='b'%20x1='51.47'%20x2='85.916'%20y1='62.946'%20y2='62.946'%20gradientUnits='userSpaceOnUse'%3e%3cstop%20stop-color='%23CD9F28'/%3e%3cstop%20offset='1'%20stop-color='%23ECD80B'/%3e%3c/linearGradient%3e%3cclipPath%20id='a'%3e%3cpath%20fill='%23fff'%20d='M51.47%2045.728h186.104V80.14H51.47z'/%3e%3c/clipPath%3e%3c/defs%3e%3c/svg%3e)


More from Videojet


Explore Other Assets


© 2026 MaintainX. All rights reserved.