


Trane Modular Air Handler M-Series TEM4A0C42S41SC
Need answers fast?
Explore the manual using AI.
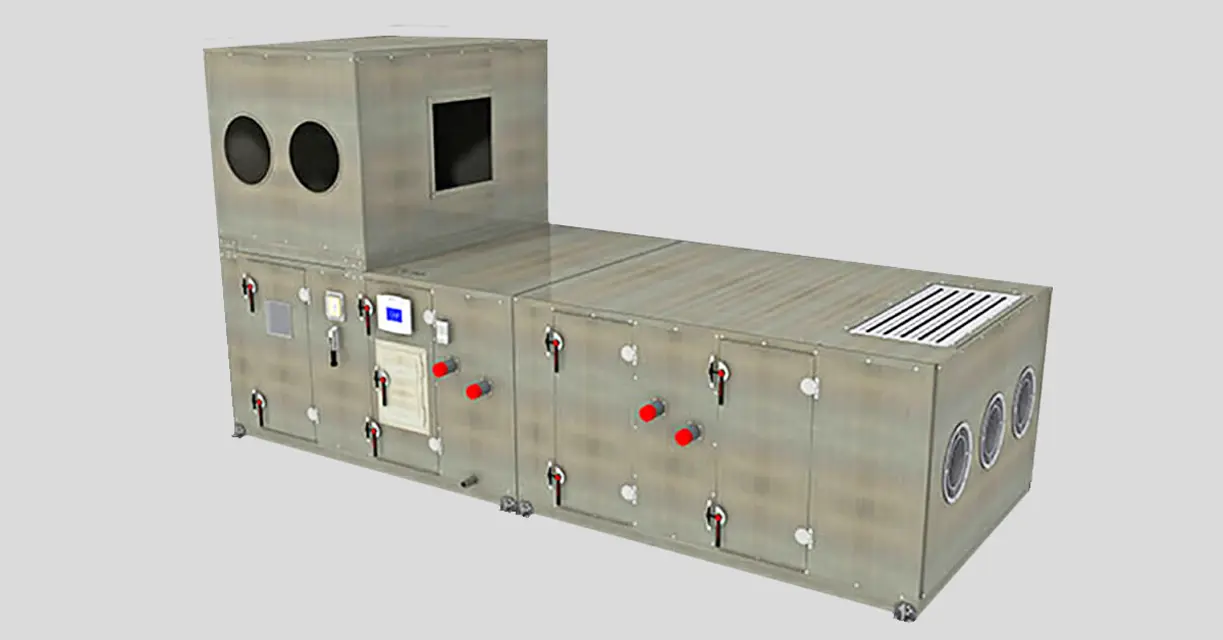
The Trane Modular Air Handler M-Series TEM4A0C42S41SC is a high-efficiency air handling unit designed for optimal climate control in commercial applications. With its modular design, this air handler offers flexibility and reliability, ensuring consistent performance and energy savings for various HVAC systems.
Turn manuals into instant answers
with your AI-powered assistantTurn manuals into instant answers
with your AI-powered assistant
Manual for Trane Modular Air Handler M-Series TEM4A0C42S41SC
Complete asset maintenance, one click away
Get instant access to all the maintenance information you need. Empower technicians to perform preventive maintenance with asset packages, ready to use right out of the box.

Documents & Manuals
Find all the essential guides in one place.
 Tensioning Guide
- Belt-diagram
- C-120 pulleys
+ 13 more

Work Order Templates
Pre-built workflows to keep your asset running smoothly.
- Daily Electrical System Inspection
- Replace Roller and Pulley
- Install Engine B-120
+ 29 more

Procedures
Integrate maintenance plans directly into your work orders.
- Motion Industries
- Applied Industrial Technologies
- Electrical Brothers
+ 5 more

Parts
Access the parts list for your equipment in MaintainX.
- Drive Motor
- B2 Rollers
- Tensioning System
+ 40 more
Trane Modular Air Handler M-Series TEM4A0C42S41SC
Create an account to install this asset package.
Maintenance Plans for Trane Modular Air Handler Model M-Series TEM4A0C42S41SC
Integrate maintenance plans directly into your work orders in MaintainX.
3 Monthly Type UW, UU, W, P2, P4, P8, WD, 5D, and 5W Coils Cleaning
Warning: Use care in removing header plugs from Type P2, P4, and P8 coils. Over-torquing may result in twisted tubes
Remove the vent and drain plugs
Blow the coil out as completely as possible with compressed air
Fill and drain the coil several times with full strength glycol so that it mixes thoroughly with the water retained in the coil
Drain the coil out as completely as possible
To ensure no water remains in the coil, do not replace the vent and drain plugs until the coils are put back into service
Sign off on the coil cleaning

6 Monthly Fan Maintenance
WARNING: Rotating Components! Disconnect all electric power, including remote disconnects before servicing. Follow proper lockout/ tagout procedures to ensure the power can not be inadvertently energized. Secure drive sheaves to ensure rotor cannot freewheel. Failure to secure drive sheaves or disconnect power before servicing could result in death or serious injury.
Fan sections of air handlers should be inspected every six months at a minimum or more frequently if operating experience dictates. If evidence of microbial growth (mold) is found, identify and remedy the cause immediately.
Disconnect all electrical power to the unit
Wearing the appropriate personal protective equipment, remove any contamination
Vacuum the section with a vacuum device that uses high- efficiency particulate arrestance (HEPA) filters with a minimum efficiency of 99.97 percent at 0.3 micron particle size
Thoroughly clean any contaminated area(s) with a mild bleach and water solution or an EPA-approved sanitizer specifically designed for HVAC use
Immediately rinse the affected surfaces thoroughly with fresh water and a fresh sponge to prevent potential corrosion of metal surfaces
Allow the unit to dry completely before putting it back into service
Be careful any contaminated material does not contact other areas of the unit or building. Properly dispose of all contaminated materials and cleaning solution
3 Monthly Air Handler Maintenance
Check fan bearing grease line connections. Lines should be tight to the bearings
Check bearing and motor bracket bolt torque and bearing setscrew torque
Align fan and motor sheaves. Tighten sheave set screws to the proper torque
Inspect and clean drain pans
Tighten electrical connections
Inspect coils for dirt build-up
3 Monthly Coils Cleaning
Inspect coils for dirt build-up
Disconnect all electrical power to the unit
Use a soft brush to remove loose debris from both sides of the coil
Install a block-off to prevent spray from going through the coil and into a dry section of the unit and/or system ductwork
Mix a high-quality coil cleaning detergent with water according to the manufacturer’s instructions
Place the mixed solution in a garden pump-up sprayer or high-pressure sprayer
Maintain minimum nozzle spray angle of 15 degrees
Spray perpendicular to the coil face
Keep the nozzle at least 6 inches from the coil
3 Monthly Drain Pans Maintenance
Inspect and clean drain pans every three to six months
WARNING: No Step Surface! Do not walk on the sheet metal drain pan. Walking on the drain pan could cause the supporting metal to collapse. Failure of the drain pan could result in death or serious injury
The condensate drain pan and drain line must be checked to assure the condensate drains as designed. This inspection should occur a minimum of every six months or more often as dictated by operating experience
If evidence of standing water or condensate overflow exists, identify and remedy the cause immediately
Disconnect all electrical power to the unit
Wearing the appropriate personal protective equipment, remove any standing water
Scrape solid matter off of the drain pan
Vacuum the drain pan with a vacuum device that uses high-efficiency particulate arrestance (HEPA) filters with a minimum efficiency of 99.97 percent at 0.3 micron particle size
Thoroughly clean any contaminated area(s) with a mild bleach and water solution or an EPA-approved sanitizer specifically designed for HVAC use
Parts for Trane Modular Air Handler M-Series TEM4A0C42S41SC
Access the parts list for your equipment in MaintainX.
Kit With Sensor
X13790452010 SEN-01212
Bearing Bracket Assembly
BRK1756
Self-drilling Screws, #10, On 8-in. Centers
SCR01789
Gasket
GKT 03870
Kit With Sensor
X13100429010 THT 02442
Kit With Sensor
X13790452010 SEN-01212
Bearing Bracket Assembly
BRK1756
Self-drilling Screws, #10, On 8-in. Centers
SCR01789
Gasket
GKT 03870
Kit With Sensor
X13100429010 THT 02442
Kit With Sensor
X13790452010 SEN-01212
Bearing Bracket Assembly
BRK1756
Self-drilling Screws, #10, On 8-in. Centers
SCR01789
Gasket
GKT 03870
Kit With Sensor
X13100429010 THT 02442
Unlock efficiency
with MaintainX CoPilot
MaintainX CoPilot is your expert colleague, on call 24/7, helping your team find the answers they need to keep equipment running.
Reduce Unplanned Downtime
Ensure your team follows consistent procedures to minimize equipment failures and costly delays.
Maximize Asset Availability
Keep your assets running longer and more reliably, with standardized maintenance workflows from OEM manuals.
Lower Maintenance Costs
Turn any technician into an expert to streamline operations, maintain more assets, and reduce overall costs.
Thousands of companies manage their assets with MaintainX

'%3e%3cpath%20fill='url(%23b)'%20d='M66.008%2080.068c-5.084-.786-9.763-3.834-12.442-8.68a16.942%2016.942%200%200%201-1.87-5.18c1.096.19%202.203.476%203.298.87%206.525%202.333%2010.836%207.68%2011.014%2012.99ZM51.47%2061.576c.488-5.524%203.62-10.716%208.847-13.597a17.132%2017.132%200%200%201%2011.335-1.882c-.798%208.145-7.43%2014.848-16.038%2015.599-1.417.119-2.799.07-4.144-.12Zm28.564-11.478a17.513%2017.513%200%200%201%203.727%204.62c4.608%208.335%201.584%2018.813-6.75%2023.409a16.988%2016.988%200%200%201-4.359%201.679%2019.624%2019.624%200%200%201-3.977-12.776c.346-7.561%204.942-13.931%2011.36-16.932Z'/%3e%3cpath%20fill='%23110F0D'%20fill-rule='evenodd'%20d='M142.831%2048.324h4.977V77.03h-4.977V48.324Zm27.278%2013.002c.322%201.048.453%202.263.453%203.62v12.073h-4.787V66.208c0-.75-.047-1.572-.154-2.143-.453-2.382-1.822-3.572-4.215-3.572-2.31%200-3.882%201.274-4.43%203.476-.143.596-.226%201.405-.226%202.25v10.8h-4.787V56.623h4.477v2.989c1.536-2.5%203.906-3.43%206.371-3.43%203.488%200%206.263%201.68%207.298%205.144Zm24.636%207.323c0%203.882-2.358%206.525-5.763%207.727-1.298.453-2.632.643-4.62.643h-10.169V48.324h9.085c1.691%200%203.156.143%204.049.38%203.465.93%205.727%203.68%205.727%207.335%200%202.441-.81%204.156-2.762%205.644%202.905%201.417%204.453%203.727%204.453%206.966Zm-15.634-8.656h4.584c1.024%200%201.917-.143%202.536-.417%201.215-.548%201.905-1.608%201.905-3.167%200-1.548-.643-2.572-1.845-3.132-.691-.31-1.762-.452-2.763-.452h-4.417v7.168Zm10.716%208.465c0-1.536-.893-3.37-3.227-3.893-.428-.095-1.036-.143-1.571-.143h-5.918v8.085h5.501c.56%200%201.429-.048%201.953-.167%201.94-.453%203.262-1.846%203.262-3.882Zm47.747-11.847-8.097%2020.408h-4.429l-8.109-20.408h5.191l5.192%2014.574%205.108-14.574h5.144Zm-20.218%2010.002c0%20.69-.036%201.262-.155%201.94h-15.943c.631%202.87%202.714%204.728%205.882%204.728%202.131%200%203.607-.882%204.703-2.525h4.87c-1.762%204.144-5.204%206.692-9.657%206.692-6.084%200-10.537-4.858-10.537-10.49%200-6.108%204.524-10.776%2010.335-10.776%206.239%200%2010.442%204.954%2010.502%2010.43Zm-4.763-1.405c-.333-2.846-2.643-4.858-5.691-4.858-2.894%200-5.287%201.929-5.621%204.858h11.312Zm-72.667%203.44c0%204.787-3.287%208.371-9.419%208.371H119.363V64.66c-1.917.274-3.87.69-5.811%201.238l4.537%2011.121h-5.418l-3.596-9.585c-5.144%202.084-10.085%205.216-14.217%209.585h-4.786L101.8%2048.312h4.56l5.68%2013.883a44.112%2044.112%200%200%201%207.323-1.774V48.312h9.084c1.703%200%203.156.143%204.061.393%203.453.929%205.727%203.667%205.727%207.323%200%201.917-.738%204.179-2.81%205.691%203.06%201.56%204.501%204.025%204.501%206.93Zm-15.634-8.667a62.664%2062.664%200%200%201%202.06-.036c1.703.012%203.239.131%204.608.37%201.441-.549%202.357-1.727%202.357-3.537%200-1.941-.881-3.144-2.488-3.667-.548-.18-1.358-.286-2.322-.286h-4.215v7.156Zm-16.55%203.905-3.715-9.894-6.394%2016.502c2.833-2.595%206.263-4.858%2010.109-6.608Zm27.254%204.74c0-2.775-3.131-4.347-8.513-4.418-.715%200-1.441.011-2.191.047v8.252h5.918c2.548%200%204.786-1.37%204.786-3.882Z'%20clip-rule='evenodd'/%3e%3c/g%3e%3cdefs%3e%3clinearGradient%20id='b'%20x1='51.47'%20x2='85.916'%20y1='62.946'%20y2='62.946'%20gradientUnits='userSpaceOnUse'%3e%3cstop%20stop-color='%23CD9F28'/%3e%3cstop%20offset='1'%20stop-color='%23ECD80B'/%3e%3c/linearGradient%3e%3cclipPath%20id='a'%3e%3cpath%20fill='%23fff'%20d='M51.47%2045.728h186.104V80.14H51.47z'/%3e%3c/clipPath%3e%3c/defs%3e%3c/svg%3e)


More from Trane


Explore Other Assets


© 2026 MaintainX. All rights reserved.