


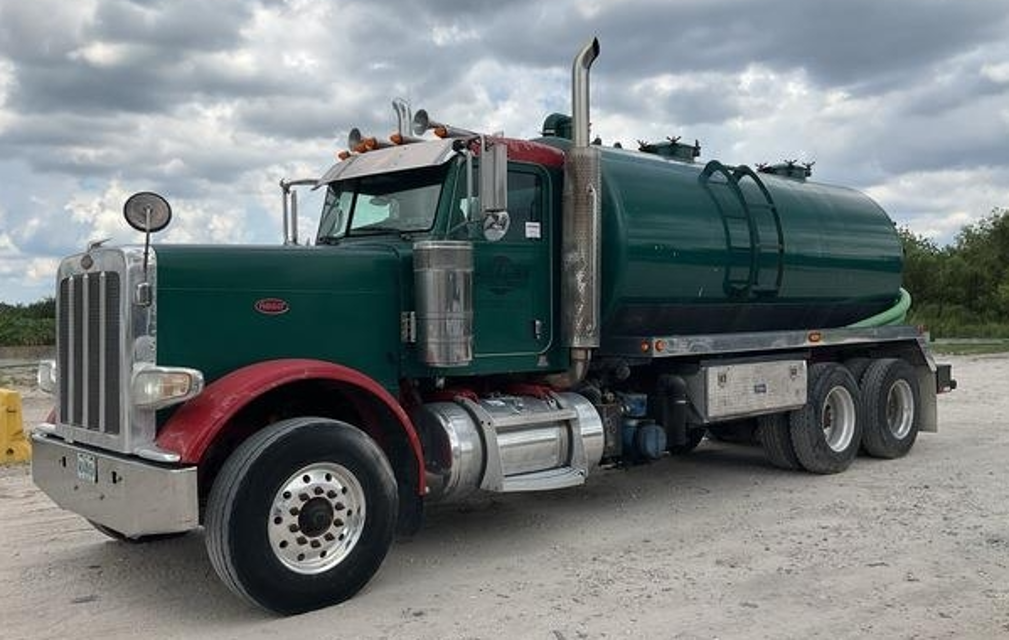
Peterbilt Car 388 Vacuum
Need answers fast?
Explore the manual using AI.
Turn manuals into instant answers
with your AI-powered assistantTurn manuals into instant answers
with your AI-powered assistant
Manual for Peterbilt Car 388 Vacuum
Complete asset maintenance, one click away
Get instant access to all the maintenance information you need. Empower technicians to perform preventive maintenance with asset packages, ready to use right out of the box.

Documents & Manuals
Find all the essential guides in one place.
 Tensioning Guide
- Belt-diagram
- C-120 pulleys
+ 13 more

Work Order Templates
Pre-built workflows to keep your asset running smoothly.
- Daily Electrical System Inspection
- Replace Roller and Pulley
- Install Engine B-120
+ 29 more

Procedures
Integrate maintenance plans directly into your work orders.
- Motion Industries
- Applied Industrial Technologies
- Electrical Brothers
+ 5 more

Parts
Access the parts list for your equipment in MaintainX.
- Drive Motor
- B2 Rollers
- Tensioning System
+ 40 more
Peterbilt Car 388 Vacuum
Create an account to install this asset package.
Maintenance Plans for Peterbilt Car Model 388 Vacuum
Integrate maintenance plans directly into your work orders in MaintainX.
2 Yearly Car Maintenance
Hub, Drum, and Hubcap Hubs (non-LMS) with outrunner seals: Clean the components and check for excessive wear or damage. Change the oil and seal (shown on page 5-54).
Use hypoid oil, A.P.I.-GL-5 SAE 75W-90FE synthetic gear lubricant or equivalent. A minimum of 1 quart (921 ml) of oil is required for proper lubrication of each drive hub. Add oil through the filler hole in the hub; if none, add oil through the differential filler hole. (Note: Remember to replace vent plug or threaded filler plug when done.) Allow time for the oil to seep through the bearings when initially filling a hub.
Maintain the differential oil level by adding oil until its surface is even with the bottom of the filler hole (see illustration on page 5-45).
Oil-lubricated Nondriven Hubs
Use CD50 synthetic transmission fluid SAE 50W or equivalent. A minimum of 9 oz. (270 ml) of lubricant is required for proper lubrication of an LMSTM hub; 10-13 oz. (295-400 ml) is required for a non-LMS hub, depending on wheel design. Allow time for the fluid to seep through the bearings when initially filling a hub. When properly filled, the fluid level will lie between the fluid level line and 1/4” above the line.
NOTE: Remember to replace vent plug when done.
Cooling Extended Life Coolant (ELC): Flush, drain, and refill with new coolant (shown on page 5-82).;

Engine Intake Air Cleaner Element Replacement
CAUTION: Failure to replace air filter at proper intervals may result in passage of dirt/debris into the engine or the “dusting” of an engine resulting in significant engine damage.
Service the air cleaner filter elements as specified in the Preventive Maintenance Schedule on page 5-12.
This vehicle is equipped with an air inlet restriction indicator. Service the filter elements when the air inlet restriction indicator locks in the extreme Up position.
Paper elements require care and proper handling because they are critical to engine service life.
If your vehicle has an external air cleaner and cab-mounted mirrors, the mirror must be pivoted to provide access for servicing the filter element.
Loosen (do not remove) upper 5/16 in. mounting hardware.
Remove acorn nut and flat washer, then pivot upper stabilizer rod away from cab.
Loosen the two rearmost M6 hex socket head screws on the lower clamp.
Rotate the main support tube rearward to provide clearance to remove and replace the air cleaner filter element.
Air Compressor Maintenance
Warning: All maintenance checks should be performed by a certified mechanic.
After completing any repairs to the air system, always test for air leaks, and check the brakes for safe operation before putting the vehicle in service.
Inspect compressor air filter element, if so equipped, and replace element if clogged.
Check compressor mounting and drive for alignment and belt tension. Adjust if necessary.
Remove compressor discharge valve cap nuts and check for presence of excessive carbon.
If excessive carbon is found, clean or replace the compressor cylinder head.
Check compressor discharge line for carbon, and clean or replace the discharge line if necessary.
Disassemble compressor and thoroughly clean and inspect all parts.
Repair or replace all worn or damaged parts, or replace compressor with a factory exchange unit.
Allison Transmission Lubrication
Refer to your transmission manual (furnished separately) for lubrication information.
Refer to the Allison Transmission manual for servicing information.
Upload a photo of the transmission manual
Lubrication change performed
Transmission inspection performed
Sign off on the lubrication change and inspection
Greenhouse Gas Certified Tires Maintenance
NOTE: The tires installed on this vehicle at the factory as original equipment are certified for Greenhouse Gas and Fuel Efficiency regulations. Replacement tires must be of equal or lower rolling resistance level (TRRL or Crr). Consult with your tire supplier(s) for appropriate replacement tires.
Maintaining a greenhouse gas certified tire. In order to limit the rolling resistance of the tires and optimize fuel economy, the maintenance procedures specified by the tire manufacture must be followed.
For warranty information, See Original Equipment Tires on page 6-10.
Tires are of equal or lower rolling resistance level (TRRL or Crr)?
Tire supplier consulted for appropriate replacement tires
Maintenance procedures specified by the tire manufacture followed?
Sign off on the tire maintenance
Unlock efficiency
with MaintainX CoPilot
MaintainX CoPilot is your expert colleague, on call 24/7, helping your team find the answers they need to keep equipment running.
Reduce Unplanned Downtime
Ensure your team follows consistent procedures to minimize equipment failures and costly delays.
Maximize Asset Availability
Keep your assets running longer and more reliably, with standardized maintenance workflows from OEM manuals.
Lower Maintenance Costs
Turn any technician into an expert to streamline operations, maintain more assets, and reduce overall costs.
Thousands of companies manage their assets with MaintainX

'%3e%3cpath%20fill='url(%23b)'%20d='M66.008%2080.068c-5.084-.786-9.763-3.834-12.442-8.68a16.942%2016.942%200%200%201-1.87-5.18c1.096.19%202.203.476%203.298.87%206.525%202.333%2010.836%207.68%2011.014%2012.99ZM51.47%2061.576c.488-5.524%203.62-10.716%208.847-13.597a17.132%2017.132%200%200%201%2011.335-1.882c-.798%208.145-7.43%2014.848-16.038%2015.599-1.417.119-2.799.07-4.144-.12Zm28.564-11.478a17.513%2017.513%200%200%201%203.727%204.62c4.608%208.335%201.584%2018.813-6.75%2023.409a16.988%2016.988%200%200%201-4.359%201.679%2019.624%2019.624%200%200%201-3.977-12.776c.346-7.561%204.942-13.931%2011.36-16.932Z'/%3e%3cpath%20fill='%23110F0D'%20fill-rule='evenodd'%20d='M142.831%2048.324h4.977V77.03h-4.977V48.324Zm27.278%2013.002c.322%201.048.453%202.263.453%203.62v12.073h-4.787V66.208c0-.75-.047-1.572-.154-2.143-.453-2.382-1.822-3.572-4.215-3.572-2.31%200-3.882%201.274-4.43%203.476-.143.596-.226%201.405-.226%202.25v10.8h-4.787V56.623h4.477v2.989c1.536-2.5%203.906-3.43%206.371-3.43%203.488%200%206.263%201.68%207.298%205.144Zm24.636%207.323c0%203.882-2.358%206.525-5.763%207.727-1.298.453-2.632.643-4.62.643h-10.169V48.324h9.085c1.691%200%203.156.143%204.049.38%203.465.93%205.727%203.68%205.727%207.335%200%202.441-.81%204.156-2.762%205.644%202.905%201.417%204.453%203.727%204.453%206.966Zm-15.634-8.656h4.584c1.024%200%201.917-.143%202.536-.417%201.215-.548%201.905-1.608%201.905-3.167%200-1.548-.643-2.572-1.845-3.132-.691-.31-1.762-.452-2.763-.452h-4.417v7.168Zm10.716%208.465c0-1.536-.893-3.37-3.227-3.893-.428-.095-1.036-.143-1.571-.143h-5.918v8.085h5.501c.56%200%201.429-.048%201.953-.167%201.94-.453%203.262-1.846%203.262-3.882Zm47.747-11.847-8.097%2020.408h-4.429l-8.109-20.408h5.191l5.192%2014.574%205.108-14.574h5.144Zm-20.218%2010.002c0%20.69-.036%201.262-.155%201.94h-15.943c.631%202.87%202.714%204.728%205.882%204.728%202.131%200%203.607-.882%204.703-2.525h4.87c-1.762%204.144-5.204%206.692-9.657%206.692-6.084%200-10.537-4.858-10.537-10.49%200-6.108%204.524-10.776%2010.335-10.776%206.239%200%2010.442%204.954%2010.502%2010.43Zm-4.763-1.405c-.333-2.846-2.643-4.858-5.691-4.858-2.894%200-5.287%201.929-5.621%204.858h11.312Zm-72.667%203.44c0%204.787-3.287%208.371-9.419%208.371H119.363V64.66c-1.917.274-3.87.69-5.811%201.238l4.537%2011.121h-5.418l-3.596-9.585c-5.144%202.084-10.085%205.216-14.217%209.585h-4.786L101.8%2048.312h4.56l5.68%2013.883a44.112%2044.112%200%200%201%207.323-1.774V48.312h9.084c1.703%200%203.156.143%204.061.393%203.453.929%205.727%203.667%205.727%207.323%200%201.917-.738%204.179-2.81%205.691%203.06%201.56%204.501%204.025%204.501%206.93Zm-15.634-8.667a62.664%2062.664%200%200%201%202.06-.036c1.703.012%203.239.131%204.608.37%201.441-.549%202.357-1.727%202.357-3.537%200-1.941-.881-3.144-2.488-3.667-.548-.18-1.358-.286-2.322-.286h-4.215v7.156Zm-16.55%203.905-3.715-9.894-6.394%2016.502c2.833-2.595%206.263-4.858%2010.109-6.608Zm27.254%204.74c0-2.775-3.131-4.347-8.513-4.418-.715%200-1.441.011-2.191.047v8.252h5.918c2.548%200%204.786-1.37%204.786-3.882Z'%20clip-rule='evenodd'/%3e%3c/g%3e%3cdefs%3e%3clinearGradient%20id='b'%20x1='51.47'%20x2='85.916'%20y1='62.946'%20y2='62.946'%20gradientUnits='userSpaceOnUse'%3e%3cstop%20stop-color='%23CD9F28'/%3e%3cstop%20offset='1'%20stop-color='%23ECD80B'/%3e%3c/linearGradient%3e%3cclipPath%20id='a'%3e%3cpath%20fill='%23fff'%20d='M51.47%2045.728h186.104V80.14H51.47z'/%3e%3c/clipPath%3e%3c/defs%3e%3c/svg%3e)


More from Peterbilt


Explore Other Assets


© 2026 MaintainX. All rights reserved.