


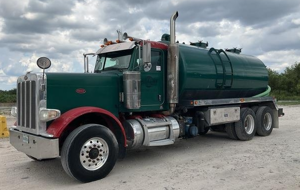
Peterbilt Car 389
Need answers fast?
Explore the manual using AI.

Turn manuals into instant answers
with your AI-powered assistantTurn manuals into instant answers
with your AI-powered assistant
Manual for Peterbilt Car 389
Complete asset maintenance, one click away
Get instant access to all the maintenance information you need. Empower technicians to perform preventive maintenance with asset packages, ready to use right out of the box.

Documents & Manuals
Find all the essential guides in one place.
 Tensioning Guide
- Belt-diagram
- C-120 pulleys
+ 13 more

Work Order Templates
Pre-built workflows to keep your asset running smoothly.
- Daily Electrical System Inspection
- Replace Roller and Pulley
- Install Engine B-120
+ 29 more

Procedures
Integrate maintenance plans directly into your work orders.
- Motion Industries
- Applied Industrial Technologies
- Electrical Brothers
+ 5 more

Parts
Access the parts list for your equipment in MaintainX.
- Drive Motor
- B2 Rollers
- Tensioning System
+ 40 more
Peterbilt Car 389
Create an account to install this asset package.
Maintenance Plans for Peterbilt Car Model 389
Integrate maintenance plans directly into your work orders in MaintainX.
Meritor Axle Lubrication
NOTE: Axles utilized in 100% off-highway use are not eligible for Meritor’s Advanced Lube Rear Drive Axle program.
Under Meritor’s Advanced Lube Rear Drive Axle program, the axles listed below are exempt from an initial lubricant change:
List of exempted axles
Meritor rear axles that do not appear on the list above will continue to require an initial drain at 3000-5000 miles (4800-8000 km).
Refer to the Meritor Field Maintenance Manual for a particular axle for lubricant specifications.
See your dealer for Meritor-approved lubricant brands.
Refer to the following chart for lubricant change intervals:
Lubricant change intervals chart
Change the lubricant filter every 120,000 miles (192,000 km). Top off the lubricant level with a similar lubricant.

6 Monthly Car Maintenance
Inspect engine mounts
Inspect both mount and leg fasteners
Check mount and leg for fractures, breaks or deformation
Check for complete insertion of motor mount
Kingpin bushings, thrust bearings, and tie rod ball ends lubricated with approved grease
Steering knuckle spindles, thrust bearings, kingpins, drawkeys, tie rod ends, steering stops, and bushings inspected for wear and damage and for endplay
Front Suspension Front Spring inspected for cracked leaves, worn bushings, and excessive corrosion
Front Suspension Spring Pins and Shackles inspected for worn parts and excessive joint clearance
Front Suspension Shock Absorbers inspected for leaking, body damage, and damaged or worn bushings
Air Gauges / Air Leaks Maintenance
Your vehicle comes with air pressure gauges for two separate systems, Primary and Secondary: the Primary gauge indicates pressure in the rear braking system; the Secondary gauge indicates pressure in the front braking system. Each gauge indicates the amount of air pressure in pounds per square inch (psi).
WARNING!: Do not operate the vehicle if leakage in the air system is detected. Conduct the following procedure and contact an authorized dealer (or any other properly equipped service center) if a leak is detected. Failure to check the brakes or follow these procedures could cause a system failure, increasing the risk of an accident and may result in death, personal injury, equipment or property damage.
If the light and alarm do not turn off at start-up, do not try to drive the vehicle until the problem is found and fixed. If the pressure in either or both systems is too low for normal brake operation, i.e., the pointer of one gauge falls below 65 psi (448 kPa), a warning light on the gauge will glow and the audible alarm will sound.
NOTE: Park brakes lock up at 60 psi (414 kPa), the audible alarm will sound at 65 psi (448 kPa).
Follow the procedure below to check the compressed air system for leaks:
1. Periodically, or after maintenance or replacement of air system components:
2. Build up air pressure in the system to the governor cutout point or until 120 psi (827 kPa) is reached.
3. Stop the engine and release the service brakes.
4. Without applying the brake pedal, observe the rate of air pressure drop. This rate should not exceed 2.0 psi (14 kPa) per minute.
900 Hourly / 3 Monthly Air Dryer Check
Warning: This check requires trained personnel with PPE!
Enter the current operating hours of the air dryer
Presence of moisture in the air brake system?
Note: A small amount of oil in the system may be normal and should not, in itself, be considered a reason to replace the desiccant cartridge.
Is the air usage exceptionally high and not normal for a highway vehicle?
Is there a temperature range of more than 30° F (17° C) in one day?
Has an outside air source been used to charge the air system?
Additional notes or observations
Sign off on the air dryer check
2 Monthly Car Maintenance
Front Axle (Meritor) Drawkeys: Tighten nuts
Front Suspension Spring Pins: Lubricate with approved grease
Front Suspension U-bolts (OFF HIGHWAY): Check the general condition and the tightness of the nuts
Drum Brakes (All) Brake treadle valve: Clean the area around the treadle, boot, and mounting plate
Drum Brakes (All) Brake lining: Inspect; replace as required
Hub, Drum, and Hubcap Hubs (non-LMS): Check the bearing endplay and adjust as required
Hub, Drum, and Hubcap Hub seals (all): Check for leaks; replace as required
Hub, Drum, and Hubcap Brake drums: Inspect for visible cracks, heat checking, galling or scoring of the braking surface, and for severe corrosion on the outside surface
Main and auxiliary transmission Main and auxiliary transmission and transfer case: Check the drain plugs for tightness
Unlock efficiency
with MaintainX CoPilot
MaintainX CoPilot is your expert colleague, on call 24/7, helping your team find the answers they need to keep equipment running.
Reduce Unplanned Downtime
Ensure your team follows consistent procedures to minimize equipment failures and costly delays.
Maximize Asset Availability
Keep your assets running longer and more reliably, with standardized maintenance workflows from OEM manuals.
Lower Maintenance Costs
Turn any technician into an expert to streamline operations, maintain more assets, and reduce overall costs.
Thousands of companies manage their assets with MaintainX

'%3e%3cpath%20fill='url(%23b)'%20d='M66.008%2080.068c-5.084-.786-9.763-3.834-12.442-8.68a16.942%2016.942%200%200%201-1.87-5.18c1.096.19%202.203.476%203.298.87%206.525%202.333%2010.836%207.68%2011.014%2012.99ZM51.47%2061.576c.488-5.524%203.62-10.716%208.847-13.597a17.132%2017.132%200%200%201%2011.335-1.882c-.798%208.145-7.43%2014.848-16.038%2015.599-1.417.119-2.799.07-4.144-.12Zm28.564-11.478a17.513%2017.513%200%200%201%203.727%204.62c4.608%208.335%201.584%2018.813-6.75%2023.409a16.988%2016.988%200%200%201-4.359%201.679%2019.624%2019.624%200%200%201-3.977-12.776c.346-7.561%204.942-13.931%2011.36-16.932Z'/%3e%3cpath%20fill='%23110F0D'%20fill-rule='evenodd'%20d='M142.831%2048.324h4.977V77.03h-4.977V48.324Zm27.278%2013.002c.322%201.048.453%202.263.453%203.62v12.073h-4.787V66.208c0-.75-.047-1.572-.154-2.143-.453-2.382-1.822-3.572-4.215-3.572-2.31%200-3.882%201.274-4.43%203.476-.143.596-.226%201.405-.226%202.25v10.8h-4.787V56.623h4.477v2.989c1.536-2.5%203.906-3.43%206.371-3.43%203.488%200%206.263%201.68%207.298%205.144Zm24.636%207.323c0%203.882-2.358%206.525-5.763%207.727-1.298.453-2.632.643-4.62.643h-10.169V48.324h9.085c1.691%200%203.156.143%204.049.38%203.465.93%205.727%203.68%205.727%207.335%200%202.441-.81%204.156-2.762%205.644%202.905%201.417%204.453%203.727%204.453%206.966Zm-15.634-8.656h4.584c1.024%200%201.917-.143%202.536-.417%201.215-.548%201.905-1.608%201.905-3.167%200-1.548-.643-2.572-1.845-3.132-.691-.31-1.762-.452-2.763-.452h-4.417v7.168Zm10.716%208.465c0-1.536-.893-3.37-3.227-3.893-.428-.095-1.036-.143-1.571-.143h-5.918v8.085h5.501c.56%200%201.429-.048%201.953-.167%201.94-.453%203.262-1.846%203.262-3.882Zm47.747-11.847-8.097%2020.408h-4.429l-8.109-20.408h5.191l5.192%2014.574%205.108-14.574h5.144Zm-20.218%2010.002c0%20.69-.036%201.262-.155%201.94h-15.943c.631%202.87%202.714%204.728%205.882%204.728%202.131%200%203.607-.882%204.703-2.525h4.87c-1.762%204.144-5.204%206.692-9.657%206.692-6.084%200-10.537-4.858-10.537-10.49%200-6.108%204.524-10.776%2010.335-10.776%206.239%200%2010.442%204.954%2010.502%2010.43Zm-4.763-1.405c-.333-2.846-2.643-4.858-5.691-4.858-2.894%200-5.287%201.929-5.621%204.858h11.312Zm-72.667%203.44c0%204.787-3.287%208.371-9.419%208.371H119.363V64.66c-1.917.274-3.87.69-5.811%201.238l4.537%2011.121h-5.418l-3.596-9.585c-5.144%202.084-10.085%205.216-14.217%209.585h-4.786L101.8%2048.312h4.56l5.68%2013.883a44.112%2044.112%200%200%201%207.323-1.774V48.312h9.084c1.703%200%203.156.143%204.061.393%203.453.929%205.727%203.667%205.727%207.323%200%201.917-.738%204.179-2.81%205.691%203.06%201.56%204.501%204.025%204.501%206.93Zm-15.634-8.667a62.664%2062.664%200%200%201%202.06-.036c1.703.012%203.239.131%204.608.37%201.441-.549%202.357-1.727%202.357-3.537%200-1.941-.881-3.144-2.488-3.667-.548-.18-1.358-.286-2.322-.286h-4.215v7.156Zm-16.55%203.905-3.715-9.894-6.394%2016.502c2.833-2.595%206.263-4.858%2010.109-6.608Zm27.254%204.74c0-2.775-3.131-4.347-8.513-4.418-.715%200-1.441.011-2.191.047v8.252h5.918c2.548%200%204.786-1.37%204.786-3.882Z'%20clip-rule='evenodd'/%3e%3c/g%3e%3cdefs%3e%3clinearGradient%20id='b'%20x1='51.47'%20x2='85.916'%20y1='62.946'%20y2='62.946'%20gradientUnits='userSpaceOnUse'%3e%3cstop%20stop-color='%23CD9F28'/%3e%3cstop%20offset='1'%20stop-color='%23ECD80B'/%3e%3c/linearGradient%3e%3cclipPath%20id='a'%3e%3cpath%20fill='%23fff'%20d='M51.47%2045.728h186.104V80.14H51.47z'/%3e%3c/clipPath%3e%3c/defs%3e%3c/svg%3e)


More from Peterbilt


Explore Other Assets


© 2026 MaintainX. All rights reserved.