


Hobart Mixer HSM40
Need answers fast?
Explore the manual using AI.
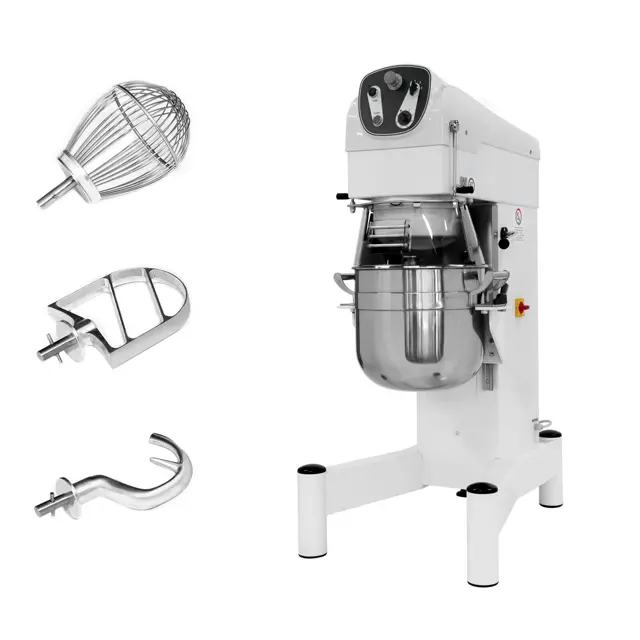
The Hobart Mixer HSM40 is a robust industrial mixer designed for high-efficiency mixing in commercial kitchens. Known for its durability and performance, this model is ideal for mixing dough, batter, and other ingredients, ensuring consistent results in food preparation. Optimize your kitchen operations with the reliable Hobart HSM40 mixer.
Turn manuals into instant answers
with your AI-powered assistantTurn manuals into instant answers
with your AI-powered assistant
Manual for Hobart Mixer HSM40
Complete asset maintenance, one click away
Get instant access to all the maintenance information you need. Empower technicians to perform preventive maintenance with asset packages, ready to use right out of the box.

Documents & Manuals
Find all the essential guides in one place.
 Tensioning Guide
- Belt-diagram
- C-120 pulleys
+ 13 more

Work Order Templates
Pre-built workflows to keep your asset running smoothly.
- Daily Electrical System Inspection
- Replace Roller and Pulley
- Install Engine B-120
+ 29 more

Procedures
Integrate maintenance plans directly into your work orders.
- Motion Industries
- Applied Industrial Technologies
- Electrical Brothers
+ 5 more

Parts
Access the parts list for your equipment in MaintainX.
- Drive Motor
- B2 Rollers
- Tensioning System
+ 40 more
Hobart Mixer HSM40
Create an account to install this asset package.
Maintenance Plans for Hobart Mixer Model HSM40
Integrate maintenance plans directly into your work orders in MaintainX.
6 Monthly Mixer Lubrication
NOTE! Do not remove any covers or loosen any fittings while the mixer is operating.
NOTE! Ensure the electrical supply has been isolated before attempting to service or move the mixer.
The motor and transmission are packed with special grease, which will last for several years. When replacement is needed, contact your local service centre.
The bowl support guide rods are lubricated with food grade grease
The mixer is serviced regularly
Sign off on the mixer lubrication

Bowl Scraper Cleaning
Warning: Do not use aggressive chemicals to clean the sleeve since they may degrade the plastic material.
Remove the plastic sleeve from the stainless steel arm
Tip: Tapping the sleeve against the edge of a table will aid its removal.
Clean both parts in a sink with hot water and detergent solution
Rinse with clean water and dry
Slide the sleeve onto the arm so the bevelled edge is the leading edge
Note: Use water as a lubricant. The end of the sleeve must be flush with the end of the arm.
Sign off on the bowl scraper cleaning
1 Daily Guard Cleaning
The guard assembly has been designed to be removed easily for machine washing.
- To remove the guard assembly.
• Ensure that the bowl support is in the lowered position.
• Remove the agitator and bowl.
• Withdraw the interlock plunger and rotate the guard deflector assembly in an anticlockwise direction until the unit disengages from the sprung retainers. At this point care should be taken, as the guard will now be able to drop freely from the machine.
• Carefully lower the guard assembly and remove.
- Cleaning the guard.
• The guard should be cleaned at the end of each day.
• Once the guard is removed it can be cleaned with hot water, using a suitable nonabrasive detergent and soft bristle brush. Alternatively the guard can be cleaned in a commercial dishwasher.
After Use Mixer Cleaning
Warning: Ensure the mixer is turned off and unplugged before cleaning.
Clean the mixing bowl with hot water and non-abrasive detergent
Clean the agitators and attachments with hot water and non-abrasive detergent
Note: Do not clean the aluminium agitators in a dishwasher.
Clean the mixer with a hot damp cloth
Thoroughly wipe the bowl support arms and all exterior surfaces
Clean the guard
Sign off on the mixer cleaning
Initial Mixer Cleaning
Before using for the first time, thoroughly wash new mixer bowls, agitators and attachments.
Washed in hot water and a mild detergent solution?
This procedure should also be followed for bowls and agitators before whipping egg whites or whole eggs.
Washed bowls and agitators before whipping egg whites or whole eggs?
Sign off on the initial mixer cleaning
Parts for Hobart Mixer HSM40
Access the parts list for your equipment in MaintainX.
Catalogue Of Replacement Parts
PLE200459
Capacitor, Start (160-200 F) (As Appropriate For Model)
138725
Bowl Scraper Assembly 30 Litre Including Blade And Housing
ML-109242
Blade-Scraper 40 Litre
737458-4
Light Food Grade Oil
SU-E-3-4
Catalogue Of Replacement Parts
PLE200459
Capacitor, Start (160-200 F) (As Appropriate For Model)
138725
Bowl Scraper Assembly 30 Litre Including Blade And Housing
ML-109242
Blade-Scraper 40 Litre
737458-4
Light Food Grade Oil
SU-E-3-4
Catalogue Of Replacement Parts
PLE200459
Capacitor, Start (160-200 F) (As Appropriate For Model)
138725
Bowl Scraper Assembly 30 Litre Including Blade And Housing
ML-109242
Blade-Scraper 40 Litre
737458-4
Light Food Grade Oil
SU-E-3-4
Unlock efficiency
with MaintainX CoPilot
MaintainX CoPilot is your expert colleague, on call 24/7, helping your team find the answers they need to keep equipment running.
Reduce Unplanned Downtime
Ensure your team follows consistent procedures to minimize equipment failures and costly delays.
Maximize Asset Availability
Keep your assets running longer and more reliably, with standardized maintenance workflows from OEM manuals.
Lower Maintenance Costs
Turn any technician into an expert to streamline operations, maintain more assets, and reduce overall costs.
Thousands of companies manage their assets with MaintainX

'%3e%3cpath%20fill='url(%23b)'%20d='M66.008%2080.068c-5.084-.786-9.763-3.834-12.442-8.68a16.942%2016.942%200%200%201-1.87-5.18c1.096.19%202.203.476%203.298.87%206.525%202.333%2010.836%207.68%2011.014%2012.99ZM51.47%2061.576c.488-5.524%203.62-10.716%208.847-13.597a17.132%2017.132%200%200%201%2011.335-1.882c-.798%208.145-7.43%2014.848-16.038%2015.599-1.417.119-2.799.07-4.144-.12Zm28.564-11.478a17.513%2017.513%200%200%201%203.727%204.62c4.608%208.335%201.584%2018.813-6.75%2023.409a16.988%2016.988%200%200%201-4.359%201.679%2019.624%2019.624%200%200%201-3.977-12.776c.346-7.561%204.942-13.931%2011.36-16.932Z'/%3e%3cpath%20fill='%23110F0D'%20fill-rule='evenodd'%20d='M142.831%2048.324h4.977V77.03h-4.977V48.324Zm27.278%2013.002c.322%201.048.453%202.263.453%203.62v12.073h-4.787V66.208c0-.75-.047-1.572-.154-2.143-.453-2.382-1.822-3.572-4.215-3.572-2.31%200-3.882%201.274-4.43%203.476-.143.596-.226%201.405-.226%202.25v10.8h-4.787V56.623h4.477v2.989c1.536-2.5%203.906-3.43%206.371-3.43%203.488%200%206.263%201.68%207.298%205.144Zm24.636%207.323c0%203.882-2.358%206.525-5.763%207.727-1.298.453-2.632.643-4.62.643h-10.169V48.324h9.085c1.691%200%203.156.143%204.049.38%203.465.93%205.727%203.68%205.727%207.335%200%202.441-.81%204.156-2.762%205.644%202.905%201.417%204.453%203.727%204.453%206.966Zm-15.634-8.656h4.584c1.024%200%201.917-.143%202.536-.417%201.215-.548%201.905-1.608%201.905-3.167%200-1.548-.643-2.572-1.845-3.132-.691-.31-1.762-.452-2.763-.452h-4.417v7.168Zm10.716%208.465c0-1.536-.893-3.37-3.227-3.893-.428-.095-1.036-.143-1.571-.143h-5.918v8.085h5.501c.56%200%201.429-.048%201.953-.167%201.94-.453%203.262-1.846%203.262-3.882Zm47.747-11.847-8.097%2020.408h-4.429l-8.109-20.408h5.191l5.192%2014.574%205.108-14.574h5.144Zm-20.218%2010.002c0%20.69-.036%201.262-.155%201.94h-15.943c.631%202.87%202.714%204.728%205.882%204.728%202.131%200%203.607-.882%204.703-2.525h4.87c-1.762%204.144-5.204%206.692-9.657%206.692-6.084%200-10.537-4.858-10.537-10.49%200-6.108%204.524-10.776%2010.335-10.776%206.239%200%2010.442%204.954%2010.502%2010.43Zm-4.763-1.405c-.333-2.846-2.643-4.858-5.691-4.858-2.894%200-5.287%201.929-5.621%204.858h11.312Zm-72.667%203.44c0%204.787-3.287%208.371-9.419%208.371H119.363V64.66c-1.917.274-3.87.69-5.811%201.238l4.537%2011.121h-5.418l-3.596-9.585c-5.144%202.084-10.085%205.216-14.217%209.585h-4.786L101.8%2048.312h4.56l5.68%2013.883a44.112%2044.112%200%200%201%207.323-1.774V48.312h9.084c1.703%200%203.156.143%204.061.393%203.453.929%205.727%203.667%205.727%207.323%200%201.917-.738%204.179-2.81%205.691%203.06%201.56%204.501%204.025%204.501%206.93Zm-15.634-8.667a62.664%2062.664%200%200%201%202.06-.036c1.703.012%203.239.131%204.608.37%201.441-.549%202.357-1.727%202.357-3.537%200-1.941-.881-3.144-2.488-3.667-.548-.18-1.358-.286-2.322-.286h-4.215v7.156Zm-16.55%203.905-3.715-9.894-6.394%2016.502c2.833-2.595%206.263-4.858%2010.109-6.608Zm27.254%204.74c0-2.775-3.131-4.347-8.513-4.418-.715%200-1.441.011-2.191.047v8.252h5.918c2.548%200%204.786-1.37%204.786-3.882Z'%20clip-rule='evenodd'/%3e%3c/g%3e%3cdefs%3e%3clinearGradient%20id='b'%20x1='51.47'%20x2='85.916'%20y1='62.946'%20y2='62.946'%20gradientUnits='userSpaceOnUse'%3e%3cstop%20stop-color='%23CD9F28'/%3e%3cstop%20offset='1'%20stop-color='%23ECD80B'/%3e%3c/linearGradient%3e%3cclipPath%20id='a'%3e%3cpath%20fill='%23fff'%20d='M51.47%2045.728h186.104V80.14H51.47z'/%3e%3c/clipPath%3e%3c/defs%3e%3c/svg%3e)


More from Hobart


Explore Other Assets


© 2026 MaintainX. All rights reserved.