


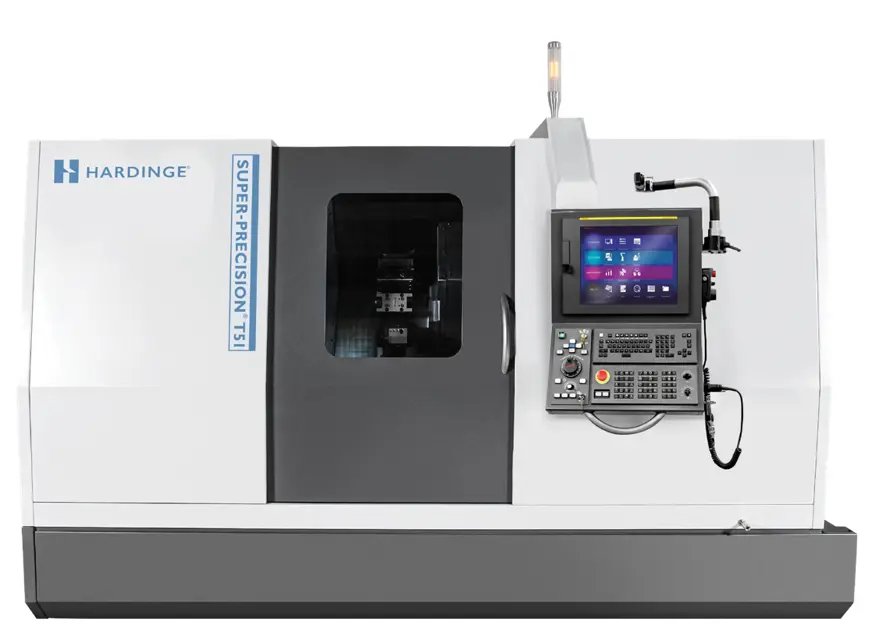
The Hardinge Lathe T-51 is a precision-engineered industrial lathe designed for high-performance machining. Known for its durability and accuracy, this lathe is ideal for various applications in manufacturing and metalworking. Optimize your operations with the T-51's advanced features and reliable performance.
Turn manuals into instant answers
with your AI-powered assistantTurn manuals into instant answers
with your AI-powered assistant
Complete asset maintenance, one click away
Get instant access to all the maintenance information you need. Empower technicians to perform preventive maintenance with asset packages, ready to use right out of the box.

Documents & Manuals
Find all the essential guides in one place.
 Tensioning Guide
- Belt-diagram
- C-120 pulleys
+ 13 more

Work Order Templates
Pre-built workflows to keep your asset running smoothly.
- Daily Electrical System Inspection
- Replace Roller and Pulley
- Install Engine B-120
+ 29 more

Procedures
Integrate maintenance plans directly into your work orders.
- Motion Industries
- Applied Industrial Technologies
- Electrical Brothers
+ 5 more

Parts
Access the parts list for your equipment in MaintainX.
- Drive Motor
- B2 Rollers
- Tensioning System
+ 40 more
Hardinge Lathe T-51
Create an account to install this asset package.
Maintenance Plans for Hardinge Lathe Model T-51
Integrate maintenance plans directly into your work orders in MaintainX.
Spindle Cleaning
Remove access cover at the left end of the machine
Remove the plug(s) from the end of the spindle draw tube(s) if present
Loosen the six draw tube screws completely
Rotate the draw tube nut counterclockwise to disengage the draw tube from the work-holding device
Remove the work-holding device(s) from the spindle(s)
Cover the sub-spindle to protect it from chips while the main spindle is being cleaned if the machine is equipped with the optional sub-spindle
Close the main coolant guard door
Use an air line to blow chips and coolant out of the main spindle from the left end of the machine
Cover the main spindle to protect it from chips while the sub-spindle is being cleaned if the machine is equipped with the optional sub-spindle

Coolant Filter Cleaning
Verify the machine is powered down
Open rear access doors
Wipe filter head and filter housing, clean with a lint-free cloth
Remove the nut on the top of the filter unit to release the filter housing from the filter head
Remove the filter element from the filter body
Allow the coolant in the filter element to drain into the filter housing
Properly dispose of the coolant in the filter housing
Clean the filter element and the inside of the filter housing
Install the filter element in the filter body
Spindle Chiller Cleaning
Verify the machine is powered down
Remove air filter
Remove access cover
Remove the clear shield from terminal strip
Disconnect all wires in conduit from the terminal strip and circuit breaker
Disconnect the conduit from the chiller unit
Disconnect temperature probe wires from the terminal strip
Remove the temperature probe wires from the chiller unit
Replace the clear shield on the terminal strip
1 Year Battery Repalcement
Warning: Only trained personnel should perform this procedure
Last battery replacement date
Will the batteries expire before the machine is put back into service?
If yes, proceed with the following steps
Control battery located behind the control display panel and on top of the control unit
Axis drive batteries located on the drive units in the power case
Upload a photo of the replaced batteries
Sign off on the battery replacement
Air Filter Bowl Cleaning
Power down the machine
Turn the air supply to the machine OFF
Lift the filter bowl sleeve and turn it counterclockwise about one eighth of a turn to release it from the filter head. Do not use excessive force to remove a filter bowl
Pour out contaminants that are present in the filter bowls
Wipe the bowls clean with a lint-free cloth and change the filter if necessary
Mount the bowl by aligning the bowl and sleeve on the head and turning it clockwise about one eighth of a turn to tighten it in place. Pull down on the sleeve to confirm that the bowl is in place
Grasp the sleeve and pull down to verify that the bowl is secure
Turn the air supply to the machine ON
Power up the machine
Parts for Hardinge Lathe T-51
Access the parts list for your equipment in MaintainX.
Battery Pack
18-0011865-05
Grease
TT 0010994NCA
Grease Gun
TT 0010994-01
Control Battery
18-0011865-TB
Battery Pack
18-0011865-05
Grease
TT 0010994NCA
Grease Gun
TT 0010994-01
Control Battery
18-0011865-TB
Battery Pack
18-0011865-05
Grease
TT 0010994NCA
Grease Gun
TT 0010994-01
Control Battery
18-0011865-TB
Unlock efficiency
with MaintainX CoPilot
MaintainX CoPilot is your expert colleague, on call 24/7, helping your team find the answers they need to keep equipment running.
Reduce Unplanned Downtime
Ensure your team follows consistent procedures to minimize equipment failures and costly delays.
Maximize Asset Availability
Keep your assets running longer and more reliably, with standardized maintenance workflows from OEM manuals.
Lower Maintenance Costs
Turn any technician into an expert to streamline operations, maintain more assets, and reduce overall costs.
Thousands of companies manage their assets with MaintainX

'%3e%3cpath%20fill='url(%23b)'%20d='M66.008%2080.068c-5.084-.786-9.763-3.834-12.442-8.68a16.942%2016.942%200%200%201-1.87-5.18c1.096.19%202.203.476%203.298.87%206.525%202.333%2010.836%207.68%2011.014%2012.99ZM51.47%2061.576c.488-5.524%203.62-10.716%208.847-13.597a17.132%2017.132%200%200%201%2011.335-1.882c-.798%208.145-7.43%2014.848-16.038%2015.599-1.417.119-2.799.07-4.144-.12Zm28.564-11.478a17.513%2017.513%200%200%201%203.727%204.62c4.608%208.335%201.584%2018.813-6.75%2023.409a16.988%2016.988%200%200%201-4.359%201.679%2019.624%2019.624%200%200%201-3.977-12.776c.346-7.561%204.942-13.931%2011.36-16.932Z'/%3e%3cpath%20fill='%23110F0D'%20fill-rule='evenodd'%20d='M142.831%2048.324h4.977V77.03h-4.977V48.324Zm27.278%2013.002c.322%201.048.453%202.263.453%203.62v12.073h-4.787V66.208c0-.75-.047-1.572-.154-2.143-.453-2.382-1.822-3.572-4.215-3.572-2.31%200-3.882%201.274-4.43%203.476-.143.596-.226%201.405-.226%202.25v10.8h-4.787V56.623h4.477v2.989c1.536-2.5%203.906-3.43%206.371-3.43%203.488%200%206.263%201.68%207.298%205.144Zm24.636%207.323c0%203.882-2.358%206.525-5.763%207.727-1.298.453-2.632.643-4.62.643h-10.169V48.324h9.085c1.691%200%203.156.143%204.049.38%203.465.93%205.727%203.68%205.727%207.335%200%202.441-.81%204.156-2.762%205.644%202.905%201.417%204.453%203.727%204.453%206.966Zm-15.634-8.656h4.584c1.024%200%201.917-.143%202.536-.417%201.215-.548%201.905-1.608%201.905-3.167%200-1.548-.643-2.572-1.845-3.132-.691-.31-1.762-.452-2.763-.452h-4.417v7.168Zm10.716%208.465c0-1.536-.893-3.37-3.227-3.893-.428-.095-1.036-.143-1.571-.143h-5.918v8.085h5.501c.56%200%201.429-.048%201.953-.167%201.94-.453%203.262-1.846%203.262-3.882Zm47.747-11.847-8.097%2020.408h-4.429l-8.109-20.408h5.191l5.192%2014.574%205.108-14.574h5.144Zm-20.218%2010.002c0%20.69-.036%201.262-.155%201.94h-15.943c.631%202.87%202.714%204.728%205.882%204.728%202.131%200%203.607-.882%204.703-2.525h4.87c-1.762%204.144-5.204%206.692-9.657%206.692-6.084%200-10.537-4.858-10.537-10.49%200-6.108%204.524-10.776%2010.335-10.776%206.239%200%2010.442%204.954%2010.502%2010.43Zm-4.763-1.405c-.333-2.846-2.643-4.858-5.691-4.858-2.894%200-5.287%201.929-5.621%204.858h11.312Zm-72.667%203.44c0%204.787-3.287%208.371-9.419%208.371H119.363V64.66c-1.917.274-3.87.69-5.811%201.238l4.537%2011.121h-5.418l-3.596-9.585c-5.144%202.084-10.085%205.216-14.217%209.585h-4.786L101.8%2048.312h4.56l5.68%2013.883a44.112%2044.112%200%200%201%207.323-1.774V48.312h9.084c1.703%200%203.156.143%204.061.393%203.453.929%205.727%203.667%205.727%207.323%200%201.917-.738%204.179-2.81%205.691%203.06%201.56%204.501%204.025%204.501%206.93Zm-15.634-8.667a62.664%2062.664%200%200%201%202.06-.036c1.703.012%203.239.131%204.608.37%201.441-.549%202.357-1.727%202.357-3.537%200-1.941-.881-3.144-2.488-3.667-.548-.18-1.358-.286-2.322-.286h-4.215v7.156Zm-16.55%203.905-3.715-9.894-6.394%2016.502c2.833-2.595%206.263-4.858%2010.109-6.608Zm27.254%204.74c0-2.775-3.131-4.347-8.513-4.418-.715%200-1.441.011-2.191.047v8.252h5.918c2.548%200%204.786-1.37%204.786-3.882Z'%20clip-rule='evenodd'/%3e%3c/g%3e%3cdefs%3e%3clinearGradient%20id='b'%20x1='51.47'%20x2='85.916'%20y1='62.946'%20y2='62.946'%20gradientUnits='userSpaceOnUse'%3e%3cstop%20stop-color='%23CD9F28'/%3e%3cstop%20offset='1'%20stop-color='%23ECD80B'/%3e%3c/linearGradient%3e%3cclipPath%20id='a'%3e%3cpath%20fill='%23fff'%20d='M51.47%2045.728h186.104V80.14H51.47z'/%3e%3c/clipPath%3e%3c/defs%3e%3c/svg%3e)


More from Hardinge


Explore Other Assets


© 2026 MaintainX. All rights reserved.