


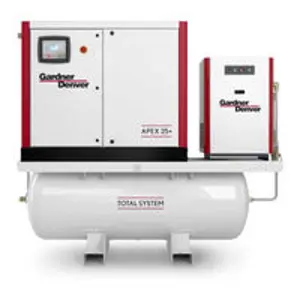
Gardner Denver Compressor APEX25-30A 25HP
Need answers fast?
Explore the manual using AI.

Turn manuals into instant answers
with your AI-powered assistantTurn manuals into instant answers
with your AI-powered assistant
Manual for Gardner Denver Compressor APEX25-30A 25HP
Complete asset maintenance, one click away
Get instant access to all the maintenance information you need. Empower technicians to perform preventive maintenance with asset packages, ready to use right out of the box.

Documents & Manuals
Find all the essential guides in one place.
 Tensioning Guide
- Belt-diagram
- C-120 pulleys
+ 13 more

Work Order Templates
Pre-built workflows to keep your asset running smoothly.
- Daily Electrical System Inspection
- Replace Roller and Pulley
- Install Engine B-120
+ 29 more

Procedures
Integrate maintenance plans directly into your work orders.
- Motion Industries
- Applied Industrial Technologies
- Electrical Brothers
+ 5 more

Parts
Access the parts list for your equipment in MaintainX.
- Drive Motor
- B2 Rollers
- Tensioning System
+ 40 more
Gardner Denver Compressor APEX25-30A 25HP
Create an account to install this asset package.
Maintenance Plans for Gardner Denver Compressor Model APEX25-30A 25HP
Integrate maintenance plans directly into your work orders in MaintainX.
Motor Lubrication
Warning: Always disconnect, lockout and tagout power supply to the compressor package before starting.
Are the spring loaded covers of the automatic grease relief fittings operational?
Locate the grease fittings provided at each motor top end.
Did you wipe each grease fitting clean?
Did you add grease with a hand-operated grease gun until excess grease starts draining from the companion grease relief fitting?
Make sure that the grease volume does not exceed the motor manufacturer’s recommendation by a factor of approximately 2X.
Did you wipe off excess grease expelled by the automatic grease relief fittings?
Re-start the unit.
Sign off on the motor lubrication

Filter Element Inspection
Loosen latches fastening end cover to the filter housing
Remove the end cover
Remove the air filter element
Visually inspect the filter element for flaws
Check the filter element for contamination
Check the vacuum sensor reading
Insert the element into the air filter housing
Replace the air filter housing cover in place
Engage the latches
Filter Maintenance
Remove the intake air grill panel from the package by first removing the top-located screws and washers.
Remove the vfd filter by sliding out sideways through the provided slot.
If fouling is evident, cleanse the filter media gently with water – do not remove from the aluminum frame. Replace the filter media if media is heavily fouled or ruptured.
Replace the filter and the intake air grill panel in the reverse order.
Sign off on the filter maintenance
8 Hourly Compressor Maintenance
Reservoir oil level
Unit loads and unloads properly?
Discharge pressure
Discharge temperature
Control panel display advisory text messages
Sign off on the 8 hourly compressor maintenance
1 Yearly Compressor Maintenance
DANGER: Before inspecting the pressure relief valve, release air pressure, lockout and tagout the power supply to the compressor package. Failure to release pressure or properly disconnect the power may result in personal injury or death.
CAUTION: Never paint, lubricate or alter a relief valve. Do not plug vent or restrict.
DANGER: Operation of the unit with improper relief valve setting can result in severe personal injury or machine damage. Ensure properly set valves are installed and maintained.
Pressure Relief Valve Check During Operation - The pressure relief valve has no user-serviceable or repairable components. However, it should be tested for proper operation at least once every year. To test the pressure relief valve: · Raise the system operating pressure to its normal level. · Pull the stem ring to open valve and let it vent for a few seconds. · Release the stem ring to close the valve.
Change oil separator, see “Removal of Oil Separator for Inspection or Replacement”, Section 5, page 53 for further details (or when 8 psid pressure differential across the element).
OIL FILTER, AIR/OIL SEPARATOR ELEMENT or OIL SCAVENGE RETURN ORIFICE INSPECTION PROCEDURE:
Remove the spin-on element.
Clean the gasket seating surface of the head.
Inspect the element internals by shinning a light unto the media surface. If signs of contamination (dirt, rust, varnish, etc.) or damage is evident, replace the element.
Unlock efficiency
with MaintainX CoPilot
MaintainX CoPilot is your expert colleague, on call 24/7, helping your team find the answers they need to keep equipment running.
Reduce Unplanned Downtime
Ensure your team follows consistent procedures to minimize equipment failures and costly delays.
Maximize Asset Availability
Keep your assets running longer and more reliably, with standardized maintenance workflows from OEM manuals.
Lower Maintenance Costs
Turn any technician into an expert to streamline operations, maintain more assets, and reduce overall costs.
Thousands of companies manage their assets with MaintainX

'%3e%3cpath%20fill='url(%23b)'%20d='M66.008%2080.068c-5.084-.786-9.763-3.834-12.442-8.68a16.942%2016.942%200%200%201-1.87-5.18c1.096.19%202.203.476%203.298.87%206.525%202.333%2010.836%207.68%2011.014%2012.99ZM51.47%2061.576c.488-5.524%203.62-10.716%208.847-13.597a17.132%2017.132%200%200%201%2011.335-1.882c-.798%208.145-7.43%2014.848-16.038%2015.599-1.417.119-2.799.07-4.144-.12Zm28.564-11.478a17.513%2017.513%200%200%201%203.727%204.62c4.608%208.335%201.584%2018.813-6.75%2023.409a16.988%2016.988%200%200%201-4.359%201.679%2019.624%2019.624%200%200%201-3.977-12.776c.346-7.561%204.942-13.931%2011.36-16.932Z'/%3e%3cpath%20fill='%23110F0D'%20fill-rule='evenodd'%20d='M142.831%2048.324h4.977V77.03h-4.977V48.324Zm27.278%2013.002c.322%201.048.453%202.263.453%203.62v12.073h-4.787V66.208c0-.75-.047-1.572-.154-2.143-.453-2.382-1.822-3.572-4.215-3.572-2.31%200-3.882%201.274-4.43%203.476-.143.596-.226%201.405-.226%202.25v10.8h-4.787V56.623h4.477v2.989c1.536-2.5%203.906-3.43%206.371-3.43%203.488%200%206.263%201.68%207.298%205.144Zm24.636%207.323c0%203.882-2.358%206.525-5.763%207.727-1.298.453-2.632.643-4.62.643h-10.169V48.324h9.085c1.691%200%203.156.143%204.049.38%203.465.93%205.727%203.68%205.727%207.335%200%202.441-.81%204.156-2.762%205.644%202.905%201.417%204.453%203.727%204.453%206.966Zm-15.634-8.656h4.584c1.024%200%201.917-.143%202.536-.417%201.215-.548%201.905-1.608%201.905-3.167%200-1.548-.643-2.572-1.845-3.132-.691-.31-1.762-.452-2.763-.452h-4.417v7.168Zm10.716%208.465c0-1.536-.893-3.37-3.227-3.893-.428-.095-1.036-.143-1.571-.143h-5.918v8.085h5.501c.56%200%201.429-.048%201.953-.167%201.94-.453%203.262-1.846%203.262-3.882Zm47.747-11.847-8.097%2020.408h-4.429l-8.109-20.408h5.191l5.192%2014.574%205.108-14.574h5.144Zm-20.218%2010.002c0%20.69-.036%201.262-.155%201.94h-15.943c.631%202.87%202.714%204.728%205.882%204.728%202.131%200%203.607-.882%204.703-2.525h4.87c-1.762%204.144-5.204%206.692-9.657%206.692-6.084%200-10.537-4.858-10.537-10.49%200-6.108%204.524-10.776%2010.335-10.776%206.239%200%2010.442%204.954%2010.502%2010.43Zm-4.763-1.405c-.333-2.846-2.643-4.858-5.691-4.858-2.894%200-5.287%201.929-5.621%204.858h11.312Zm-72.667%203.44c0%204.787-3.287%208.371-9.419%208.371H119.363V64.66c-1.917.274-3.87.69-5.811%201.238l4.537%2011.121h-5.418l-3.596-9.585c-5.144%202.084-10.085%205.216-14.217%209.585h-4.786L101.8%2048.312h4.56l5.68%2013.883a44.112%2044.112%200%200%201%207.323-1.774V48.312h9.084c1.703%200%203.156.143%204.061.393%203.453.929%205.727%203.667%205.727%207.323%200%201.917-.738%204.179-2.81%205.691%203.06%201.56%204.501%204.025%204.501%206.93Zm-15.634-8.667a62.664%2062.664%200%200%201%202.06-.036c1.703.012%203.239.131%204.608.37%201.441-.549%202.357-1.727%202.357-3.537%200-1.941-.881-3.144-2.488-3.667-.548-.18-1.358-.286-2.322-.286h-4.215v7.156Zm-16.55%203.905-3.715-9.894-6.394%2016.502c2.833-2.595%206.263-4.858%2010.109-6.608Zm27.254%204.74c0-2.775-3.131-4.347-8.513-4.418-.715%200-1.441.011-2.191.047v8.252h5.918c2.548%200%204.786-1.37%204.786-3.882Z'%20clip-rule='evenodd'/%3e%3c/g%3e%3cdefs%3e%3clinearGradient%20id='b'%20x1='51.47'%20x2='85.916'%20y1='62.946'%20y2='62.946'%20gradientUnits='userSpaceOnUse'%3e%3cstop%20stop-color='%23CD9F28'/%3e%3cstop%20offset='1'%20stop-color='%23ECD80B'/%3e%3c/linearGradient%3e%3cclipPath%20id='a'%3e%3cpath%20fill='%23fff'%20d='M51.47%2045.728h186.104V80.14H51.47z'/%3e%3c/clipPath%3e%3c/defs%3e%3c/svg%3e)


More from Gardner Denver


Explore Other Assets


© 2026 MaintainX. All rights reserved.