


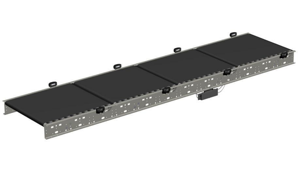
Dematic Slat Sorter 2430
Need answers fast?
Explore the manual using AI.
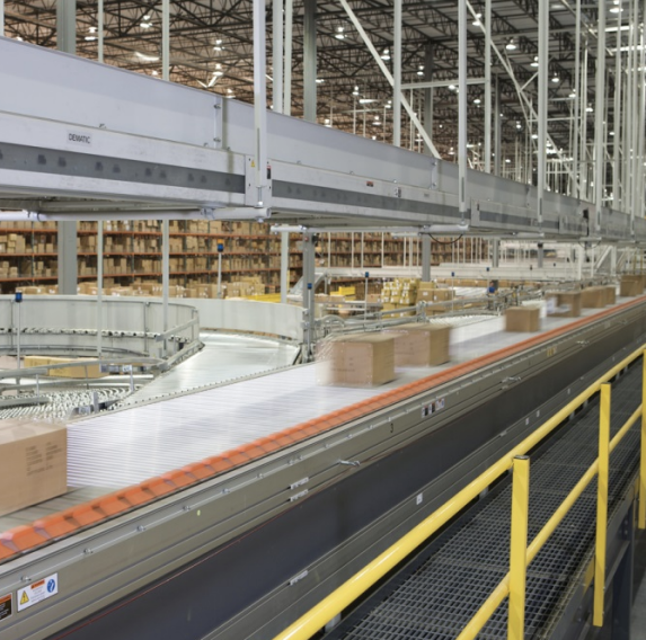
The Dematic Slat Sorter 2430 is a high-performance sorting solution designed for efficient material handling in industrial environments. Known for its reliability and precision, this sorter optimizes workflow and enhances productivity, making it an essential asset for modern logistics operations.
Turn manuals into instant answers
with your AI-powered assistantTurn manuals into instant answers
with your AI-powered assistant
Manual for Dematic Slat Sorter 2430
Complete asset maintenance, one click away
Get instant access to all the maintenance information you need. Empower technicians to perform preventive maintenance with asset packages, ready to use right out of the box.

Documents & Manuals
Find all the essential guides in one place.
 Tensioning Guide
- Belt-diagram
- C-120 pulleys
+ 13 more

Work Order Templates
Pre-built workflows to keep your asset running smoothly.
- Daily Electrical System Inspection
- Replace Roller and Pulley
- Install Engine B-120
+ 29 more

Procedures
Integrate maintenance plans directly into your work orders.
- Motion Industries
- Applied Industrial Technologies
- Electrical Brothers
+ 5 more

Parts
Access the parts list for your equipment in MaintainX.
- Drive Motor
- B2 Rollers
- Tensioning System
+ 40 more
Dematic Slat Sorter 2430
Create an account to install this asset package.
Maintenance Plans for Dematic Slat Sorter Model 2430
Integrate maintenance plans directly into your work orders in MaintainX.
400 Hourly Photoeyes and Reflector Cleaning
Inspect the photoeyes and reflectors for cleanliness
Clean photoeyes and reflectors with a soft cloth, mild soap, and water
Dry photoeyes and reflectors with a soft cloth after cleaning
Sign off on the cleaning procedure

1200 Hourly Electrostatic Discharge Brush Cleaning
Three slats removed from the sorter to create a maintenance window on the charge bed
Dried, loose debris removed from the ESD brush with compressed air
Sticky, clotted debris removed
Brush assembly position marked on its bracket
Brush removed from its bracket
Brush thoroughly cleaned using water and dish detergent
Brush thoroughly dried and replaced on the bracket
Slats replaced
Sign off on the brush cleaning
4800 Hourly Slat Sorter Maintenance
Inspect the switch gate for wear. If damaged, replace the MDS with a spare and then replace the gate and bumpers
Check that switch gate moves freely. If not, check that the screws holding the bumpers are not tight
Inspect the the foam bumpers for damage. If the finger extending from one bumper is missing or torn, replace the bumpers
Inspect the crescent plate assemblies for damage and wear
Check the discharge take-up assembly for freedom of movement
Replace gas springs every 3 Years
Sign off on the 4800 Hourly Slat Sorter Maintenance
1200 Hourly Slat Replacement
Warning: Ensure the machine is turned off and locked out before starting the procedure
Slat placed onto the carrier wheel chain correctly
Slat pins depressed using the slat removal tool
Slat pushed down until the pins are engaged behind the link plate
Slat pulled towards the link until the pins snap into the link plate holes
Pry bar used between the chain link and the cap angle if necessary
Pins on the other end of the slat depressed and snapped into the holes
Procedure repeated for each removed slat
Sign off on the slat replacement
400 Hourly Gas Spring Tension Check
Warning: This check requires trained personnel with PPE!
Can the discharge end be pushed easily towards the charge end?
Enter the distance the discharge end moved in mm
Did the discharge end move more than 20 mm?
Has the discharge end movement changed significantly from the last PM check?
Does the discharge end require replacement?
Sign off on the gas spring tension check
Parts for Dematic Slat Sorter 2430
Access the parts list for your equipment in MaintainX.
Lim Gap Tool
K0301-7006A
Sensor Calibration Flag
K0318-6001A
Frame Gapping Plate
K0318-5701A
Slat Timing Tool
K0318-5401A
Lim Height Tool
K0301-7001A
Lim Gap Tool
K0301-7006A
Sensor Calibration Flag
K0318-6001A
Frame Gapping Plate
K0318-5701A
Slat Timing Tool
K0318-5401A
Lim Height Tool
K0301-7001A
Lim Gap Tool
K0301-7006A
Sensor Calibration Flag
K0318-6001A
Frame Gapping Plate
K0318-5701A
Slat Timing Tool
K0318-5401A
Lim Height Tool
K0301-7001A
Unlock efficiency
with MaintainX CoPilot
MaintainX CoPilot is your expert colleague, on call 24/7, helping your team find the answers they need to keep equipment running.
Reduce Unplanned Downtime
Ensure your team follows consistent procedures to minimize equipment failures and costly delays.
Maximize Asset Availability
Keep your assets running longer and more reliably, with standardized maintenance workflows from OEM manuals.
Lower Maintenance Costs
Turn any technician into an expert to streamline operations, maintain more assets, and reduce overall costs.
Thousands of companies manage their assets with MaintainX

'%3e%3cpath%20fill='url(%23b)'%20d='M66.008%2080.068c-5.084-.786-9.763-3.834-12.442-8.68a16.942%2016.942%200%200%201-1.87-5.18c1.096.19%202.203.476%203.298.87%206.525%202.333%2010.836%207.68%2011.014%2012.99ZM51.47%2061.576c.488-5.524%203.62-10.716%208.847-13.597a17.132%2017.132%200%200%201%2011.335-1.882c-.798%208.145-7.43%2014.848-16.038%2015.599-1.417.119-2.799.07-4.144-.12Zm28.564-11.478a17.513%2017.513%200%200%201%203.727%204.62c4.608%208.335%201.584%2018.813-6.75%2023.409a16.988%2016.988%200%200%201-4.359%201.679%2019.624%2019.624%200%200%201-3.977-12.776c.346-7.561%204.942-13.931%2011.36-16.932Z'/%3e%3cpath%20fill='%23110F0D'%20fill-rule='evenodd'%20d='M142.831%2048.324h4.977V77.03h-4.977V48.324Zm27.278%2013.002c.322%201.048.453%202.263.453%203.62v12.073h-4.787V66.208c0-.75-.047-1.572-.154-2.143-.453-2.382-1.822-3.572-4.215-3.572-2.31%200-3.882%201.274-4.43%203.476-.143.596-.226%201.405-.226%202.25v10.8h-4.787V56.623h4.477v2.989c1.536-2.5%203.906-3.43%206.371-3.43%203.488%200%206.263%201.68%207.298%205.144Zm24.636%207.323c0%203.882-2.358%206.525-5.763%207.727-1.298.453-2.632.643-4.62.643h-10.169V48.324h9.085c1.691%200%203.156.143%204.049.38%203.465.93%205.727%203.68%205.727%207.335%200%202.441-.81%204.156-2.762%205.644%202.905%201.417%204.453%203.727%204.453%206.966Zm-15.634-8.656h4.584c1.024%200%201.917-.143%202.536-.417%201.215-.548%201.905-1.608%201.905-3.167%200-1.548-.643-2.572-1.845-3.132-.691-.31-1.762-.452-2.763-.452h-4.417v7.168Zm10.716%208.465c0-1.536-.893-3.37-3.227-3.893-.428-.095-1.036-.143-1.571-.143h-5.918v8.085h5.501c.56%200%201.429-.048%201.953-.167%201.94-.453%203.262-1.846%203.262-3.882Zm47.747-11.847-8.097%2020.408h-4.429l-8.109-20.408h5.191l5.192%2014.574%205.108-14.574h5.144Zm-20.218%2010.002c0%20.69-.036%201.262-.155%201.94h-15.943c.631%202.87%202.714%204.728%205.882%204.728%202.131%200%203.607-.882%204.703-2.525h4.87c-1.762%204.144-5.204%206.692-9.657%206.692-6.084%200-10.537-4.858-10.537-10.49%200-6.108%204.524-10.776%2010.335-10.776%206.239%200%2010.442%204.954%2010.502%2010.43Zm-4.763-1.405c-.333-2.846-2.643-4.858-5.691-4.858-2.894%200-5.287%201.929-5.621%204.858h11.312Zm-72.667%203.44c0%204.787-3.287%208.371-9.419%208.371H119.363V64.66c-1.917.274-3.87.69-5.811%201.238l4.537%2011.121h-5.418l-3.596-9.585c-5.144%202.084-10.085%205.216-14.217%209.585h-4.786L101.8%2048.312h4.56l5.68%2013.883a44.112%2044.112%200%200%201%207.323-1.774V48.312h9.084c1.703%200%203.156.143%204.061.393%203.453.929%205.727%203.667%205.727%207.323%200%201.917-.738%204.179-2.81%205.691%203.06%201.56%204.501%204.025%204.501%206.93Zm-15.634-8.667a62.664%2062.664%200%200%201%202.06-.036c1.703.012%203.239.131%204.608.37%201.441-.549%202.357-1.727%202.357-3.537%200-1.941-.881-3.144-2.488-3.667-.548-.18-1.358-.286-2.322-.286h-4.215v7.156Zm-16.55%203.905-3.715-9.894-6.394%2016.502c2.833-2.595%206.263-4.858%2010.109-6.608Zm27.254%204.74c0-2.775-3.131-4.347-8.513-4.418-.715%200-1.441.011-2.191.047v8.252h5.918c2.548%200%204.786-1.37%204.786-3.882Z'%20clip-rule='evenodd'/%3e%3c/g%3e%3cdefs%3e%3clinearGradient%20id='b'%20x1='51.47'%20x2='85.916'%20y1='62.946'%20y2='62.946'%20gradientUnits='userSpaceOnUse'%3e%3cstop%20stop-color='%23CD9F28'/%3e%3cstop%20offset='1'%20stop-color='%23ECD80B'/%3e%3c/linearGradient%3e%3cclipPath%20id='a'%3e%3cpath%20fill='%23fff'%20d='M51.47%2045.728h186.104V80.14H51.47z'/%3e%3c/clipPath%3e%3c/defs%3e%3c/svg%3e)


More from Dematic


Explore Other Assets


© 2026 MaintainX. All rights reserved.