


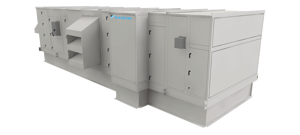
Daikin Air Handling Unit OAH021GHAM
Need answers fast?
Explore the manual using AI.

Turn manuals into instant answers
with your AI-powered assistantTurn manuals into instant answers
with your AI-powered assistant
Manual for Daikin Air Handling Unit OAH021GHAM
Complete asset maintenance, one click away
Get instant access to all the maintenance information you need. Empower technicians to perform preventive maintenance with asset packages, ready to use right out of the box.

Documents & Manuals
Find all the essential guides in one place.
 Tensioning Guide
- Belt-diagram
- C-120 pulleys
+ 13 more

Work Order Templates
Pre-built workflows to keep your asset running smoothly.
- Daily Electrical System Inspection
- Replace Roller and Pulley
- Install Engine B-120
+ 29 more

Procedures
Integrate maintenance plans directly into your work orders.
- Motion Industries
- Applied Industrial Technologies
- Electrical Brothers
+ 5 more

Parts
Access the parts list for your equipment in MaintainX.
- Drive Motor
- B2 Rollers
- Tensioning System
+ 40 more
Daikin Air Handling Unit OAH021GHAM
Create an account to install this asset package.
Maintenance Plans for Daikin Air Handling Unit Model OAH021GHAM
Integrate maintenance plans directly into your work orders in MaintainX.
Fan Drive Belt Adjustment
WARNING: Moving belt and fan can cause severe personal injury or death. Always ensure safety measures are in place.
During installation and filter maintenance: Verify that the belt and fan guards on plenum fan units are always in place. Lock and tag out fans to prevent accidental start up. Do not enter the filter compartment until the fan is completely stopped. Use approved equipment for reaching filters located above normal reach. Do not step on filter frames or unit components. Floor surfaces must be dry and free of oil or grease.
General Rules of Tensioning: The ideal tension is the lowest tension at which the belt does not slip under peak load conditions. Check tension frequently during the first 24 to 48 hours of operation. Over tensioning shortens belt and bearing life. Keep belts free from foreign material that can cause slippage. Inspect V-drive on a periodic basis.
Is the belt slipping?
Do not apply belt dressing. This can damage the belt and cause early failure.
Tension Measurement Procedure: Measure the belt span. See Figure 105. Place belt tension checker squarely on one belt at the center of the belt span. Apply force to the checker, perpendicular to the belt span, until the belt deflection equals belt span distance divided by 64. Determine the force applied while in this position.
Enter the force applied to the belt
Compare this force to the values in Table 47.
Sign off on the Fan Drive Belt Adjustment

Front Load Filter Change
Warning: Ensure the unit is turned off before starting the procedure
Filters removed from inside the unit
Wire clips rotated
Prefilter and final filter released
Clean filters installed
Filters fully seated in the frame
Sign off on the filter change
Drain Pans Cleaning
Warning: Cleaning should be performed by qualified personnel
Is the drain pan clean?
Upload a photo of the drain pan before cleaning
Is there any algae or bacteria growth?
Upload a photo of the drain pan after cleaning
Sign off on the drain pans cleaning
1 Yearly Electrical System Check
Annually check and snug all electrical connections
Inspect for signs of water damage such as corrosion and repair if necessary
Check ground conductor and connection integrity
Service if needed;
48 Hours Air Handling Unit Check
Warning: Disconnect and lock electrical power source before starting the procedure
Check tightness of all bearing, wheel, and sheave setscrews (or capscrews)
Refer to Table 28 on page 42 for more details
Recheck belt tension and adjust if necessary
Belts that are tensioned sufficiently to slip one to two seconds at startup perform satisfactorily, extending life and reducing vibration
If re-tensioning is necessary, be certain to retain sheave alignment
Sign off on the 48 Hours Air Handling Unit Check
Parts for Daikin Air Handling Unit OAH021GHAM
Access the parts list for your equipment in MaintainX.
High Voltage Harness, 30 Foot Long, One Required Per Fan
910232406
Block-Off Plate, Fan Size 355, All kW
910198700
Block-Off Plate, Fan Size 450, All kW
910198701
Block-Off Plate, Fan Size 560, All kW
910311272
Block-Off Plate, Fan Size 630, 5.9 kW; 6.3 kW
910311272
High Voltage Harness, 30 Foot Long, One Required Per Fan
910232406
Block-Off Plate, Fan Size 355, All kW
910198700
Block-Off Plate, Fan Size 450, All kW
910198701
Block-Off Plate, Fan Size 560, All kW
910311272
Block-Off Plate, Fan Size 630, 5.9 kW; 6.3 kW
910311272
High Voltage Harness, 30 Foot Long, One Required Per Fan
910232406
Block-Off Plate, Fan Size 355, All kW
910198700
Block-Off Plate, Fan Size 450, All kW
910198701
Block-Off Plate, Fan Size 560, All kW
910311272
Block-Off Plate, Fan Size 630, 5.9 kW; 6.3 kW
910311272
Unlock efficiency
with MaintainX CoPilot
MaintainX CoPilot is your expert colleague, on call 24/7, helping your team find the answers they need to keep equipment running.
Reduce Unplanned Downtime
Ensure your team follows consistent procedures to minimize equipment failures and costly delays.
Maximize Asset Availability
Keep your assets running longer and more reliably, with standardized maintenance workflows from OEM manuals.
Lower Maintenance Costs
Turn any technician into an expert to streamline operations, maintain more assets, and reduce overall costs.
Thousands of companies manage their assets with MaintainX

'%3e%3cpath%20fill='url(%23b)'%20d='M66.008%2080.068c-5.084-.786-9.763-3.834-12.442-8.68a16.942%2016.942%200%200%201-1.87-5.18c1.096.19%202.203.476%203.298.87%206.525%202.333%2010.836%207.68%2011.014%2012.99ZM51.47%2061.576c.488-5.524%203.62-10.716%208.847-13.597a17.132%2017.132%200%200%201%2011.335-1.882c-.798%208.145-7.43%2014.848-16.038%2015.599-1.417.119-2.799.07-4.144-.12Zm28.564-11.478a17.513%2017.513%200%200%201%203.727%204.62c4.608%208.335%201.584%2018.813-6.75%2023.409a16.988%2016.988%200%200%201-4.359%201.679%2019.624%2019.624%200%200%201-3.977-12.776c.346-7.561%204.942-13.931%2011.36-16.932Z'/%3e%3cpath%20fill='%23110F0D'%20fill-rule='evenodd'%20d='M142.831%2048.324h4.977V77.03h-4.977V48.324Zm27.278%2013.002c.322%201.048.453%202.263.453%203.62v12.073h-4.787V66.208c0-.75-.047-1.572-.154-2.143-.453-2.382-1.822-3.572-4.215-3.572-2.31%200-3.882%201.274-4.43%203.476-.143.596-.226%201.405-.226%202.25v10.8h-4.787V56.623h4.477v2.989c1.536-2.5%203.906-3.43%206.371-3.43%203.488%200%206.263%201.68%207.298%205.144Zm24.636%207.323c0%203.882-2.358%206.525-5.763%207.727-1.298.453-2.632.643-4.62.643h-10.169V48.324h9.085c1.691%200%203.156.143%204.049.38%203.465.93%205.727%203.68%205.727%207.335%200%202.441-.81%204.156-2.762%205.644%202.905%201.417%204.453%203.727%204.453%206.966Zm-15.634-8.656h4.584c1.024%200%201.917-.143%202.536-.417%201.215-.548%201.905-1.608%201.905-3.167%200-1.548-.643-2.572-1.845-3.132-.691-.31-1.762-.452-2.763-.452h-4.417v7.168Zm10.716%208.465c0-1.536-.893-3.37-3.227-3.893-.428-.095-1.036-.143-1.571-.143h-5.918v8.085h5.501c.56%200%201.429-.048%201.953-.167%201.94-.453%203.262-1.846%203.262-3.882Zm47.747-11.847-8.097%2020.408h-4.429l-8.109-20.408h5.191l5.192%2014.574%205.108-14.574h5.144Zm-20.218%2010.002c0%20.69-.036%201.262-.155%201.94h-15.943c.631%202.87%202.714%204.728%205.882%204.728%202.131%200%203.607-.882%204.703-2.525h4.87c-1.762%204.144-5.204%206.692-9.657%206.692-6.084%200-10.537-4.858-10.537-10.49%200-6.108%204.524-10.776%2010.335-10.776%206.239%200%2010.442%204.954%2010.502%2010.43Zm-4.763-1.405c-.333-2.846-2.643-4.858-5.691-4.858-2.894%200-5.287%201.929-5.621%204.858h11.312Zm-72.667%203.44c0%204.787-3.287%208.371-9.419%208.371H119.363V64.66c-1.917.274-3.87.69-5.811%201.238l4.537%2011.121h-5.418l-3.596-9.585c-5.144%202.084-10.085%205.216-14.217%209.585h-4.786L101.8%2048.312h4.56l5.68%2013.883a44.112%2044.112%200%200%201%207.323-1.774V48.312h9.084c1.703%200%203.156.143%204.061.393%203.453.929%205.727%203.667%205.727%207.323%200%201.917-.738%204.179-2.81%205.691%203.06%201.56%204.501%204.025%204.501%206.93Zm-15.634-8.667a62.664%2062.664%200%200%201%202.06-.036c1.703.012%203.239.131%204.608.37%201.441-.549%202.357-1.727%202.357-3.537%200-1.941-.881-3.144-2.488-3.667-.548-.18-1.358-.286-2.322-.286h-4.215v7.156Zm-16.55%203.905-3.715-9.894-6.394%2016.502c2.833-2.595%206.263-4.858%2010.109-6.608Zm27.254%204.74c0-2.775-3.131-4.347-8.513-4.418-.715%200-1.441.011-2.191.047v8.252h5.918c2.548%200%204.786-1.37%204.786-3.882Z'%20clip-rule='evenodd'/%3e%3c/g%3e%3cdefs%3e%3clinearGradient%20id='b'%20x1='51.47'%20x2='85.916'%20y1='62.946'%20y2='62.946'%20gradientUnits='userSpaceOnUse'%3e%3cstop%20stop-color='%23CD9F28'/%3e%3cstop%20offset='1'%20stop-color='%23ECD80B'/%3e%3c/linearGradient%3e%3cclipPath%20id='a'%3e%3cpath%20fill='%23fff'%20d='M51.47%2045.728h186.104V80.14H51.47z'/%3e%3c/clipPath%3e%3c/defs%3e%3c/svg%3e)


More from Daikin


Explore Other Assets


© 2026 MaintainX. All rights reserved.