


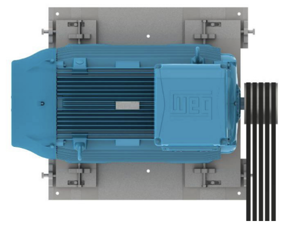
WEG Electric Motor W21Xtb 132S
Need answers fast?
Explore the manual using AI.

Turn manuals into instant answers
with your AI-powered assistantTurn manuals into instant answers
with your AI-powered assistant
Manual for WEG Electric Motor W21Xtb 132S
Complete asset maintenance, one click away
Get instant access to all the maintenance information you need. Empower technicians to perform preventive maintenance with asset packages, ready to use right out of the box.

Documents & Manuals
Find all the essential guides in one place.
 Tensioning Guide
- Belt-diagram
- C-120 pulleys
+ 13 more

Work Order Templates
Pre-built workflows to keep your asset running smoothly.
- Daily Electrical System Inspection
- Replace Roller and Pulley
- Install Engine B-120
+ 29 more

Procedures
Integrate maintenance plans directly into your work orders.
- Motion Industries
- Applied Industrial Technologies
- Electrical Brothers
+ 5 more

Parts
Access the parts list for your equipment in MaintainX.
- Drive Motor
- B2 Rollers
- Tensioning System
+ 40 more
WEG Electric Motor W21Xtb 132S
Create an account to install this asset package.
Maintenance Plans for WEG Electric Motor Model W21Xtb 132S
Integrate maintenance plans directly into your work orders in MaintainX.
Motor Maintenance
Warning: All repair services on motors for use in hazardous areas must be performed by qualified personnel and in accordance with applicable laws and regulations.
Motor disconnected from the power supply and is completely stopped?
Motor terminals inside the terminal box free of dangerous voltages?
Motor surface cooled to ambient temperature before opening the terminal box or disassembling the motor?
Upload a photo of installation conditions such as terminal connection diagram and alignment or leveling conditions before starting disassembly.
Motor disassembled without scratching machined surfaces or damaging threads?
Motor assembled on a flat surface ensuring a stable support base?
Footless motors fixed or locked on the base to prevent accidents?
Insulated components such as windings, insulated rolling bearings and power cables handled carefully to avoid damage?

Insulation Resistance Measurement
Warning: This procedure requires trained personnel with PPE!
The machine must be in a cold state and disconnected from the power supply.
The insulation resistance must be measured in a safe environment.
Is the machine in a cold state and disconnected from the power supply?
Is the environment safe for insulation resistance measurement?
It is recommended to insulate and test each phase separately.
Is each phase insulated and tested separately?
During the test of one phase, the other phases must be grounded.
Are the other phases grounded during the test of one phase?
Stator Winding Insulation Drying
Warning: This procedure requires trained personnel with PPE!
Motor dismantled completely
End shields, rotor with shaft, fan cover, fan and terminal box removed
Wound stator with frame transferred to oven for drying process
Wound stator placed in oven heated to max. 120 °C for two hours
Stator allowed to cool to room temperature after drying process
Measure the insulation resistance
Stator drying process repeated if required insulation resistance does not meet specified values
Causes of insulation resistance drop evaluated if insulation resistance does not improve despite several drying processes
20000 Hourly Motor Lubrication
Warning: This procedure requires trained personnel with PPE!
Relubricate bearings every 20000 running hours
Choose the frame size
Add grease (4g for frame size 90, 11g for frame size 132)
Lubrication procedures must be carried out according to the type of lubricant (oil or grease)
When the motor is fitted with thermal protection devices for bearing temperature control, consider the operating temperature limits shown in Table 6.6
The grease and oil disposal should be made in compliance with applicable laws in each country
Please contact WEG when motors are to be installed in special environments or used for special applications
Excess grease causes bearing overheating, resulting in bearing failure
Motor Inspection
Visual inspection of the motor and coupling
Check for abnormal noises, vibrations, excessive heating, wear signs, misalignment or damaged parts
List of damaged parts to be replaced
Insulation resistance measurement
Motor enclosure cleaned
Oil spills and dust accumulation removed from the motor frame surface
Motors with potential risk for electrostatic charge accumulation cleaned with a damp cloth
Cooling fan condition checked and air inlet & outlet openings cleaned
Seals condition checked and replaced if required
Unlock efficiency
with MaintainX CoPilot
MaintainX CoPilot is your expert colleague, on call 24/7, helping your team find the answers they need to keep equipment running.
Reduce Unplanned Downtime
Ensure your team follows consistent procedures to minimize equipment failures and costly delays.
Maximize Asset Availability
Keep your assets running longer and more reliably, with standardized maintenance workflows from OEM manuals.
Lower Maintenance Costs
Turn any technician into an expert to streamline operations, maintain more assets, and reduce overall costs.
Thousands of companies manage their assets with MaintainX

'%3e%3cpath%20fill='url(%23b)'%20d='M66.008%2080.068c-5.084-.786-9.763-3.834-12.442-8.68a16.942%2016.942%200%200%201-1.87-5.18c1.096.19%202.203.476%203.298.87%206.525%202.333%2010.836%207.68%2011.014%2012.99ZM51.47%2061.576c.488-5.524%203.62-10.716%208.847-13.597a17.132%2017.132%200%200%201%2011.335-1.882c-.798%208.145-7.43%2014.848-16.038%2015.599-1.417.119-2.799.07-4.144-.12Zm28.564-11.478a17.513%2017.513%200%200%201%203.727%204.62c4.608%208.335%201.584%2018.813-6.75%2023.409a16.988%2016.988%200%200%201-4.359%201.679%2019.624%2019.624%200%200%201-3.977-12.776c.346-7.561%204.942-13.931%2011.36-16.932Z'/%3e%3cpath%20fill='%23110F0D'%20fill-rule='evenodd'%20d='M142.831%2048.324h4.977V77.03h-4.977V48.324Zm27.278%2013.002c.322%201.048.453%202.263.453%203.62v12.073h-4.787V66.208c0-.75-.047-1.572-.154-2.143-.453-2.382-1.822-3.572-4.215-3.572-2.31%200-3.882%201.274-4.43%203.476-.143.596-.226%201.405-.226%202.25v10.8h-4.787V56.623h4.477v2.989c1.536-2.5%203.906-3.43%206.371-3.43%203.488%200%206.263%201.68%207.298%205.144Zm24.636%207.323c0%203.882-2.358%206.525-5.763%207.727-1.298.453-2.632.643-4.62.643h-10.169V48.324h9.085c1.691%200%203.156.143%204.049.38%203.465.93%205.727%203.68%205.727%207.335%200%202.441-.81%204.156-2.762%205.644%202.905%201.417%204.453%203.727%204.453%206.966Zm-15.634-8.656h4.584c1.024%200%201.917-.143%202.536-.417%201.215-.548%201.905-1.608%201.905-3.167%200-1.548-.643-2.572-1.845-3.132-.691-.31-1.762-.452-2.763-.452h-4.417v7.168Zm10.716%208.465c0-1.536-.893-3.37-3.227-3.893-.428-.095-1.036-.143-1.571-.143h-5.918v8.085h5.501c.56%200%201.429-.048%201.953-.167%201.94-.453%203.262-1.846%203.262-3.882Zm47.747-11.847-8.097%2020.408h-4.429l-8.109-20.408h5.191l5.192%2014.574%205.108-14.574h5.144Zm-20.218%2010.002c0%20.69-.036%201.262-.155%201.94h-15.943c.631%202.87%202.714%204.728%205.882%204.728%202.131%200%203.607-.882%204.703-2.525h4.87c-1.762%204.144-5.204%206.692-9.657%206.692-6.084%200-10.537-4.858-10.537-10.49%200-6.108%204.524-10.776%2010.335-10.776%206.239%200%2010.442%204.954%2010.502%2010.43Zm-4.763-1.405c-.333-2.846-2.643-4.858-5.691-4.858-2.894%200-5.287%201.929-5.621%204.858h11.312Zm-72.667%203.44c0%204.787-3.287%208.371-9.419%208.371H119.363V64.66c-1.917.274-3.87.69-5.811%201.238l4.537%2011.121h-5.418l-3.596-9.585c-5.144%202.084-10.085%205.216-14.217%209.585h-4.786L101.8%2048.312h4.56l5.68%2013.883a44.112%2044.112%200%200%201%207.323-1.774V48.312h9.084c1.703%200%203.156.143%204.061.393%203.453.929%205.727%203.667%205.727%207.323%200%201.917-.738%204.179-2.81%205.691%203.06%201.56%204.501%204.025%204.501%206.93Zm-15.634-8.667a62.664%2062.664%200%200%201%202.06-.036c1.703.012%203.239.131%204.608.37%201.441-.549%202.357-1.727%202.357-3.537%200-1.941-.881-3.144-2.488-3.667-.548-.18-1.358-.286-2.322-.286h-4.215v7.156Zm-16.55%203.905-3.715-9.894-6.394%2016.502c2.833-2.595%206.263-4.858%2010.109-6.608Zm27.254%204.74c0-2.775-3.131-4.347-8.513-4.418-.715%200-1.441.011-2.191.047v8.252h5.918c2.548%200%204.786-1.37%204.786-3.882Z'%20clip-rule='evenodd'/%3e%3c/g%3e%3cdefs%3e%3clinearGradient%20id='b'%20x1='51.47'%20x2='85.916'%20y1='62.946'%20y2='62.946'%20gradientUnits='userSpaceOnUse'%3e%3cstop%20stop-color='%23CD9F28'/%3e%3cstop%20offset='1'%20stop-color='%23ECD80B'/%3e%3c/linearGradient%3e%3cclipPath%20id='a'%3e%3cpath%20fill='%23fff'%20d='M51.47%2045.728h186.104V80.14H51.47z'/%3e%3c/clipPath%3e%3c/defs%3e%3c/svg%3e)


More from WEG


Explore Other Assets


© 2026 MaintainX. All rights reserved.